


 Search
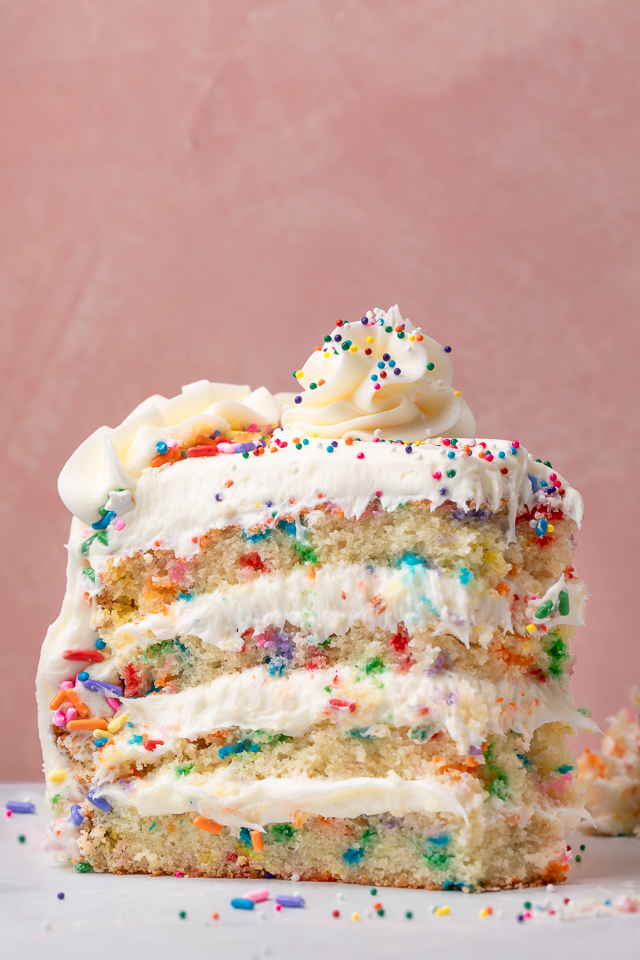
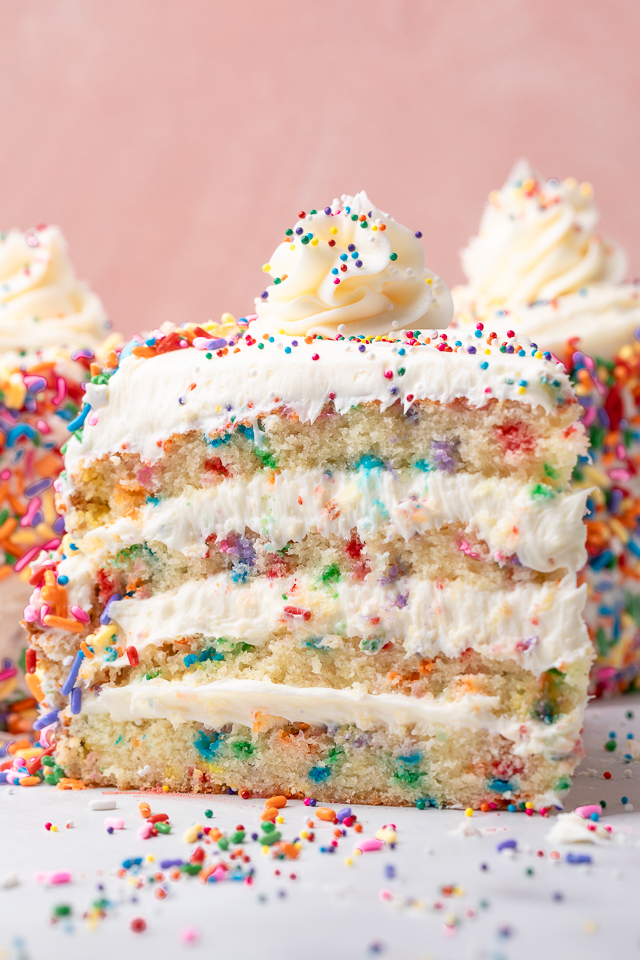
Exploding with rainbow sprinkles, this super moist funfetti cake recipe is perfect birthday cake! The vanilla cake layers are heavenly moist and fluffy… and feature colorful sprinkles in every-single-bite. We top this colorful cake with classic cream cheese frosting and extra sprinkles. Jump to the recipe card for the full recipe and recipe video!
Funfetti Cake aka Confetti Cake
Did you grow up eating funfetti cake/confetti cake? I always assumed it was a known “flavor” by all! But recently, I’ve learned a lot of folks have no idea what it is! And that funfetti cake popularity is not as widespread as I once thought!
So here’s exactly what funfetti cake is all about (in case you’re a newbie):
- You can totally find single layer funfetti cake recipes, but I use 3 cake layers. Which makes a giant celebration cake perfect for special occasions.
- Funfetti Cake is essentially a vanilla cake with tons of rainbow sprinkles folded into it!
- That’s why people also occasionally call it confetti cake.
- To make it “extra fun” I top the cake with rainbow sprinkles. And press them on the sides of the cake, too!
Funfetti Birthday Cake: All Grown Up
As a child, I simply knew funfetti cake as birthday cake. It’s what my mom made me for my birthday… every single year! And although she used the boxed mix, she went all out on decorating the cake and adding flair!
As an adult, I still get butterflies thinking about those cakes! They were so exciting and fun. And although I’m not a little kid anymore, I still crave a giant slice of Funfetti Cake on my birthday!
Minus all the additives and artificial flavorings! Which is where this homemade Funfetti birthday cake comes in! I won’t say this is just as easy as making a boxed cake recipe. Because it isn’t! But it’s not hard. And the results are a million times more delicious! So let’s jump to the recipe and get your baking!
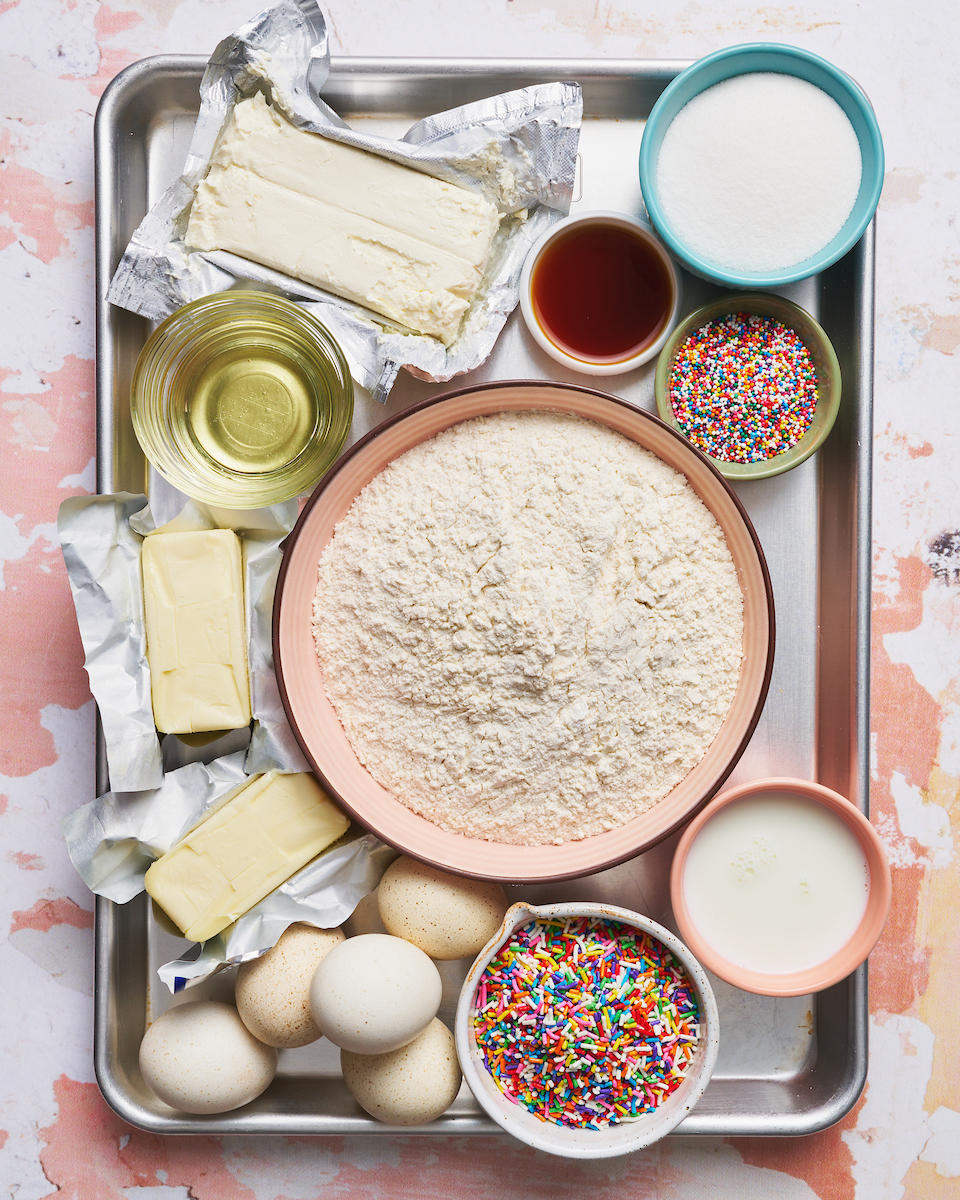
Funfetti Cake Mix Ingredients
- Cake Flour: Makes the cake layers extra moist and fluffy. All-purpose flour will work, but will yield more dense cake layers.
- Baking Powder: Helps the cake layers rise while baking in the oven. Make sure your baking powder is fresh.
- Baking Soda: Helps the cake layers spread while baking in the oven. Make sure your baking soda is fresh.
- Salt: Add small amount of salt balances the sweetness in the cake while enhancing all the flavors in this recipe.
- Unsalted Butter: In a pinch, salted butter will work. I suggest omitting the salt called for.
- Granulated Sugar: Sweetens the cake layers. I don’t suggest reducing the amount of sugar or subbing stevia or brown sugar.
- Egg Whites: Do not add the eggs whole. Separate the egg yolks from the egg whites. Only use the egg whites. Save egg yolks for another recipe.
- Milk: Whole milk will create the most tender cake layers. I don’t suggest subbing plant-based milks. Make sure it’s at room temperature before use.
- Sour Cream: This ingredient adds moisture to the cake batter. In a pinch, full-fat regular Greek yogurt will work as a sub. Make sure it’s at room temperature before use.
- Oil: Canola oil or vegetable oil work great here. You can also use melted and slightly cooled refined coconut oil.
- Vanilla Extract: A whole tablespoon of vanilla extract gives the cake batter a vanilla cake taste.
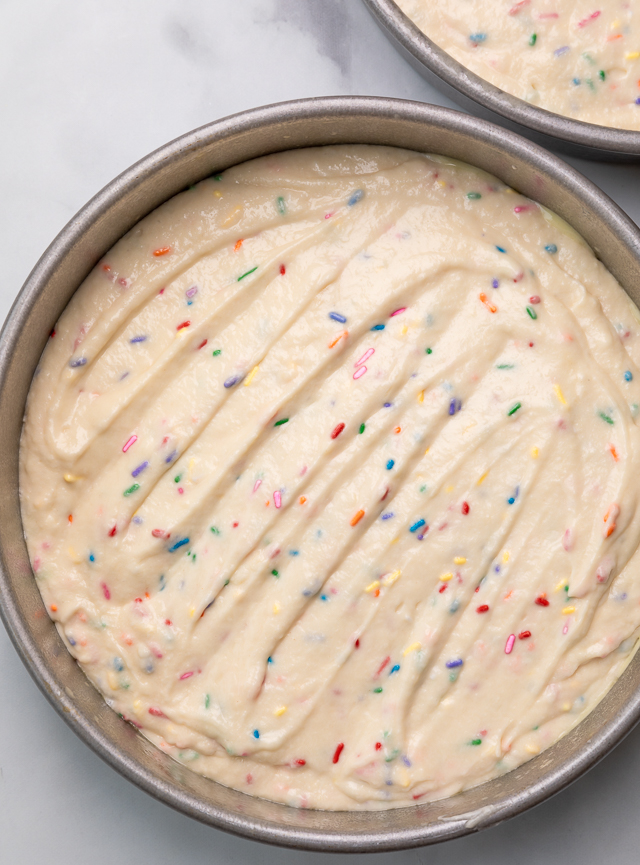
- Rainbow Sprinkles: Make sure you use rainbow sprinkles and NOT rainbow nonpareils.
Cream Cheese Frosting
- Cream Cheese: Full-fat brick-style cream cheese works best. My favorite brand to use is Philadelphia cream cheese because it’s creamy and flavorful.
- Unsalted Butter:
- Confectioners’ Sugar: Aka powdered sugar! Make sure you sift it first so there’s no large lumps in the frosting.
- Salt: Just like in the cake batter, a small amount helps balance sweetness and enhance the other flavors in the frosting.
- Milk: I suggest whole milk for best results. But in a pinch, reduced fat milk will work fine in the frosting recipe.
- Nonpareil sprinkles: For decorating the top of the cake! Do not use these in the cake batter, they will bleed color and make the cake batter tie-dye.
Cake Tools for Funfetti Cake Recipe
In addition to the ingredients, there are a few things you’ll need for this recipe.
- 9″ Cake Pans: You’ll need two of these so make sure you have them before making the cake batter.
- Electric Mixer: You’ll need a stand mixer fitted with the paddle attachment or an electric handheld mixer.
- Parchment Paper: You’ll need to line the bottom of each cake pan with a round of parchment paper.
- Nonstick Baking Spray: Generously grease the sides and bottom of the pans with nonstick baking spray. Consider this your insurance policy for cake layers that don’t stick to the cake pans!
This post may contain affiliate links!
Let’s Bake Cake: How to Make Funfetti Cake
- Cake Prep: Preheat oven to 350 degrees (F). Prep your baking pans and set them aside.
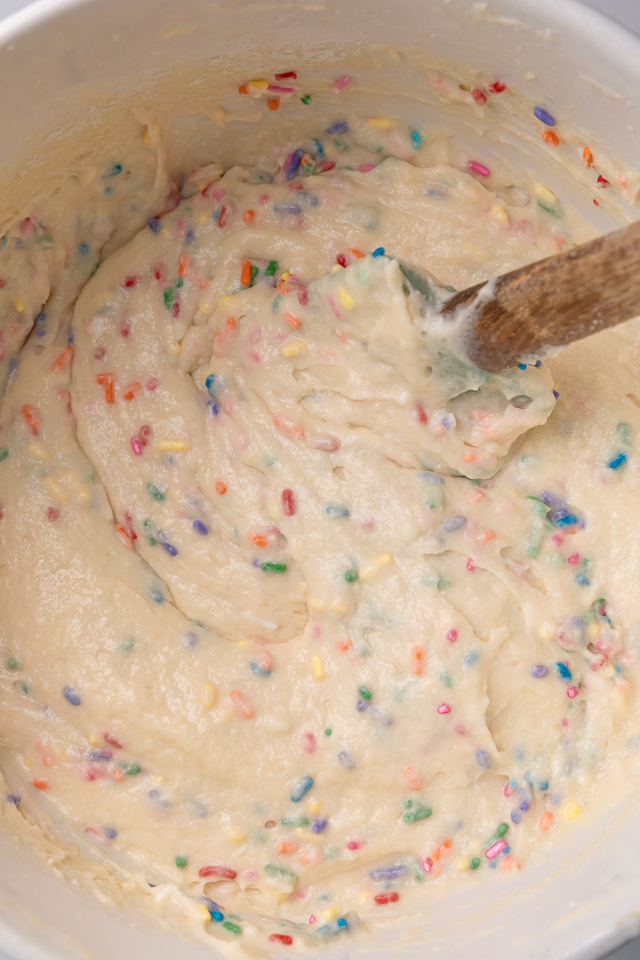
- Make the Cake Batter: Don’t exceed medium speed and make sure you don’t over mix this! Over mixed cake batter will yield dry cake layers.
- Bake the Cakes: Divide the batter evenly among the cake pans and smooth the tops. Then place the cake pans in the oven. Bake for 25 minutes or until a toothpick inserted in the center of the cakes comes out clean.
- Cool the Cakes: In the cake pans, on a wire rack, for 15 minutes. Then invert the cake layers onto cooling racks and cool completely.
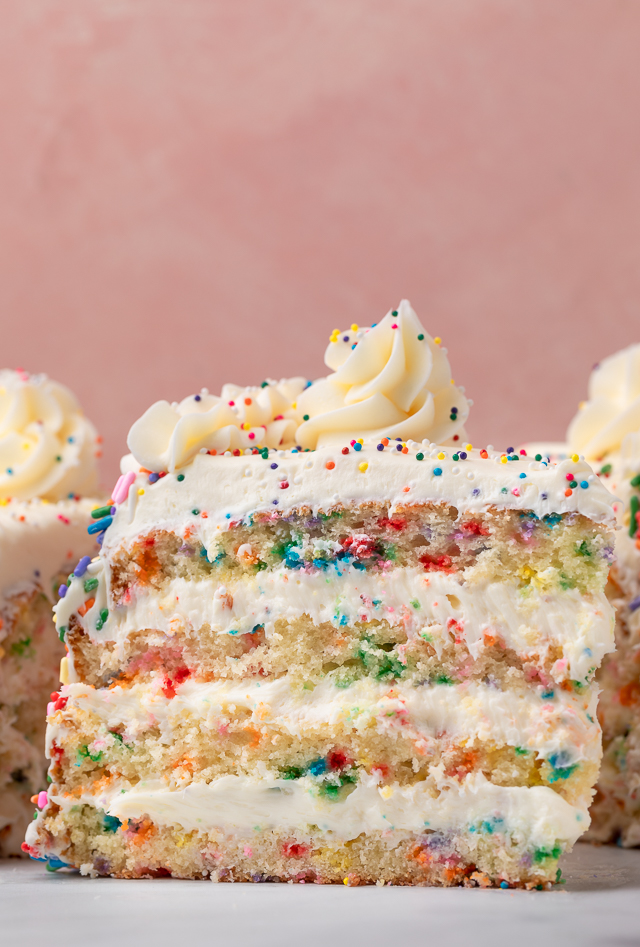
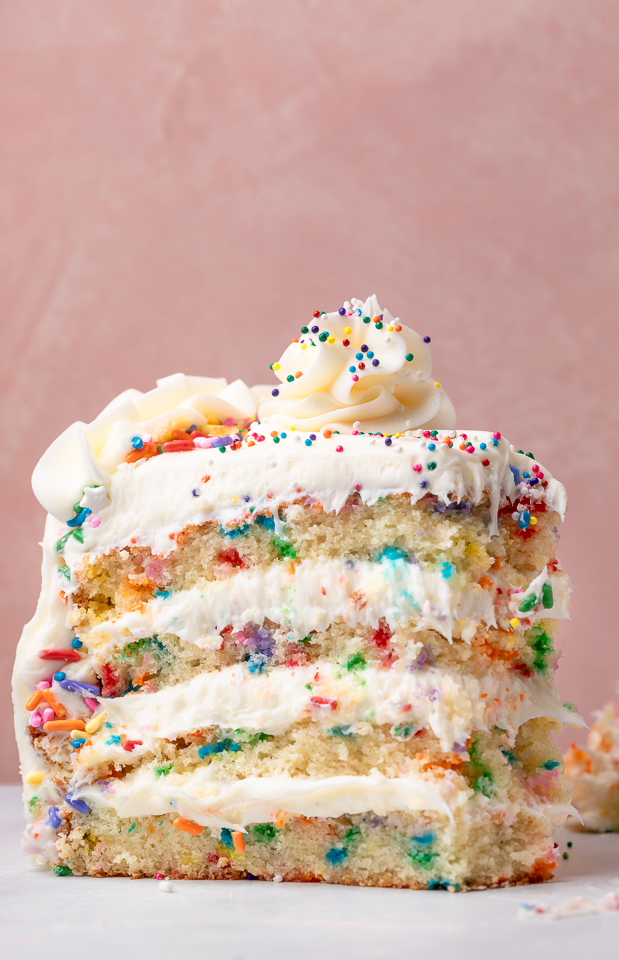
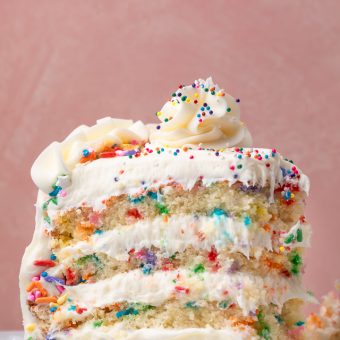
- Cut the Cake Layers: Slice each cake in half horizontally, so that you have 4 even cake layers.
- Frost the Cake: Place a cake layer on a cake stand and cover with frosting. Top with another cake layer, and repeat the layering process.
- Decorate the Cake: Press extra sprinkles around the sides of the cake. Sprinkle rainbow nonpareils on top of the cake, if desired.
How long to Bake?
My funfetti cakes are done in exactly 25 minutes! But depending on your oven, and the baking pan you use, yours could take anywhere from 24 to 30 minutes. You’ll know they’re done when the cakes are golden on top, slightly domed, and a toothpick inserted in the center comes out clean.
Can I Freeze the Cake Layers?
Yes! Allow the cakes to cool COMPLETELY! Then tightly wrap in plastic wrap and store in the freezer for up to 2 months.
When you’re ready to serve, you’ll want to remove the cakes from the freezer. Let them thaw in the fridge overnight, or for at least 4 hours. Then remove the plastic wrap and follow my assembly instructions. I don’t suggest freezing cake layers with frosting.
Do I have to Slice the Cake Layers?
Nope! If you prefer just two layers of cake, simply bake as directed, skip the slicing part, and assemble! Or you could try my Funfetti Bundt Cake Birthday Cake, which requires little to no assembly! But I do not suggest diving the cake batter into 4 pans and baking, as I’ve found the funfetti cake comes out dry and dense.
All that said, slicing the cake layers in half sounds much scarier than it really is! If you have a good long serrated knife, and a little patience, it’s a breeze! And don’t stress about the layers being perfect. Frosting and sprinkles will cover a multitude of “sins”.
More Birthday Cake Recipes:
- White Chocolate Almond Raspberry Cake
- Old-Fashioned Devil’s Food Cake
- Brown Butter Funfetti Cake
- Salted Caramel Chocolate Cake
- Best White Cake Recipe
- Classic Yellow Cake with Creamy Chocolate Frosting
Ultimate Funfetti Birthday Cake Recipe
Ingredients
For the Funfetti Cake Layers:
- 2 and 2/3 cups cake flour (330 grams)
- 1 Tablespoon (13 grams) baking powder
- 1/2 teaspoon (2 grams) baking soda
- 3/4 teaspoon (3 grams) salt
- 1 cup (8 ounces) unsalted butter, softened to room temperature
- 1 and 1/2 cups granulated sugar (298 grams)
- 6 large egg whites (201 grams) room temperature, beaten until very frothy
- 3/4 cup (170 grams) milk
- 3/4 cup (170 grams) sour cream
- 1/4 cup oil (canola or vegetable)
- 1 Tablespoon (15 grams) vanilla extract
- 1/2 cup (85 grams) rainbow sprinkles, plus more for decorating the sides of the cake
For the Cream Cheese Frosting:
- 3 cups (706 grams) cream cheese, VERY soft
- 3/4 cup (170 grams) unsalted butter, VERY soft
- 4 cups (454 grams) confectioners’ sugar, sifted
- 1/4 teaspoon salt
- 2 Tablespoons milk, more if needed
- Nonpareil sprinkles, for decorating, optional (do not use these in the cake!)
Instructions
For the Funfetti Cake Layers:
- Preheat oven to 350 degrees (F). Generously grease the bottom and sides of two 9-inch round cake pans; line with parchment paper rounds and set aside until needed.
- In a large mixing bowl, sift together the cake flour, baking powder, baking soda, and salt; set aside.
- In the bowl of a stand mixer fitted with the paddle attachment, or in a large bowl using a handheld electric mixer, beat the butter on medium-high speed until smooth and creamy, about 1 minute.
- Gradually add in the sugar. Once all of the sugar has been added, beat on high speed for 2 minutes.
- Reduce the speed to low and add in the egg whites, a little bit at a time, beating well after each addition, and scraping down the sides and bottom of the bowl frequently.
- In a spouted measuring cup, combine the milk, sour cream, oil, and vanilla. Mix until evenly combined.
- On low speed, add the flour mixture in three additions, alternating it with the liquid milk/sour creamy mixture, beginning and ending with the flour, and mixing until just combined. Fold in the sprinkles.
- Divide the batter evenly among the prepared pans and smooth the tops. (It should be about 765 grams of batter per pan).
- Bake for 25 to 30 minutes, or until lightly brown around the edges and a toothpick inserted in the center of the cakes comes out clean.
- Cool the cakes in the pans places on a wire rack for 15 minutes. Then invert the cake layers onto cooling racks and cool completely.
For the Cream Cheese Frosting:
- In the bowl of a stand-mixer fitted with the paddle attachment, or in a large bowl using an electric handheld mixer, beat the cream cheese and butter on medium-high speed until completely smooth; about 2 minutes.
- Reduce the speed to low and gradually add the sifted confectioners’ sugar. Add in the salt and milk and beat until combined.
- Once all of the ingredients have been incorporated, increase the speed to high and beat for 1 to 2 minutes, or until super fluffy.
- Place 1/2 cup of the frosting in a piping bag that’s fitted with a star tip. Set the rest aside to be used on the cake.
Assembly:
- Place one cake layer on a large plate or cake stand. Spread 2/3 cup of the frosting on top of the cake, covering it completely.
- Top with another cake layer, and repeat the layering process, ending with the last cake layer on top. Spread all remaining frosting over the top and sides of the cake. Use the frosting in the piping bag to pipe stars on top of the cake and/or decorative swirls around the edges, as seen in my photos.
- Using your hands, gently press some sprinkles around the sides of the cake.
- Allow the cake to set for 20 minutes before slicing. Then slice and serve.
Nice cake recipe
Ok so I doubled this recipe and used it for a wedding cake. It was gorgeous!!! Baked in 8-inch, 6-inch, and 3 inch tins. Frosted with white choc buttercream and decorated with sprinkles!!!
I made this for my birthday last week. Turned out great!!! Make sure to follow her tip on using real sprinkles and not the tiny ball ones in the batter!!!
I added a fresh strawberry frosting and it was stunning! The perfect pretty and pink birthday cake for my little girl.
Fluffy and very moist, like promised!
Amateur baker here and totally missed the “do not use nonpareil sprinkles” note in the description(which I usually never read). Sigh* of all sprinkles I had to choose. I would suggest putting it in all caps in the ingredients list for those who do not read the story like me XP. Also did not whip my egg whites, hoping they still turn out ok for a birthday party tomorrow. I made this recipe into cupcakes and so far pretty good just fresh out of the oven.
Ashley, your Funfetti Cake is a joyful explosion of color and flavor, every slice looks like a celebration! The light, fluffy layers paired with tangy cream cheese frosting make it an irresistible treat for any occasion.
Can this recipe be used for cupcakes?
Can I use this recipe for cupcakes?! This is THE perfect funfetti recipe!!