


 Search
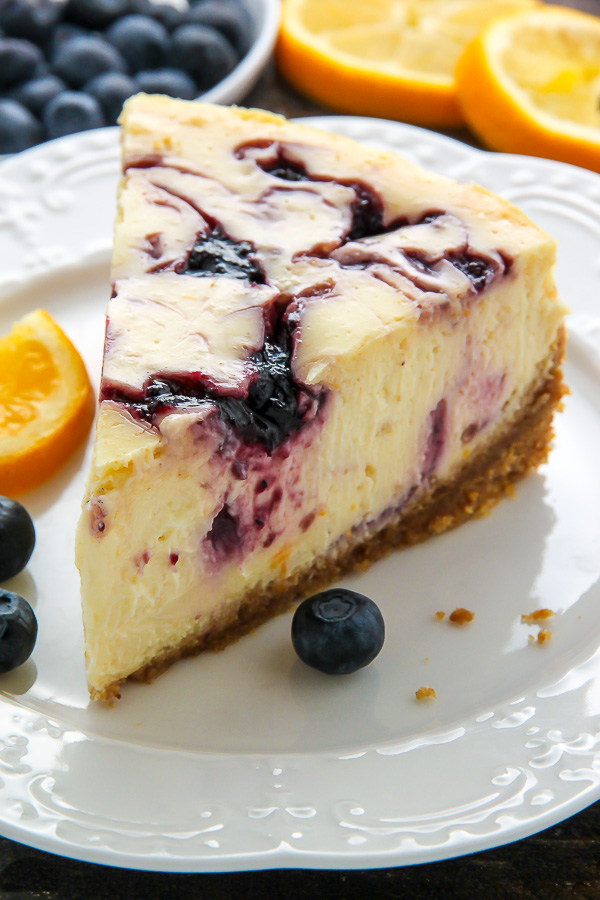
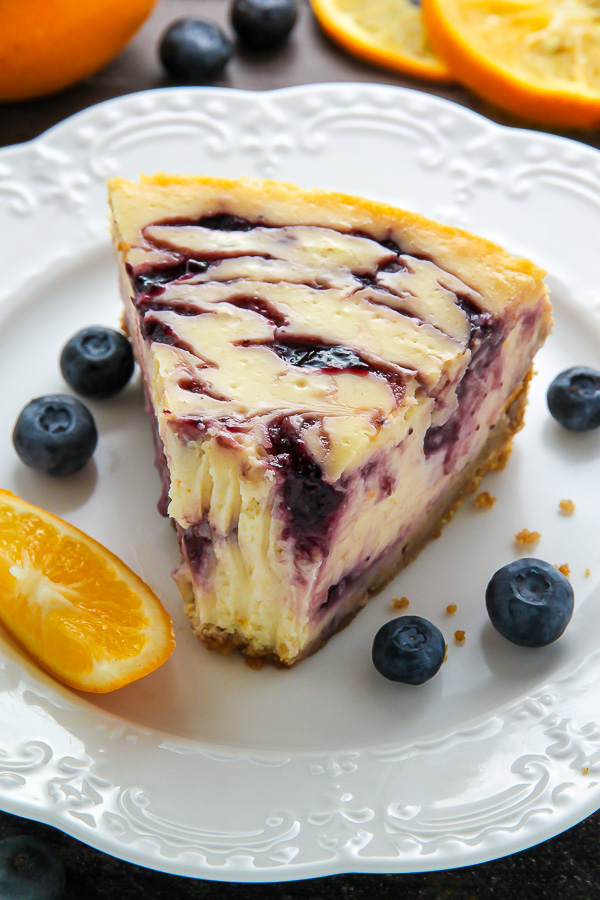
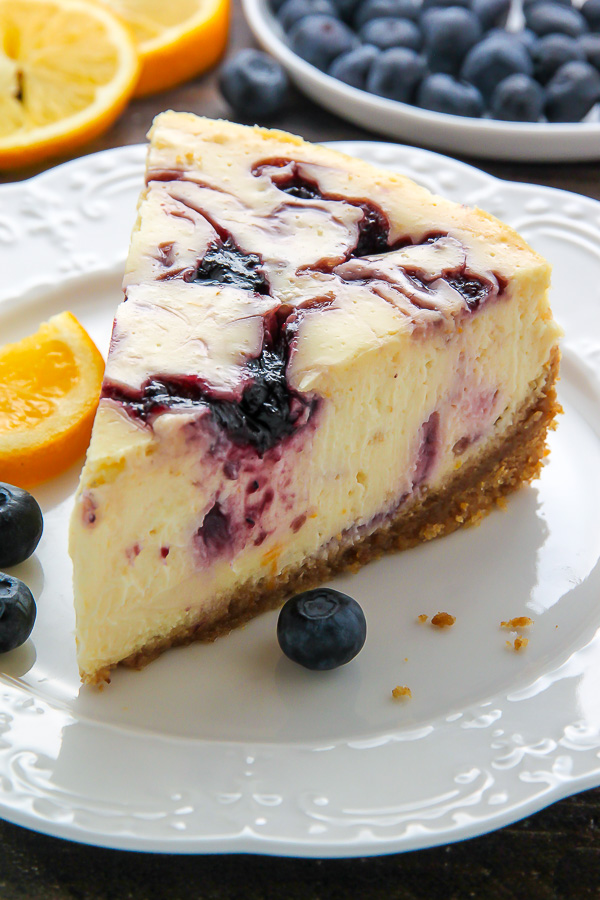
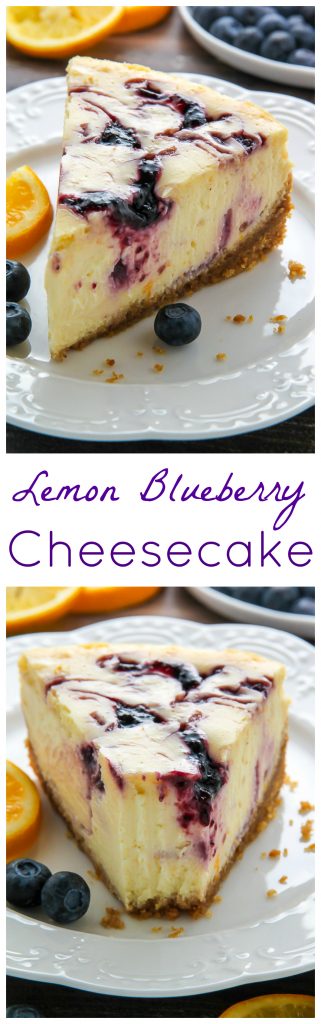
You’ve probably had lemon cheesecake before, but have you ever had a lemon blueberry swirl cheesecake? That’s right – vibrant lemon and sweet blueberry swirls… all in one creamy slice! This recipe is a game changer.
If you’ve been following my blog since the beginning, you probably already know my love for blueberries knows no seasons. They are, without a doubt, my favorite fruit! In the Summer I easily eat 5 pounds a week. And when I find them on sale – in the middle of WINTER – I buy in bulk, baby. Last week I hit the jack pot, finding fresh, organic blueberries for just 2 bucks a carton. I have to confess, I cleaned them OUT. So many blueberries = so much happy!
After inhaling a few cartons by the handful, I got to business, baking you some fabulous new recipes. Last week it was these Greek Yogurt Lemon Blueberry Scones, and today? Lemon Blueberry Swirl Cheesecake!!!

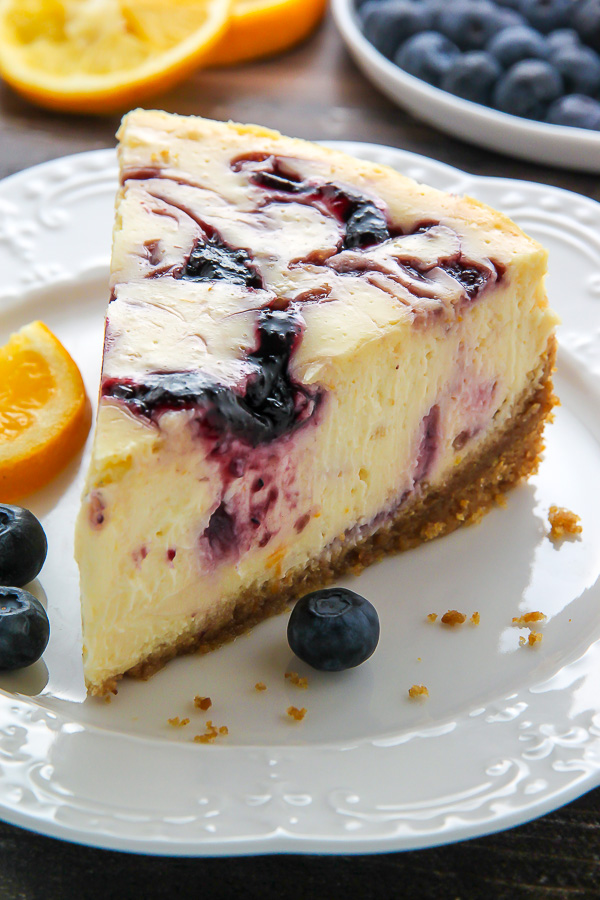
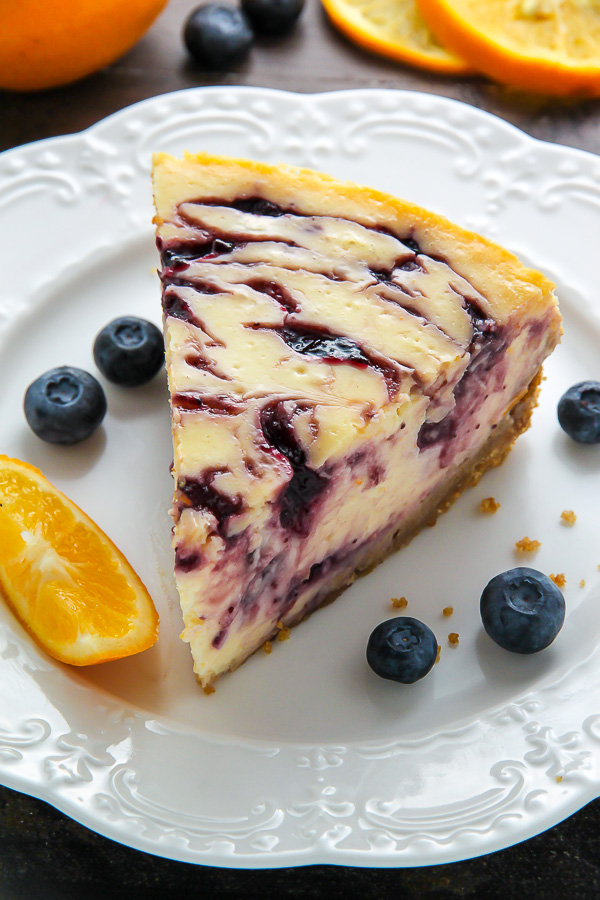
Each bite is heaven. Pure heaven. Just look how supremely creamy it is!!! And that swirl. ♥
YES.
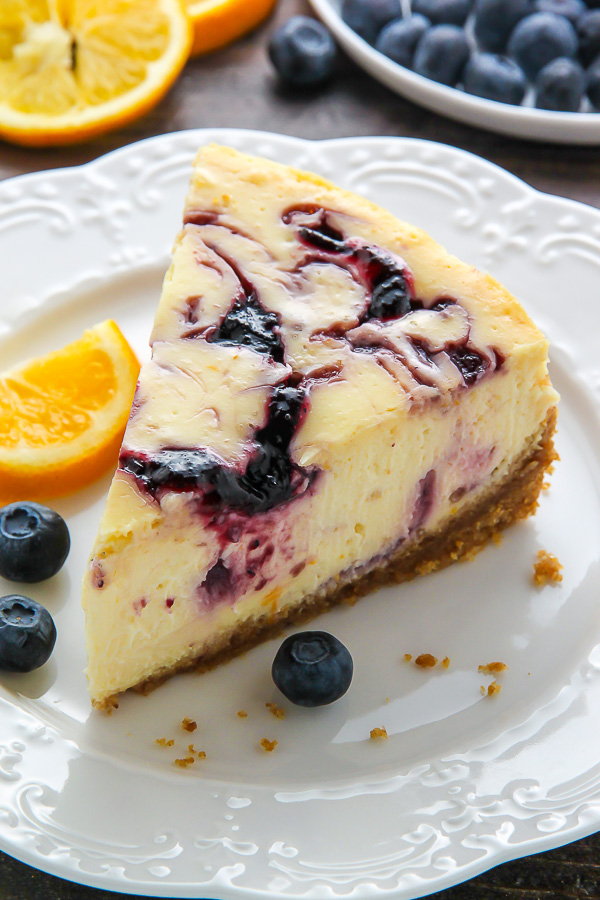
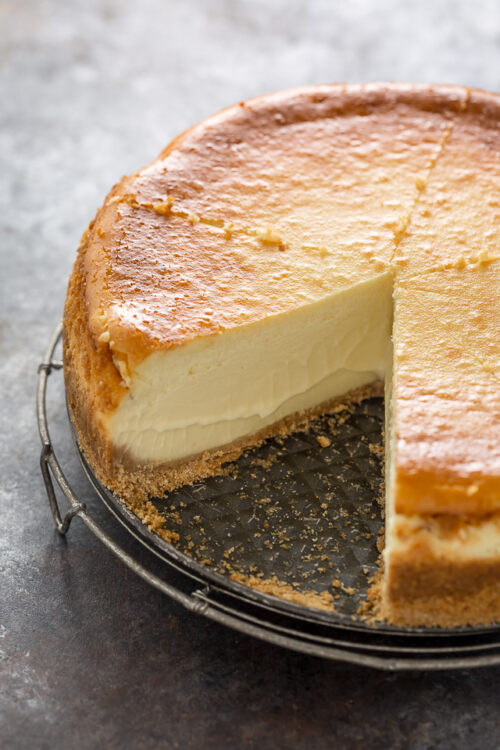
This better-than-the-bakery lemon blueberry cheesecake is made up of 3 parts: the graham cracker crust, the lemon cheesecake filling, and the blueberry swirl sauce. If making a cheesecake from scratch seems intimidating, fret not my friend– I’m going to walk you through each step.
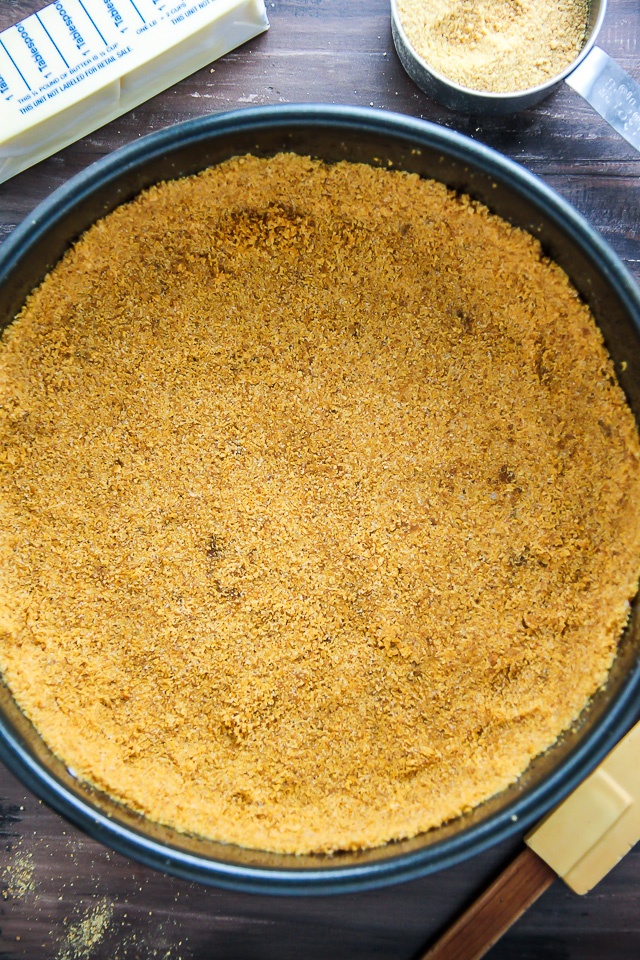
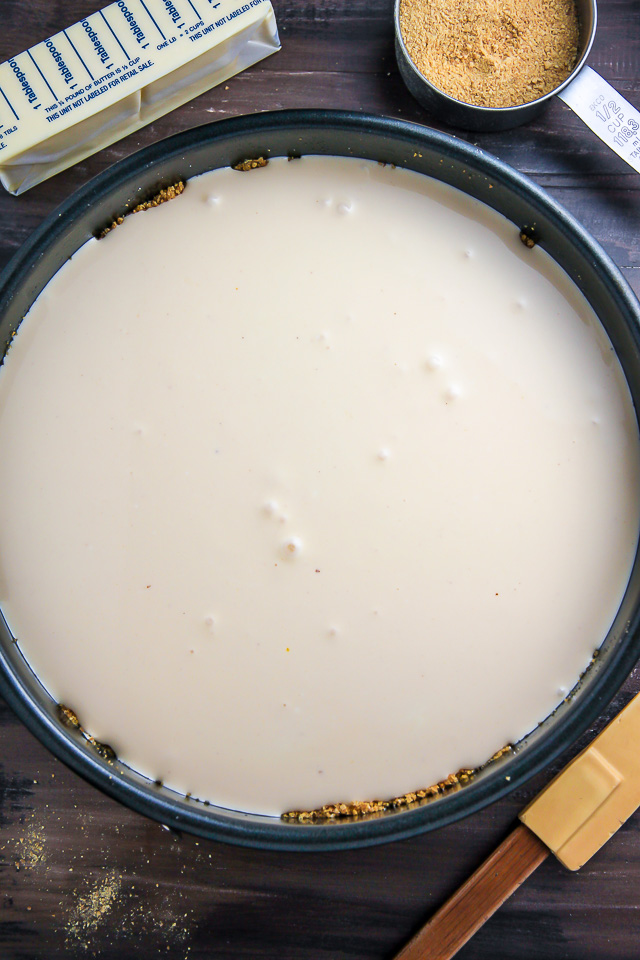
Making the graham cracker crust is the first step in this recipe and it’s an extremely easy one. Ingredient wise you’re going to need graham crackers, melted butter, sugar, and a pinch of salt – that’s it! You will need to pulse the graham crackers into crumbs, or – if you want to make things even easier – you can buy already crushed graham cracker crumbs at the store. I typically find them in the baking aisle, somewhere near the pie fillings. To assemble the crust you’ll combine the cracker crumbs, sugar, and salt, then fold in the melted butter and stir until it’s well combined. You want all of the crumbs to be moist from the butter. Then you’re going to dump the crumb mixture into a lightly greased 9″ springform pan and press it down firmly, working from the center and slightly up the edges.
For the cheesecake filling you’re going to need cream cheese, sour cream, eggs, egg yolks, sugar, vanilla extract, fresh lemon juice, lemon zest, and a spot of flour. A Few important things! Your cream cheese MUST be verrrrry soft before beginning. I typically leave my blocks of cream cheese out on the counter for at least two hours before I plan on baking. It’s also important to have your eggs, egg yolks, and sour cream at room temperature.
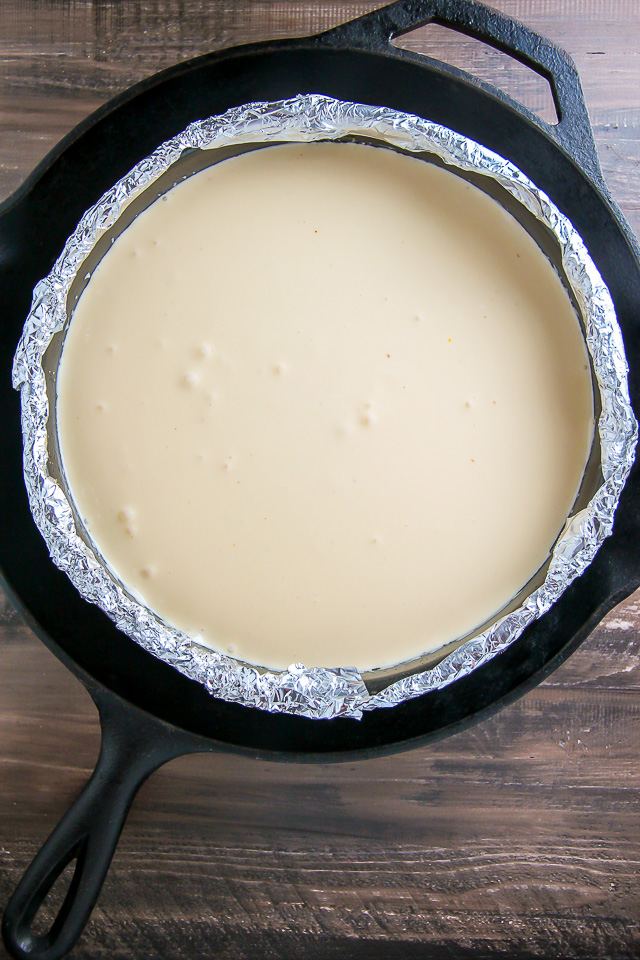
This recipe calls for a water bath.
If you’re unfamiliar with the water bath process, read on! A water bath is, simply, the term bakers use when they place a baking pan (in this case, our cheesecake pan) into a larger pan that’s been filled with hot water. Taking this extra step helps insulate the pan from direct heat on all sides while it bakes. The water bath method helps your cheesecake bake gently, ensuring the finished product doesn’t burn, curdle, or crack. It also helps the cheesecake maintain its silky smooth texture. When it comes to choosing a pan for your water bath, choose one that is as tall as the cheesecake pan and large enough to leave a few inches between the cheesecake pan and the outer rim – you want enough room for the water to circulate easily. When you’re ready to make your water bath, here’s what you do: Adjust an oven rack to the middle position. Preheat oven to called for temperature. When the oven is preheated, carefully (using an oven mitt) pull out the middle rack and place your large pan on it, fill the pan half way with hot water, then place the filled cheesecake pan in the center of the water bath. Slowly slide the rack back to its full inserted position, close the door, and bake the cheesecake according to instructions. If you’re using a spring form pan it’s essential to wrap the pan in heavy-duty tin foil to avoid water seeping in. I wrap my pan from every possible angle pressing the foil in and around to prevent a soggy crust. I use my large skillet as a water bath and it works great. Visual below in case you need it.
The blueberry swirl sauce is probably the easiest part of this entire recipe. You will need a small food processor or blender to blend the the blueberries smooth. Then you’ll press this mixture through a fine mesh strainer, getting rid of the seeds and pulp. Add in a little sugar, and you’re all done. To swirl, you’ll dollop the blueberry mixture on top of the unbaked cheesecake batter by the spoonful, then use a skewers to swirl. I don’t recommend swirling to much, or the end result will look messy.
Keep in mind this cheesecake needs to chill for at least 6 hours before being sliced and serve.
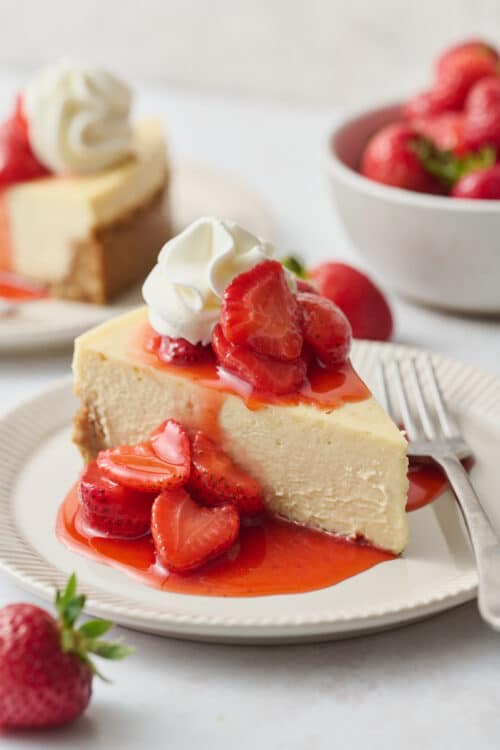
So are you ready for a slice of this cheesecake, or what?
If you try this recipe, let me know! Leave a comment below and don’t forget to snap a pic and tag it #bakerbynature on Instagram! Seeing your kitchen creations makes my day. ♥

Lemon Blueberry Swirl Cheesecake
Ingredients
For the Crust:
- 2 cups Graham Crackers, pulsed into crumbs
- 1/3 cup Granulated Sugar
- 1/4 teaspoon Kosher Salt
- 6 tablespoons Unsalted Butter, melted
For the Lemon Cheesecake Filling:
- 3 (8 ounce) packages Full-Fat Cream Cheese, very soft
- 1 cup Full-Fat Sour Cream, at room temperature
- 1 1/4 cups Granulated Sugar
- 2 teaspoons Pure Vanilla Extract
- 3 large Eggs + 2 Egg Yolks, at room temperature
- 2 tablespoons All-purpose Flour
- 3/4 cup Fresh Lemon Juice
- 2 teaspoons Fresh Lemon Zest
For the blueberry swirl:
- 3/4 cup fresh or frozen blueberries
- 3 tablespoons granulated sugar
Instructions
- Preheat oven to 325 degrees (F).
For the Crust:
- In the body of a blender or food processor, combine graham crackers, sugar, and salt; pulse until the crackers have been completely transformed into fine crumbs. Add melted butter; stir well to combine. Press down into a lightly greased 9-inch springform pan; set aside.
For the Lemon Cheesecake Filling:
- In the body of a high power blender, food processor, stand mixer fitted with the whisk attachment, or in a large bowl using a hand held mixer, beat the softened cream cheese and sour cream until smooth. Add sugar and vanilla; beat until smooth, scraping down the sides and bottom of bowl as needed. Add in the eggs and yolks; beat until smooth. Stir in the flour, mixing just until combined.
- Quickly stir in the lemon juice and zest, mixing just until it's incorporated in the batter.
- Pour filling into prepared crust, and spread the top smooth. Add blueberry swirl. Wrap the bottom of the pan in tin foil (I highly recommend doing several diligent layers here; no one wants a wet/soggy crust).
- Place the cheesecake pan into another large pan (it should be wide enough to comfortably fit the springform pan holding the cheesecake and deep enough to hold a few inches of water without risk of a spill) . Fill the pan up with very hot water; it should rise half way along the cheesecake pan. This is your water bath and will help ensure your cheesecake comes out crack free. Be sure to pour the water in slowly, as you don't want any of it to splash up and get into the actual cheesecake!
- Place pan into the preheated oven and bake for 1 hour and 20 minutes. Turn the oven off and let the cheesecake sit, undisturbed, for 45 minutes inside the oven, with the door shut. The cheesecake should be still slightly wiggly.
- Remove the cheesecake from the oven, run a knife very gently around the edge of the cake, and let it sit in the pan for another 15 minutes before covering loosely with plastic wrap and refrigerating for at least 6 hours.
For the blueberry swirl:
- In a small food processor or blender, puree the blueberries until completely smooth. Press the mixture through a fine mesh strainer, discarding seeds and pulp. Stir in the granulated sugar. Spoon the blueberry mixture on top of the unbaked cheesecake, a few dollops at a time. Use a skewer to swirl the mixture as much or as little as you'd like. Bake cheesecake as directed above.
Notes
- It is very important to bring your ingredients to room temperature when baking cheesecake - especially the cream cheese. I recommend sitting the blocks of cream cheese out on the counter for at least 2 hours prior to baking.
- Full-Fat cream cheese and sour cream is what was used for this recipe and what I find yields the best results. Using reduced-fat or non-fat versions will alter the taste and texture of this recipe.
- Meyer lemons may be used in place of regular lemons (In fact, that is what I used the final time testing this recipe).
- Cheesecake (without any whipped cream on top) may be sliced and frozen for up to one month.
- If you have any questions about the water bath prior to baking, please feel free to ask and I will walk you through it.
- Table salt may be used in place of kosher salt.

I made your key lime cheesecake which came out great! This was my 2nd cheesecake attempt. Next time I think I’d pre-bake the graham cracker crust (like the recipe for the Key Lime says) – this one it came out a bit soggy. It was very tart and lemony which was good, but the blueberry got lost. I followed the directions but there was hardly any noticeable blueberry swirl in the cheesecake. So if I make it again I’d double or even triple the amount of blueberries. Also the blueberry swirl came out thin, so maybe more sugar to make it more “gloppy”? Other than that it was still tasty and baked well (although I baked it an additional 20 min).
I just made this cheesecake for Christmas and it smells amazing! I don’t know if my crust is soggy or not as I only had the regular tin foil, although I did use 6 sheets. It looks fantastic so hopefully it turned out well. I put my blueberries in the microwave, crushed them with a fork and added the sugar then swirled it in, Worked just as well as blending would have.
Hi I was reading the ingredients and noticed you mentioned the blueberry swirl at the end. Do you do that step first then bake the cheesecake?
Hi, You swirl it on the top before baking.
my mistake for not reading all the way to the end before assembling. Step #7 said to add the. blueberry swirl. The way the rest of the receipt was laid out I was following instructions to a “T” for assembly. The swirl said blueberries and sugar but nothing about preparing until after it said to “Add swirl”, my blueberries went in whole. Waiting to see how they come out tomorrow with dinner. Fingers crossed.
After making this delicious cheesecake. I had to share it in my Instagram chef page! AMAZING!
When my son (29 years old) requested a lemon blueberry cheesecake for his birthday I went on an internet hunt and found this one. All of the guests had the very same comment…”OMG, this is by far the best cheesecake I have ever had!” It was creamy( not dense), just the right amount of lemony tartness, and the crust was almost chewy which everyone found a nice compliment to the creamy texture. The only thing I did different was to make a simple blueberry sauce to dollop on top. Thank you for this delicious recipe!!
Hi I was wondering if you could use store bought crust
Hello? I’m wondering how many cakes this typically yields
To help remedy the water bath issue, may I offer a piece of advice…I use Wilton cake pans and set my spring form inside one and then set it in another slightly larger pan instead of foil- also if you don’t have all the ingredients or equipment to make a cheesecake it will not come out the way you expect
I just made this for my daughter’s 25th birthday and served it yesterday. The cheesecake turned out perfectly, and I had no issues with the water bath making the crust soggy or the cheesecake not cooking fully. I did make sure to put boiling water into the water bath (and I added most of the water to the pan before setting the cheesecake in it, to avoid splashing). I doubled up on the heavy duty foil and used the wide heavy duty foil so it wasn’t a problem to wrap around the springform pan and prevent seams for water to leak through.
This was a really delicious cheesecake with a strong lemon flavor. Next time I would double the blueberry swirl (or use blueberry pie filling for the swirl). And, the cheesecake freezes really well, so it is nice to be able to make it in advance.
Highly recommend this cheesecake recipe — thanks for sharing this recipe!!
Has anyone tried making this using a 9×13 metal pan to make cheesecake bars?