


 Search
Inspired by the Quiche Lorraine I ate in Paris, this homemade version has a flaky crust and savory bacon and cheese egg filling. If you use a store bought pie shell, you’ll have enough filling to make two quiches – and skip the blind baking. Pairs great with a simple green salad and a glass of wine!
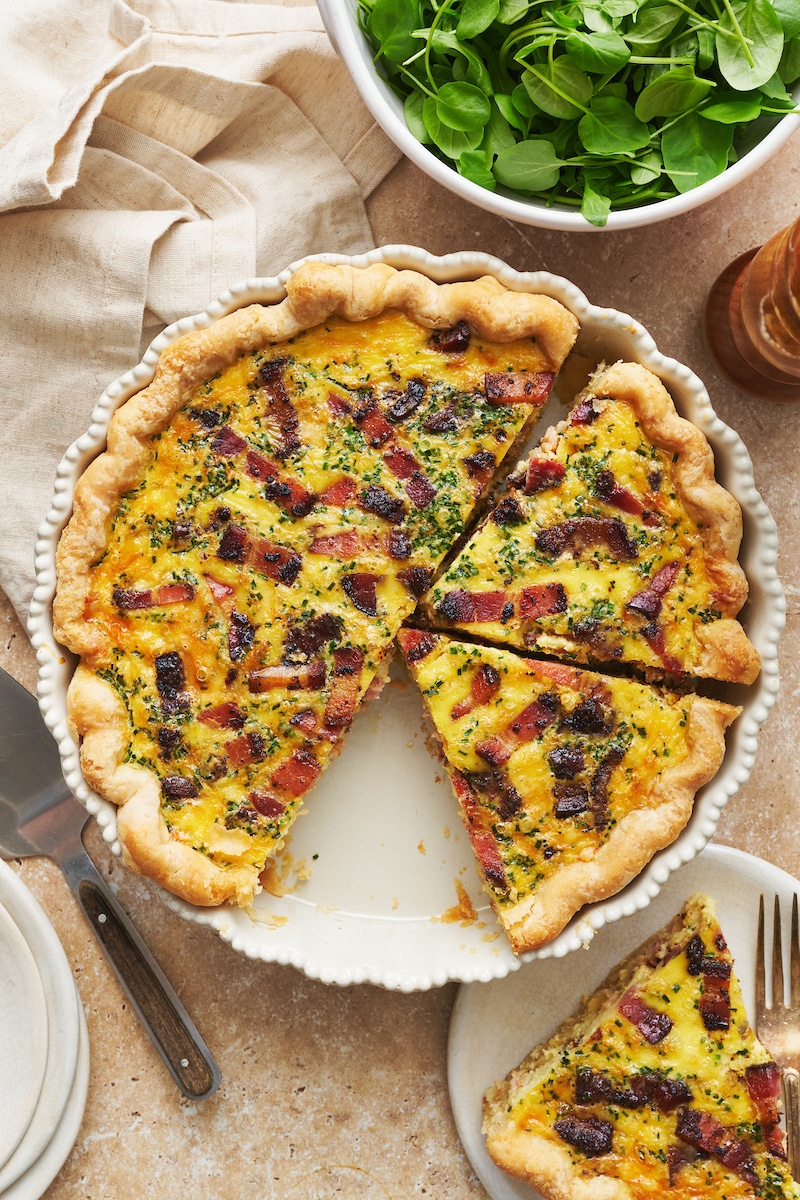
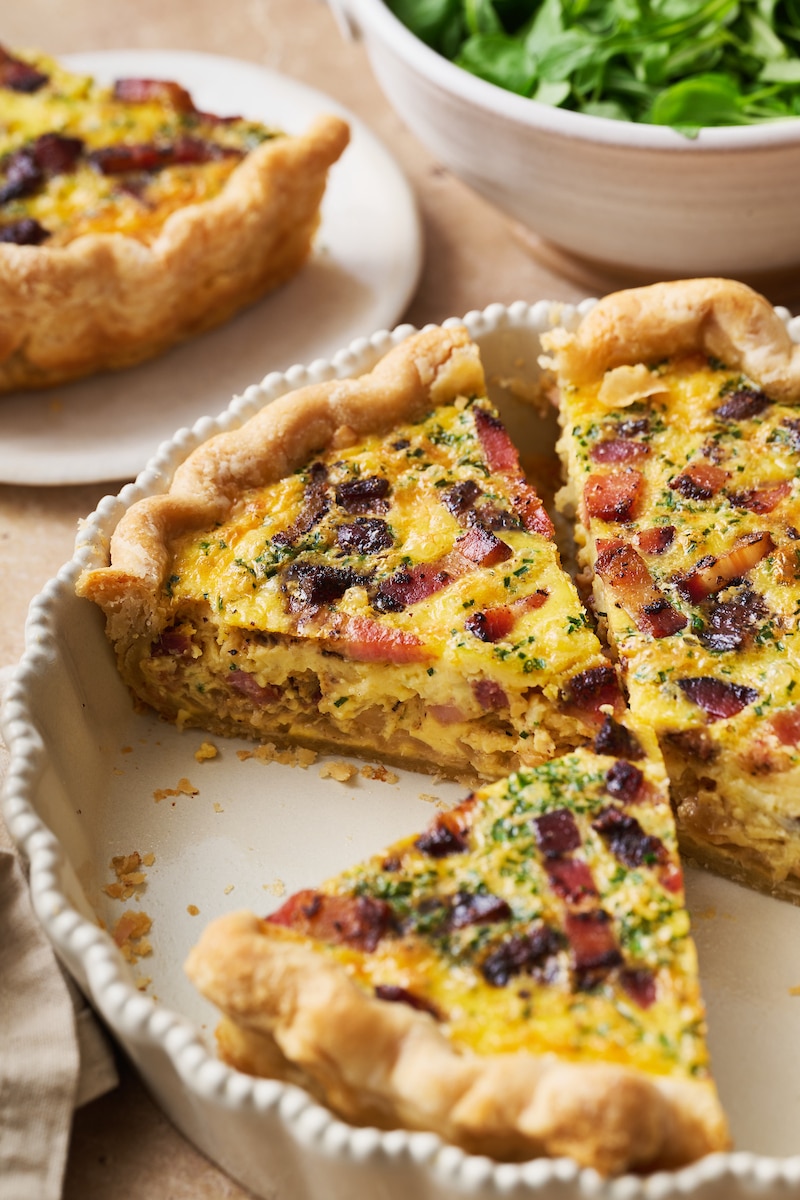
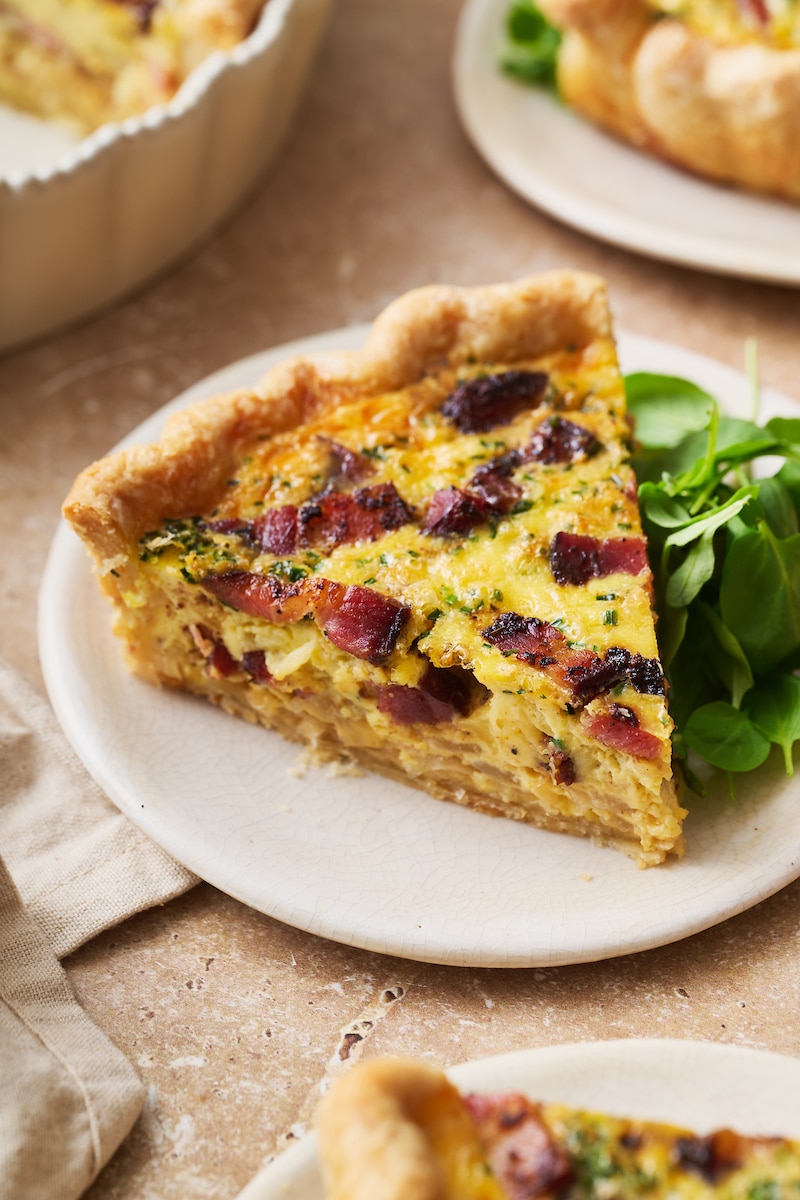
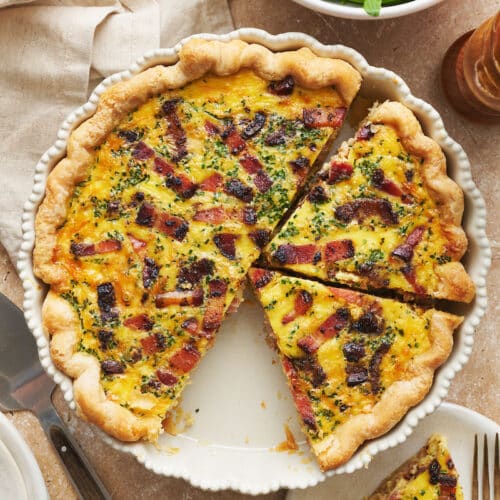
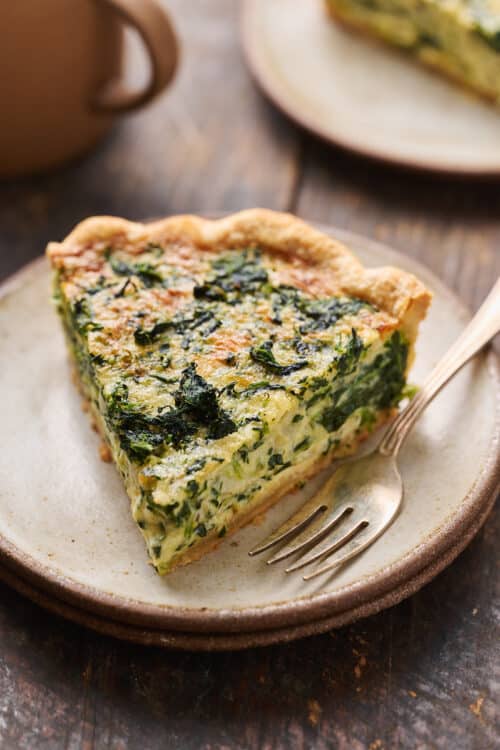
I spent the holiday season in Paris last year, and the best thing I ate was a humble slice of quiche Lorraine. Everything about it was textbook perfection! It had a flaky crust, a thick layer of egg custard filling, and plenty of bacon and caramelized onions inside. Served with a simple green salad dressed in a shallot vinaigrette and a glass of crisp white wine, it was incredibly satisfying.
And inspired me to learn everything there was to know about quiche Lorraine… from it’s history to how to make it from scratch.
Not a Traditional Quiche Lorraine
During my research I learned that the quiche Lorraine I enjoyed so much in Paris was not exactly “authentic”. Because traditionally, it was made with 4 basic ingredients: eggs, cream, bacon, and dough.
My version includes eggs, cream, and bacon. But uses an all-butter pastry crust, plus nutty gruyère cheese, shallots (or onions), and fresh thyme. Many “modern day” quiche Lorraine recipes add cheese and onions, but if you prefer the classic version, you can leave them out.
Fun Fact: Quiche Lorraine is named after the region of Lorraine, located in northeastern France, where it originated.
Make The Perfect Quiche Lorraine Recipe
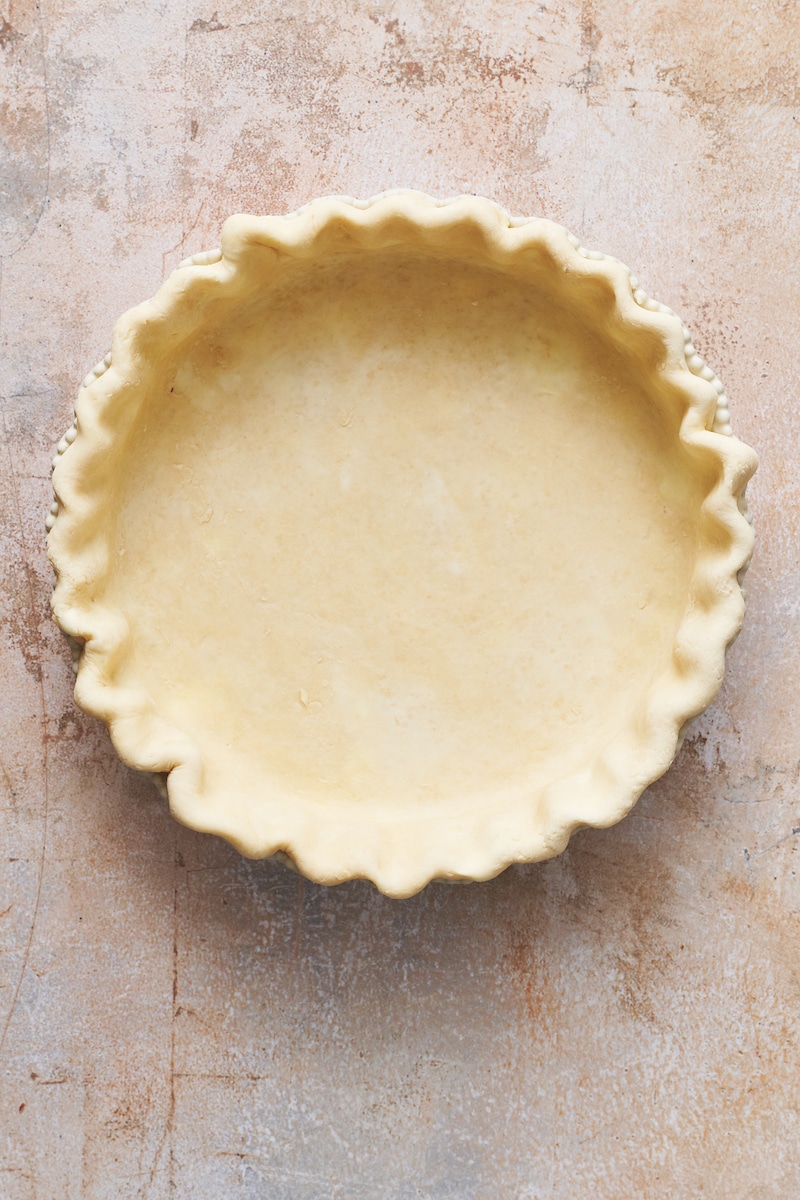
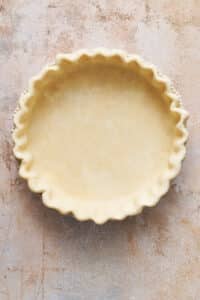
- Make the Crust: Make the pie dough and let it chill. When you’re ready to roll, preheat the oven. Roll out the pie dough and place it in the pie pan.
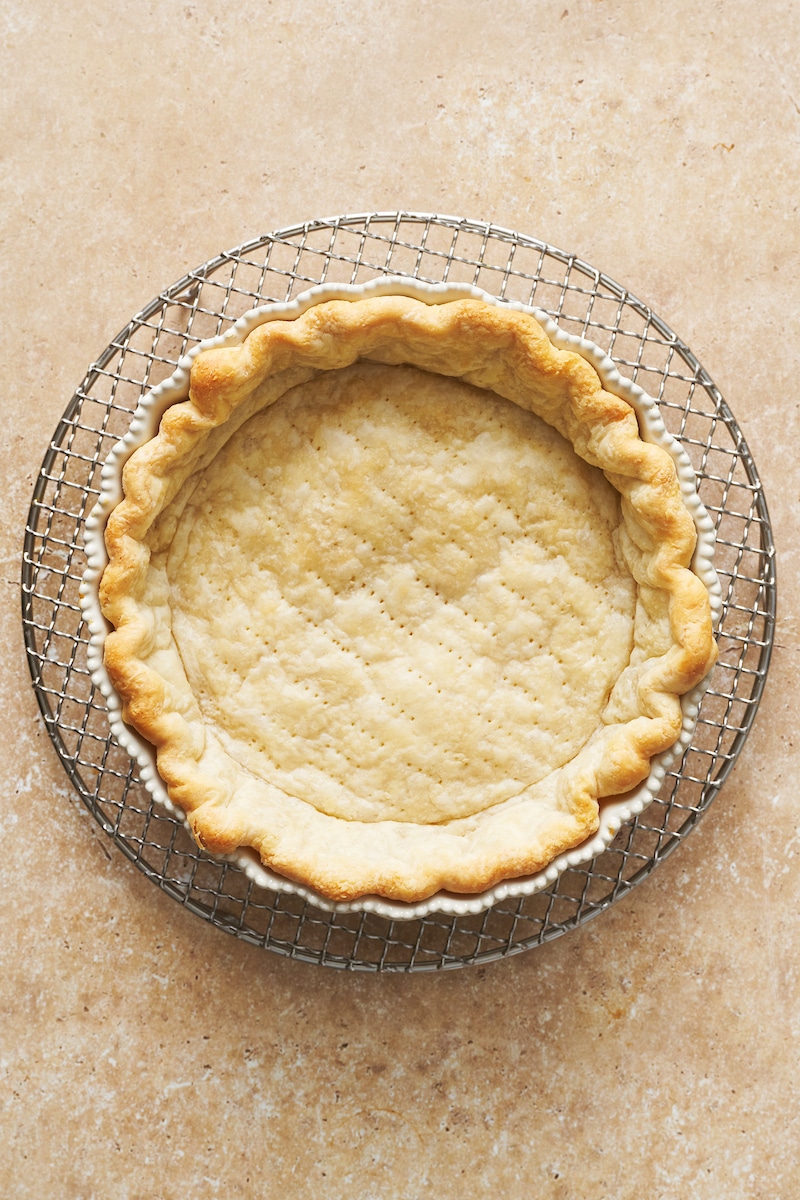
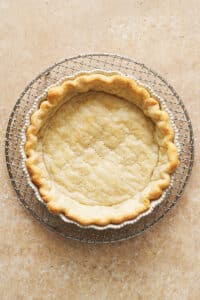
- Blind Bake: Line the crust with parchment paper and fill with pie weights or dry beans. Place the pie plate in the oven and par bake as directed. Par baking ensures the crust is crispy for the quiche.
- Quiche Filling: Cook the bacon until crispy. Add the onions and cook until caramelized. In a large bowl whisk the heavy cream, milk, eggs, salt and pepper, cornstarch, and spices.
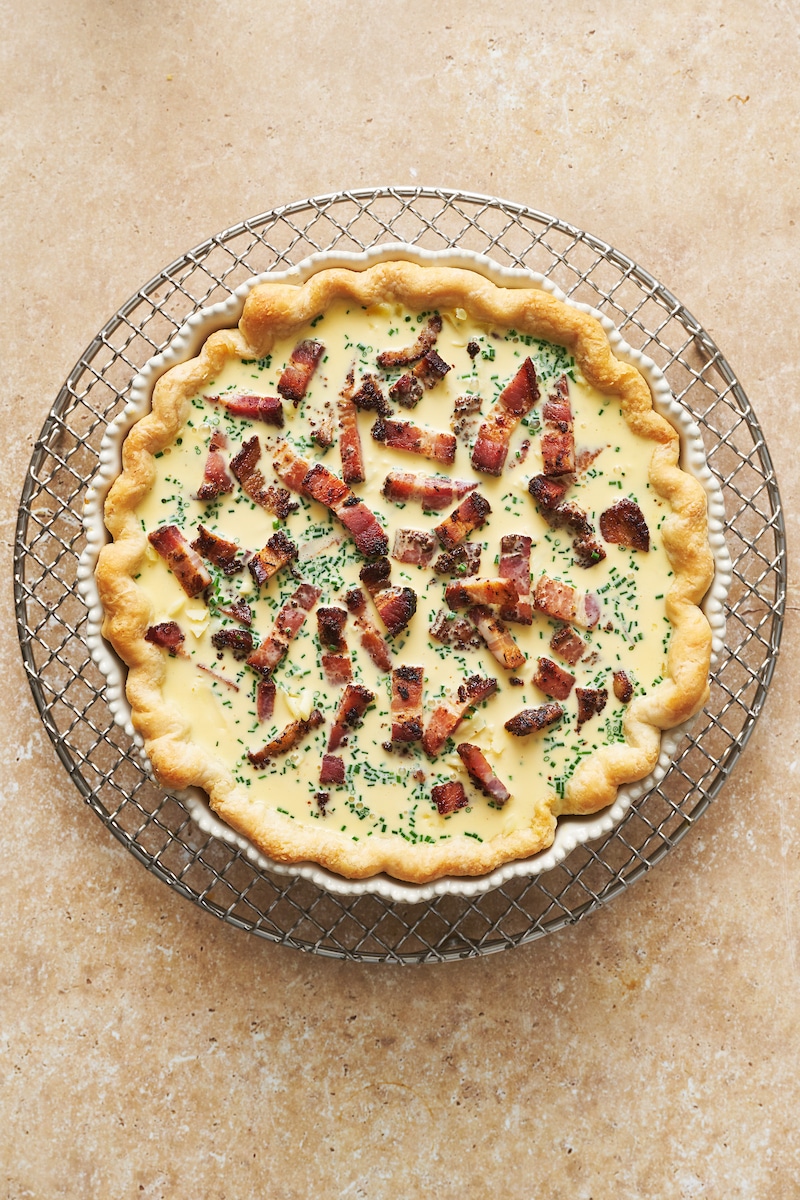
- Assembly: Top the par baked crust with half of the cooked bacon. Then sprinkle on all the cheese and add the remaining bacon. Pour the egg custard mixture over top, then carefully place the quiche on a large rimmed baking sheet.
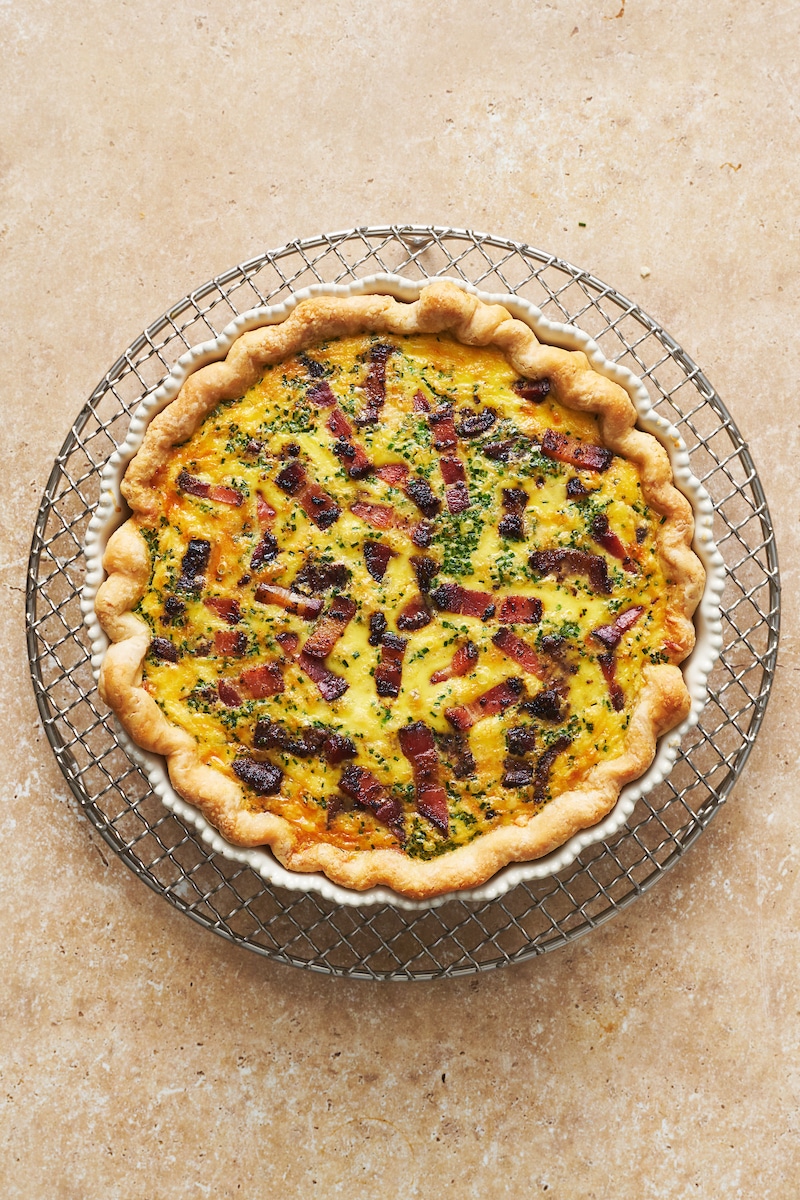
- Bake the Quiche: In the lower third of the oven until the center is set and the crust is golden brown. This usually takes about 50 to 55 minutes. If the crust/filling is getting too brown, cover it with a piece of foil but continue cooking.
Can I Use a Store Bought Pie Shell?
If you choose to use a store bought pie shell, there’s a few things you should know.
- You’ll have too much filling for just one pie shell. My recipe uses a 10-inch tart pan, so it has a lot of filling. You’ll likely be able to fill two store bought pie plates with the filling in this recipe.
- If you use a store bought pie shell, you can skip the par baking.
- I still suggest baking the quiche on a rimmed baking sheet. This makes placing the quiche in the oven much easier. As well as removing it from the oven.
- Your crust won’t be as pretty or delicious using a store bought pie shell. But it will save you time!
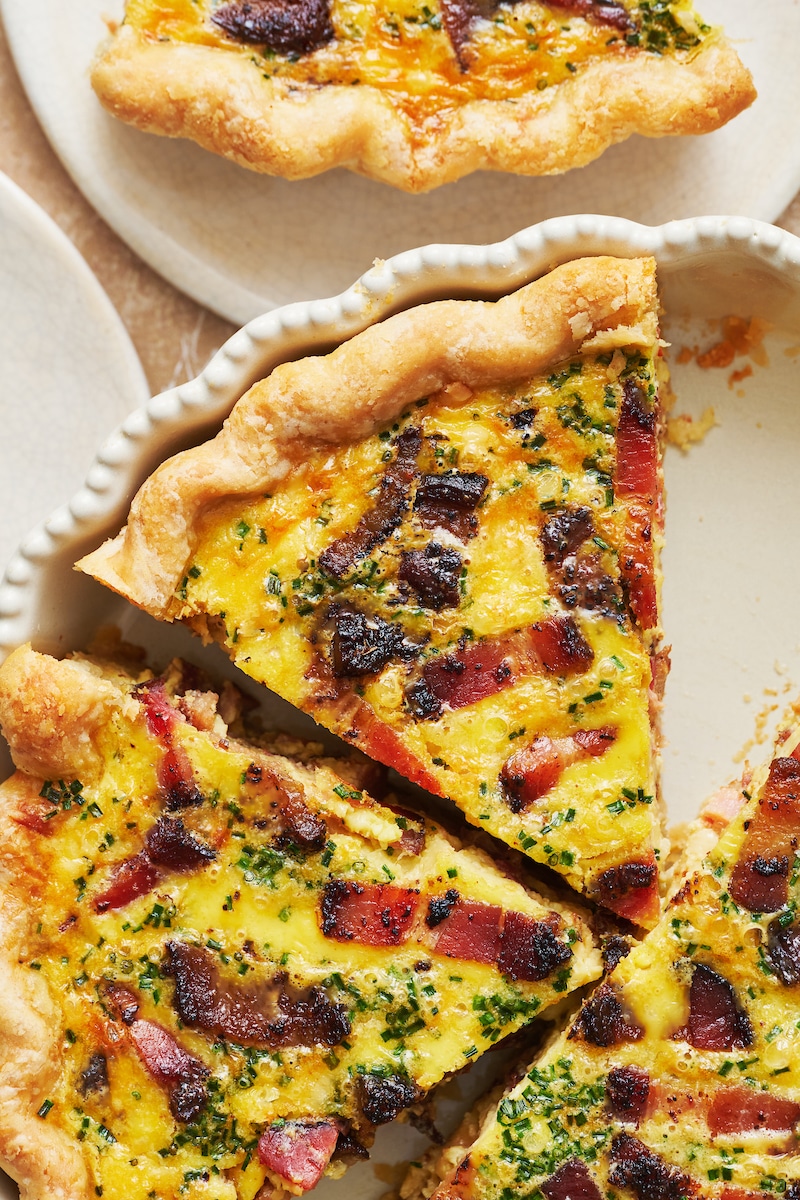
Delicious warm, cold, or room temperature, this classic French quiche is perfect for holiday celebrations. Or a simple breakfast, brunch, lunch, or dinner. Absolutely delicious with a green salad. It also pairs well with a heartier salad, like Caesar or arugula and radicchio.
How to Store/Can I Freeze This?
Wrap any leftovers with plastic wrap and store in the fridge for 3 days. You can reheat at 275 degrees, on a rimmed baking sheet, for 20 to 30 minutes, or until warmed through.
You can also freeze this quiche Lorraine recipe for up to 2 months. To freeze, cool completely at room temperature. This can take several hours, but you never want to freeze a hot or even warm quiche.
Once the quiche has cooled, wrap it tightly in plastic wrap, ensuring you cover every inch. Then place it in a freezer-safe bag and press all the air out before sealing. Place the bag in the freezer for up to 2 months.
More Quiche Recipes:
- Crustless Quiche with Spinach, Sausage, and Sundried Tomatoes
- Broccoli Cheddar Quiche
- Bacon, Onion, and Mushroom Quiche
Related Article: Discover the Origins of The Iconic Quiche Lorraine!
Quiche Lorraine with Bacon and Gruyere
Ingredients
- 1 serving all-butter pie crust chilled and ready to roll
- 12 ounces bacon
- 2 Tablespoons (28g) unsalted butter
- 1 large yellow onion diced (or 4 shallots, diced)
- 1 cup (227ml) heavy cream
- 1/2 cup (113ml) whole milk
- 5 large eggs
- 1 Tablespoon (14g) cornstarch
- 1/4 teaspoon salt
- 1/8 teaspoon black pepper
- 1/8 teaspoon cayenne pepper
- 1/8 teaspoon freshly ground nutmeg
- 2 Tablespoons fresh chives finely chopped, optional
- 4 ounces (113g) Gruyere cheese coarsely grated
Instructions
- On a lightly floured surface, roll the pie dough into a 16-inch round.
- Press the crust into a 10” tart or pie pan, firmly pressing it into the bottom and ridges. Trim excess dough, leaving a ¼” of overhang. Roll the overhang underneath the rim of the pie plate and crimp. Refrigerate for 30 minutes.

Blind Bake:
- Preheat the oven to 375 degrees (F). Remove the crust from the fridge.
- Line the crust with parchment paper and fill with pie weights or dry beans.
- Bake in the lower third of the oven for 22 minutes. Remove from the oven.
- Carefully remove the pie weights and parchment paper and prick the bottom of the crust all over with a fork. Place back in the oven and bake for 16 more minutes. Reduce the oven temperature to 325 degrees (F).
Quiche Filling:
- In a large skillet over medium-high heat, cook the bacon until crispy and brown, turning it frequently. Transfer to paper towels and drain. Chop into ¼-inch pieces and set aside.
- Return the skillet to the stovetop. Reduce the heat to medium. Add the butter, then add the chopped onion and cook, stirring occasionally, until soft and slightly caramelized, about 15 minutes.
- Transfer the onions to a small bowl and set aside until needed.
- In a large mixing bowl, add the heavy cream, milk, eggs, cornstarch, salt and pepper, cayenne pepper, nutmeg, and chives. Whisk vigorously for about 2 minutes.
Assembly and Baking:
- Spread the onions evenly over the bottom of the partially baked crust. Top with half of the bacon, all of the Gruyère, and then the remaining bacon, saving just a handful of bacon to sprinkle on top of the egg mixture.
- Pour the egg/cream mixture over top, and sprinkle the reserved handful of bacon on top of the eggs. Place quiche on a large rimmed baking sheet.
- Bake, in the lower third of the oven, until the center is set and the crust is golden brown, about 55 to 65 minutes. If the crust/filling is getting too brown, cover it with a piece of foil but continue cooking.


Just cooking the pastry and the fat from the butter is dripping on the bottom of the cooker so would suggest you put it on a baking tray
When my daughter, who is an amazing cook, asks for a recipe I know it’s a keeper!
I did make a few changed to fit the way we eat.
1. Skip the bacon
2. Use sweet or Vidalia onion
3. Use fat-free half-and-half
4. Use dried chives from seaonsing isle.
Could I freeze this quiche?
We made this morning (under estimated then cook time / prep time, so we were starving by the time it was finished), but it’s was absolutely AMAZING!!!!!!! Already talking about what we add for next time! Maybe green peppers or mushrooms. HIGHLY recommend!
GREEN PEPPERS ARE BITTER ………INSTEAD TRY THE RED OR YELLOW THEY ARE SWEET!!!! VERY GOOD.
Hi, I was planning to make this for a brunch on Sunday. Is it possible to cook this Saturday night and just reheat in the oven on Sunday morning? Will it come out the same? And how long should I reheat it for/at what temperature? Thanks!
Hi Samantha! You can totally make this ahead of time. I usually just serve it cold if I make it ahead of time, but you could reheat it at 300 degrees (F) for 10 to minutes, I think 🙂
LOVE this recipe! The 1986 book version does not have nutmeg, either. I used the recipe as is above, except the book version I have says 12 strips of bacon (YES!). That was the only change for me, other than Pillsbury refrigerated pie crust to save time. The book’s cooking instructions are different, which I followed and it came out PERFECT and light and fluffy. I think it made a difference in a really good way and no foil or precooking crust necessary. My boyfriend was amazed and salivating.
What do you do with the cooked onion? There are no instructions of when to add it.
Hi Jenny. You sprinkle it on the bottom of the partially cooked pie crust, along with the bacon and cheese 🙂
Made this for a brucnh and it was easy and very very good. thank you!
Can an Egg Substitue be used instead of the egg component?
Hi Edd. I have no experience baking with egg substitutes, so I’m not sure!
Yes it can. I have used egg substitutes in quiches gor years and it eorks perfectly. Just make sure you measure for the smount if eggs called for. Egg white subs also work used jn conjunction witj egg subs ehen recipe calls for both.
Those look like some tasty Pizza.