


 Search
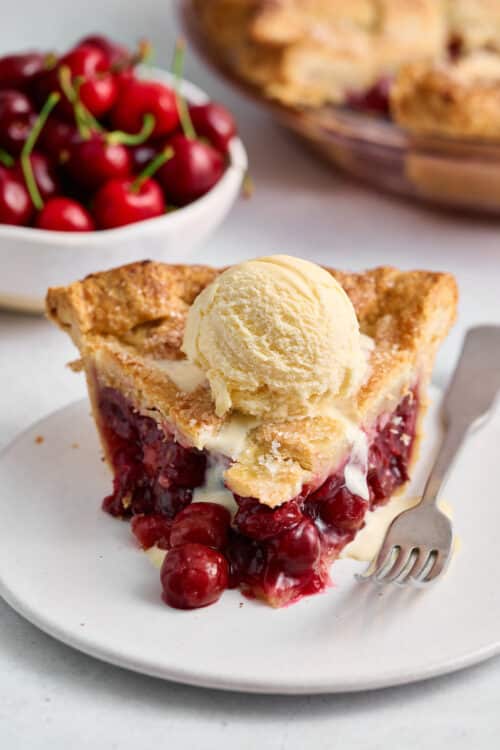
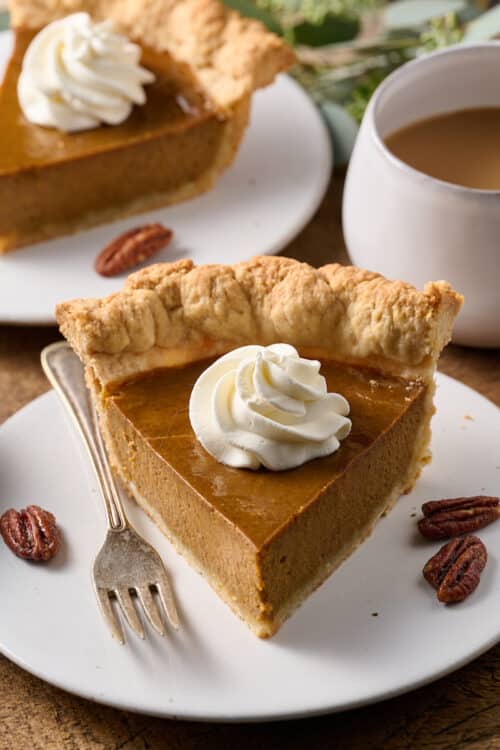
Say hello to your new favorite pie crust! This flaky crust is my go-to for all my pie recipes like cherry pie, pumpkin pie, or apple pie! The pie dough is easy to work with and roll out with a rolling pin. And you can blind bake this homemade pie crust or bake right away, depending on what your pie recipe requires.
Don’t Fear Homemade Pie Crust
Despite the rumors… making homemade pie crust for your pie recipes isn’t anything to dread! I’ve done it hundreds of times, and I’m here to convince you to skip the store bought pie dough this year. And make your own flaky crust everyone will swoon over! The secret is… just use my recipe!!!
Originally published in 2016, I’ve recently updated this recipe to be even better and easier! I’ve also added new photos plus advice for blind baking, making a lattice, and provide measurements for single crust pies and double crust pies.
If you’d like the old foolproof all-butter pie crust recipe, you can find it in the “notes” section of the recipe box!
Why Trust this Pie Crust Recipe?
I love baking pies… but boy are they a labor of love! Especially if you’re using homemade pie dough. Which is why I don’t mess around when it comes to my pie crust recipe! This recipe is *chef’s kiss* perfection.
- Hundreds of 5-star reviews from home bakers, just like you!
- Easy to work with, this pie dough comes together fast and rolls out like a dream!
- Rich and buttery flavor, with just a hint of sweetness.
- Bakes up golden brown and flaky… with plenty of crackly crunchy layers.
- Perfect for any pie or quiche recipe!
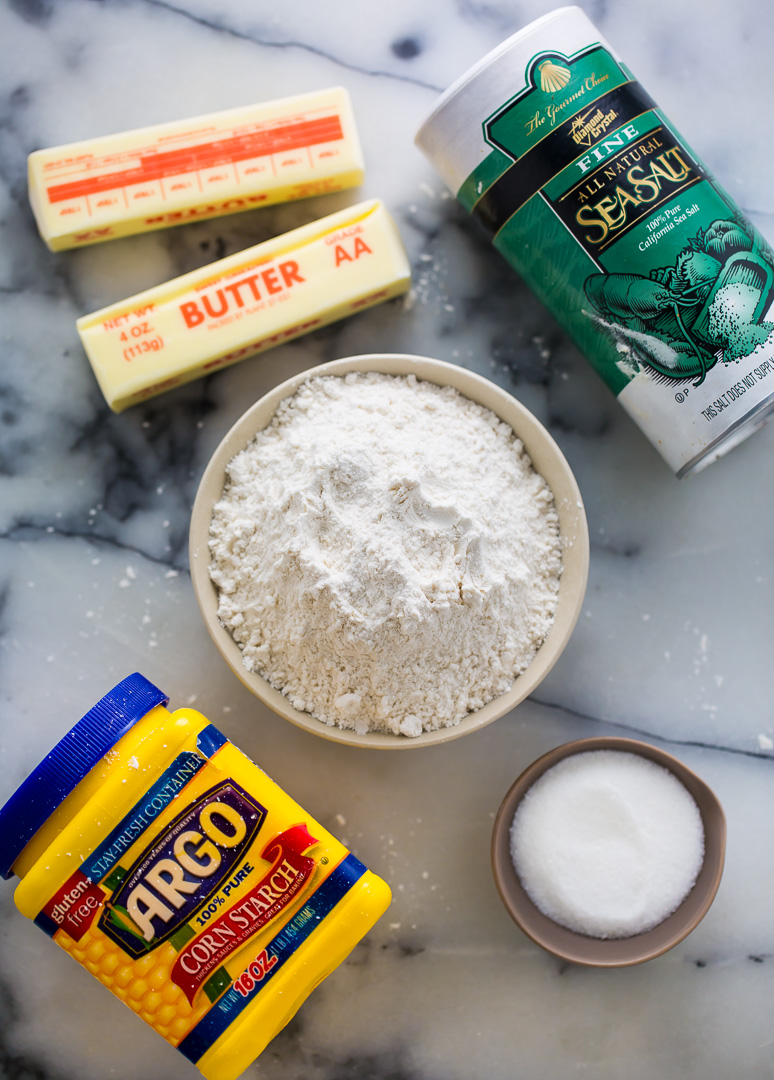
All Butter Pie Crust Recipe: Ingredients
- All-Purpose Flour: I use Gold medal flour, and always use a kitchen scale to weigh my flour.
- Cornstarch: This addition creates the most tender and flaky crust ever.
- Sugar: A small amount of granulated sugar sweetens the pie dough. Just sweet enough for pie recipes like cherry pie and apple pie. But if you’re using this pie dough for a savory pie or quiche, you can reduce to 1 Tablespoon.
- Salt: Balances sweetness and enhances all the flavors in the pie dough.
- Butter: I love using European-style butter because it’s higher in fat content than standard butter. Make sure you keep your butter cold! Cube the butter and freeze for 5 minutes before use.
- Ice Water: To create ice water add one ice cube to a measuring glass. Fill it up with cold water, mixing gently until the ice has completely melted.
- Apple Cider Vinegar: A splash makes the pie dough more tender and ensures you don’t over work the dough.
Let’s Make Pie Crust
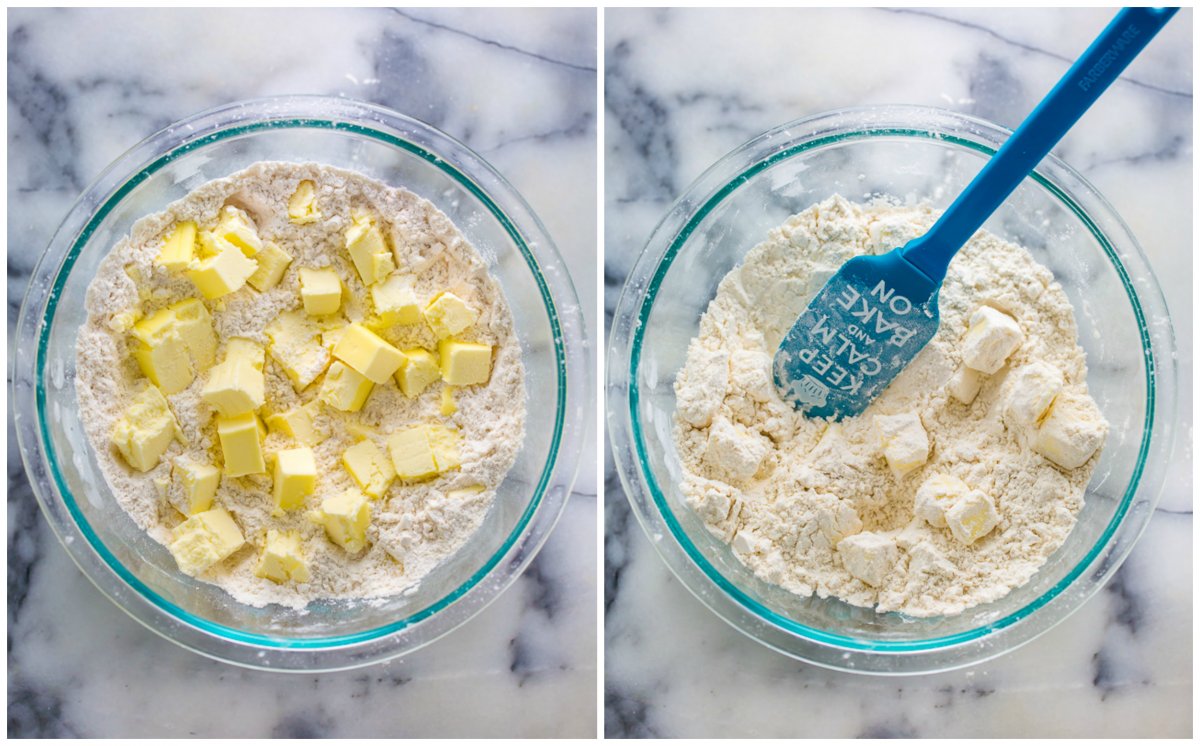
- Mix: In a large bowl, mix the flour, cornstarch, sugar, and salt. Add in the cold butter and toss well to coat the butter in the flour.
- Add Butter: Using a pastry cutter, work the butter into the flour until it’s about the size of peas. You could also use a food processor for this step.
- Add Ice Water: Use just enough ice water to form moist clumps. I suggest adding 3/4 of the ice water and working it into the dough. Then add more if needed. Too much water creates a tough pie dough.
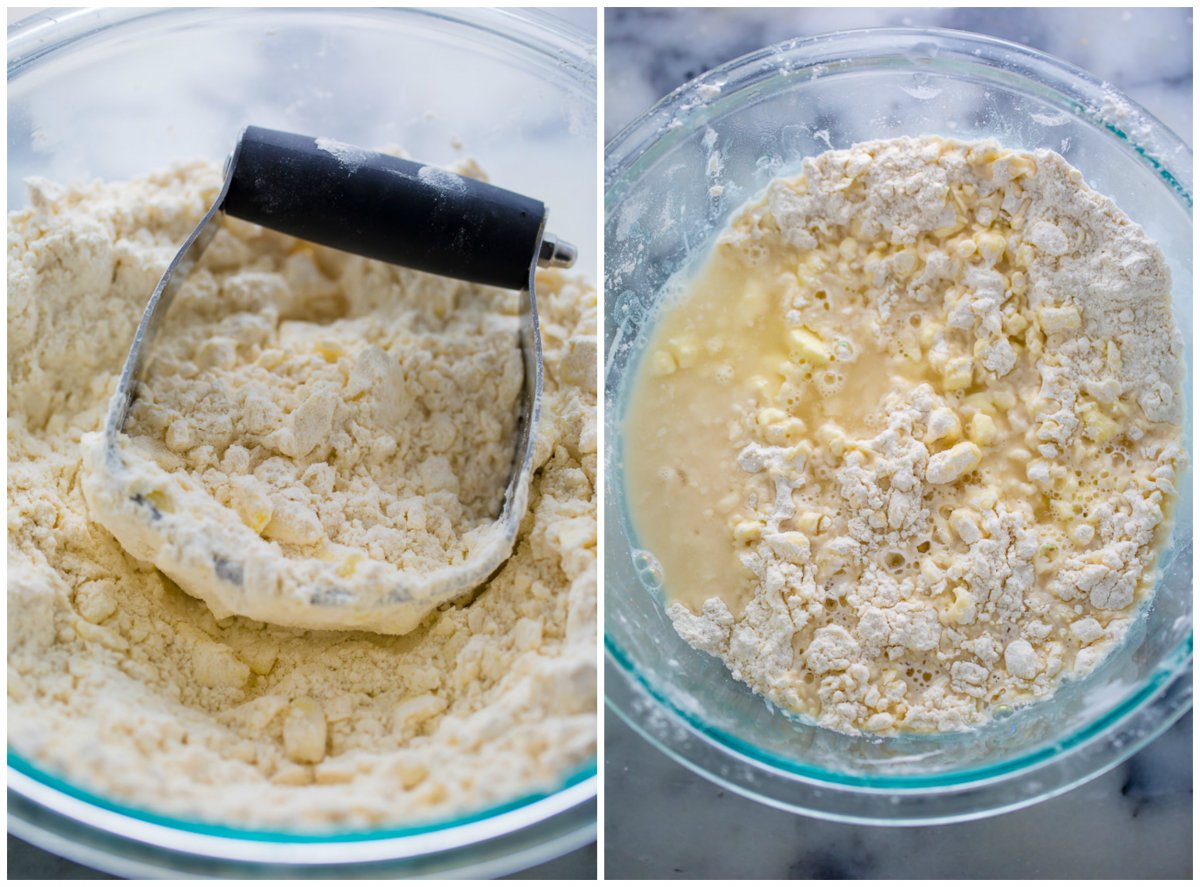
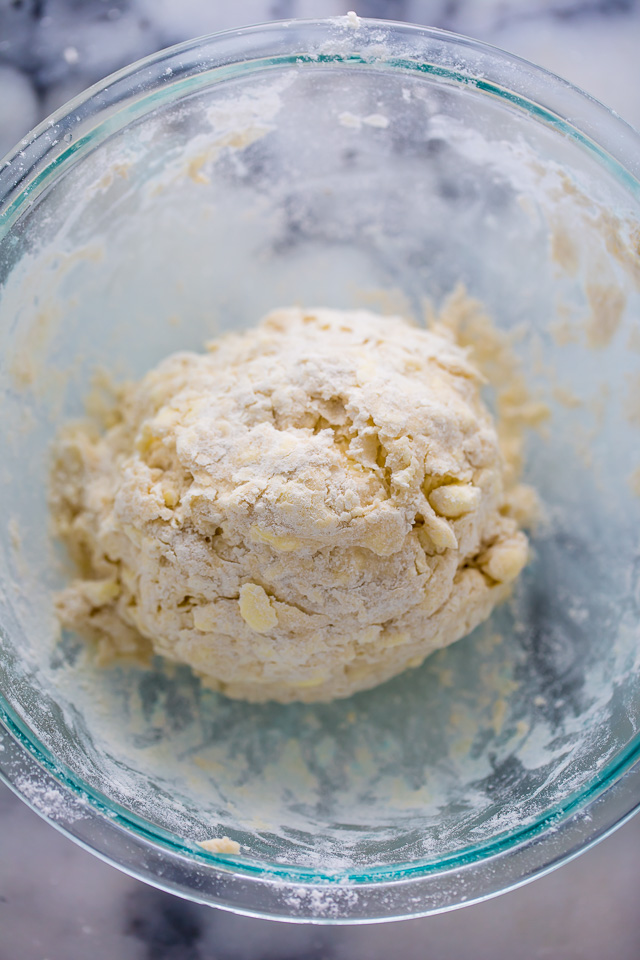
- Knead: Pour the shaggy dough onto a clean surface and knead it gently together. Adding more ice water only if absolutely needed.
- Chill: Press pie dough into a flat disk and wrap with plastic wrap. Chill for at least 2 hour, or up to 48 hours. You can also freeze pie dough for up to 2 months.
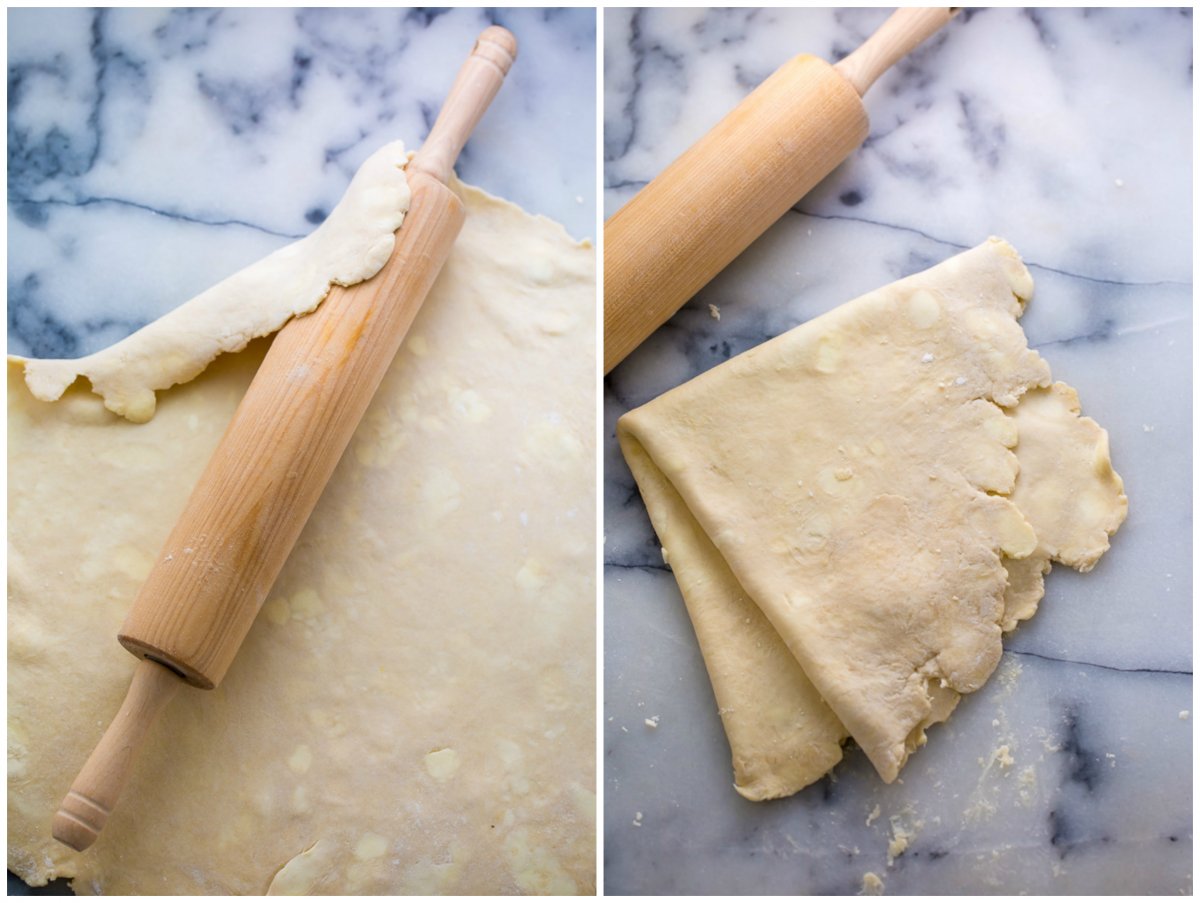
- Roll: When ready, remove pie dough from fridge. Sit at room temperature for 15 minutes before rolling it out with a rolling pin.
Place in the Pie Dish and Bake
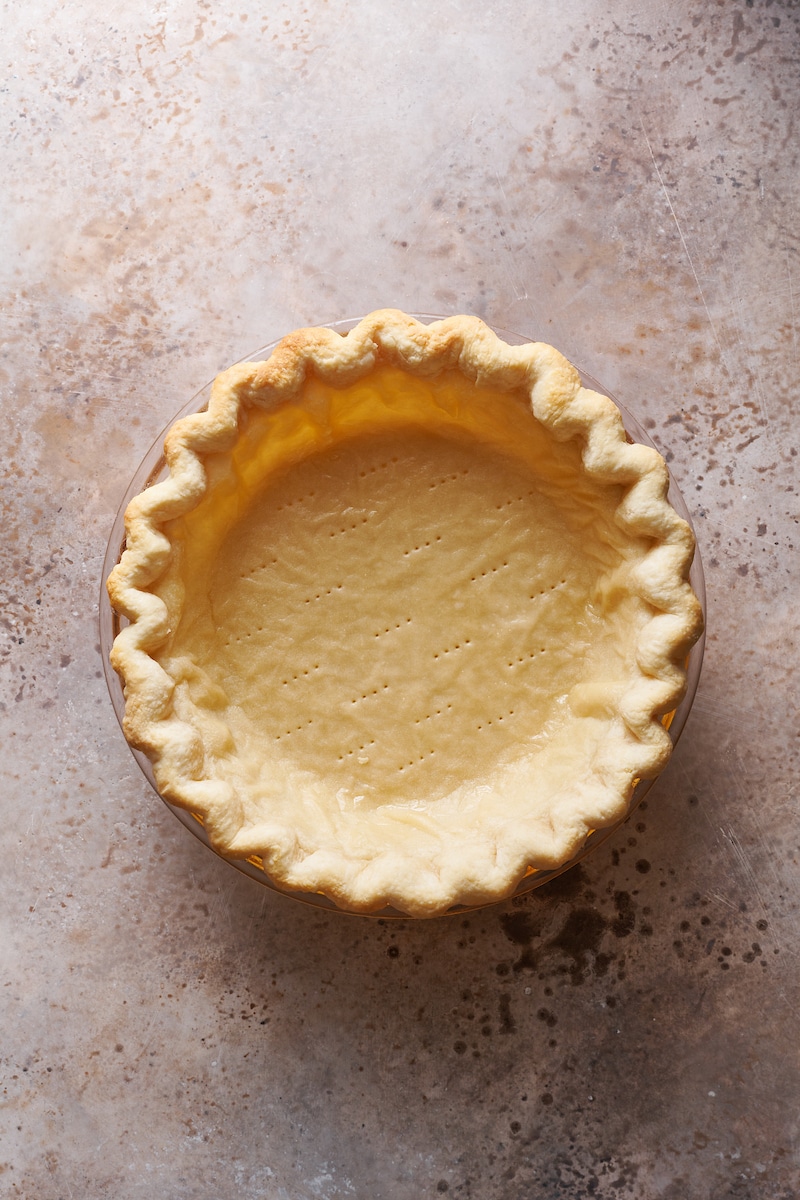
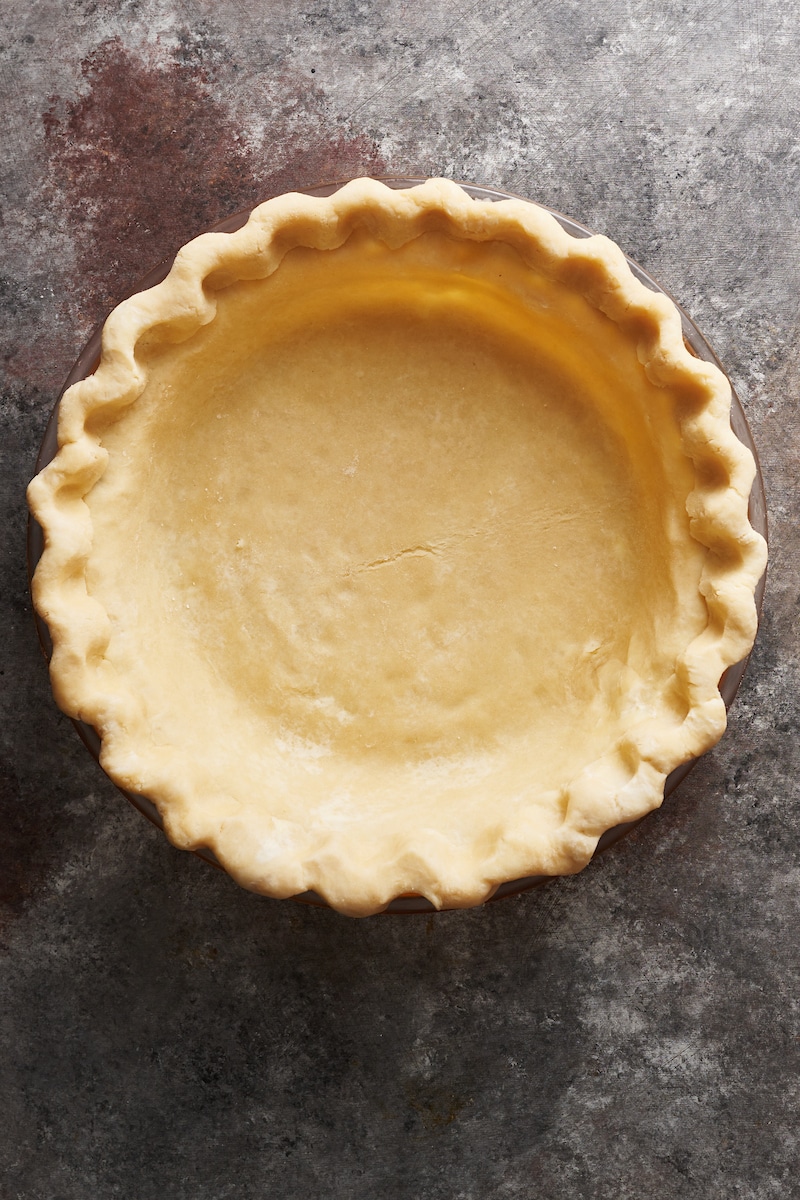
- Once rolled, place it into the pie dish. Gently press the pie dough into the pie plate, making sure not to overstretch it.
- I always suggest adding cold or room temperature fillings to pie dough. Warm or hot filling will melt the cold butter in the pie dough.
- Your pie dough should be cold when entering the oven. You can chill your pie for an extra 20 minutes if you think it looks too warm.
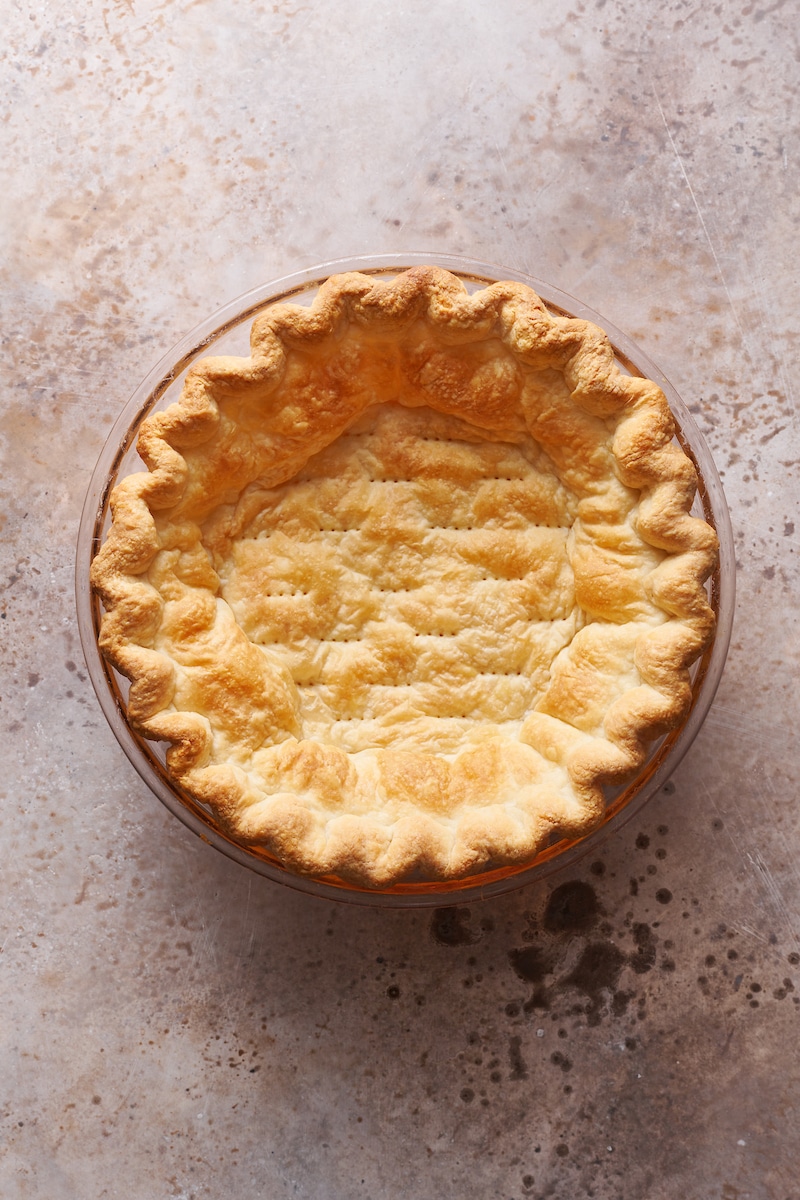
- Bake the pie as directed in your recipe. Pie baking times can vary a lot. I provide some suggestions for baking below, but it’s best to follow the recipe developer’s expert advice.
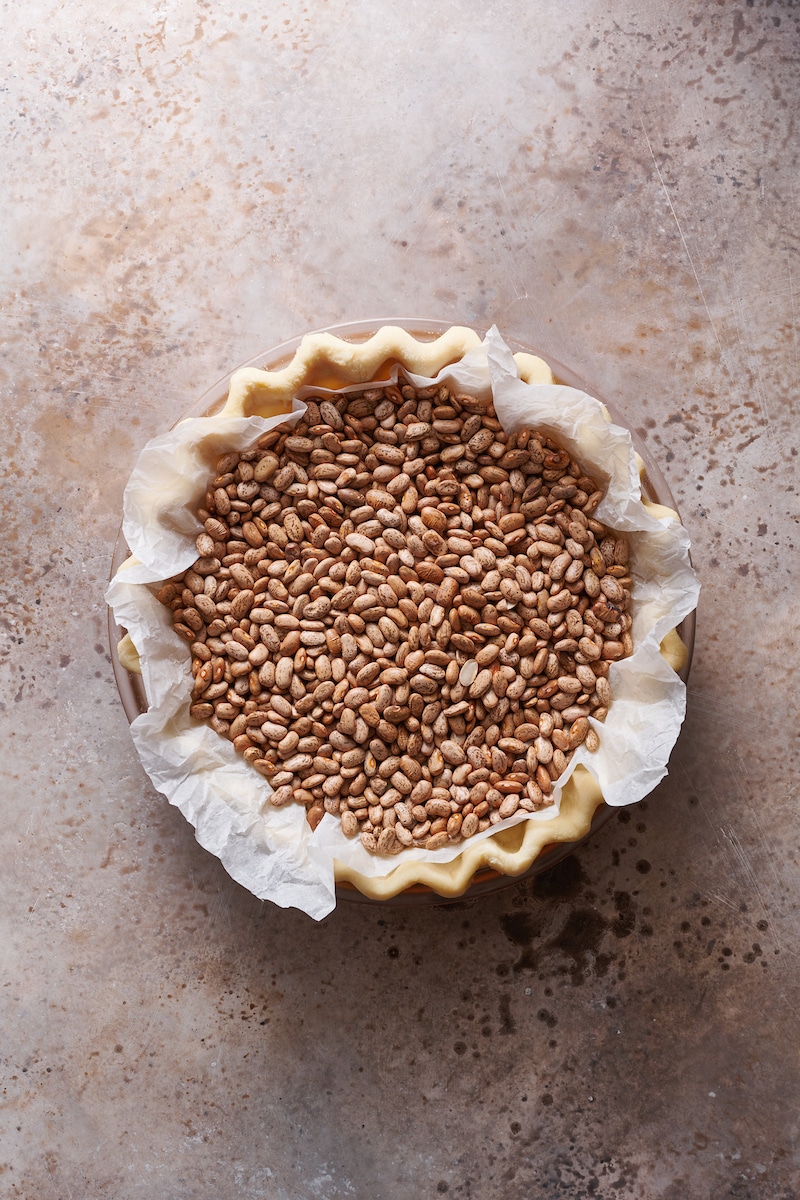
Blind Bake Pie Dough
Blind baking takes extra time and effort, but it’s an essential step for baking pie recipes that have especially wet fillings. It allows the crust to partially cook before you fill it with the wet filling, ensuring it doesn’t become soggy in the oven. Luckily, blind baking isn’t hard and only requires some parchment paper and dried beans or pie weights.
- Pie Dough: Prepare pie dough and chill as directed. Remove the pie dough from the fridge 15 minutes before needed. This makes it easier to roll out.
- Roll the Dough: Start from the bottom of the crust and roll until the dough is about 16-inches in diameter. Press the crust into pie pan. Chill in fridge for 20 minutes.
- Baking Prep: Preheat the oven to 375 degrees (F). Remove the crust from the fridge. Line the bottom of the crust with parchment paper and fill with pie weights or dry beans.
- Blind Bake: For 22 minutes, then carefully remove from the oven. Remove the pie weights and parchment paper and cut the bottom of the crust all over with a fork. Return to the oven.
- Use as Directed: At this point, I recommend following the recipe instructions for baking.
Pie Weights vs Dried Beans
- Pie weights work great and are a reliable way to blind bake pie dough for pie recipes. You can store them easily and use them over and over again.
- Dried beans are an affordable alternative that you probably already have in your kitchen! One downside is that is you use dried beans for blind baking you can’t eat them.
- I also find it takes a lot more dried beans to fill my pie crust than pie weights. And that removing the dried beans can be a little trickier than pie weights.
- But all in all, dried beans work great as a pie weights replacement. And in a pinch, you can even use rice! But again, removing the rice from the pie crust can be tricky. So be careful during that step if using rice or dried beans.
Double Crust vs Single Crust Pie
- For a single crust pie, trim excess dough, leaving a 1/4″ overhang. Roll the overhang underneath the rim of the pie plate and crimp. Refrigerate for 20 minutes.
- For a double crust pie, you’ll leave the same overhang, but roll the extra dough tightly so it sits firmly on the edge of the pie plate. Then, crimp the edges to secure the strips with the bottom crust.
- For a double crust pie, I like to add an egg wash onto the top crust. To apply this, simply brush the top crust with the egg wash using a pastry brush. An egg wash is simply an egg whisked together with a teaspoon of water or milk.
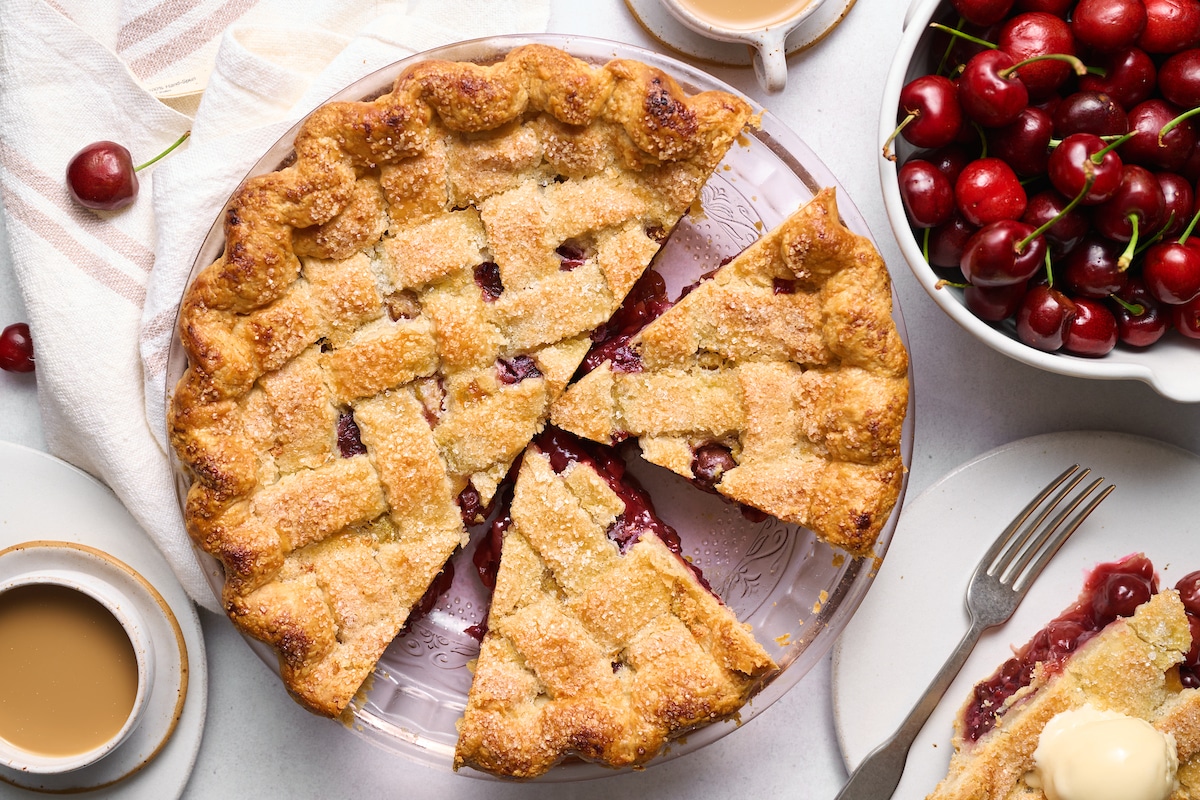
- Sparkling sugar is also lovely on top of a top crust. You can sprinkle it on top of the egg wash.
- I usually avoid using an egg wash on single crusts. It can sink into the pie filling and look unappealing.
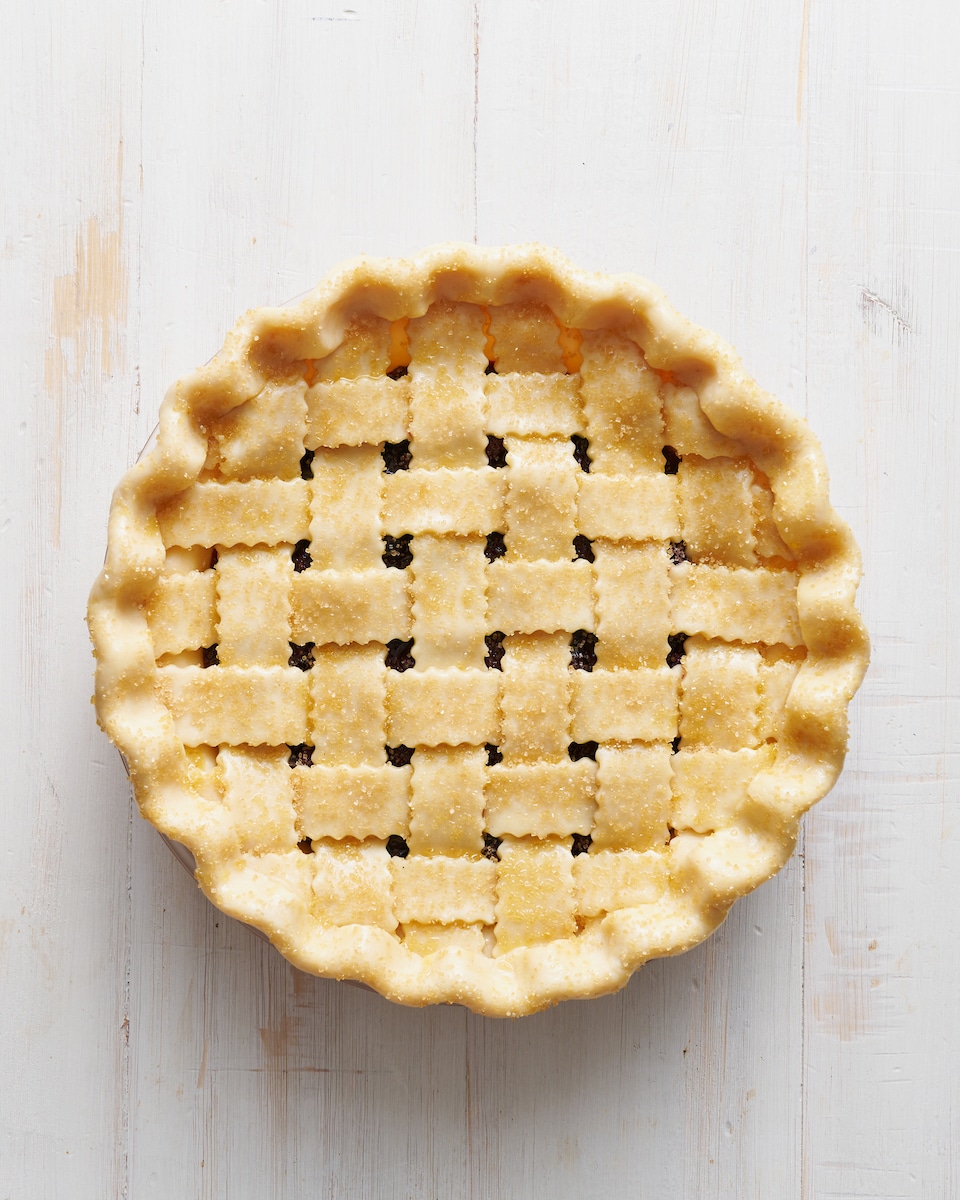
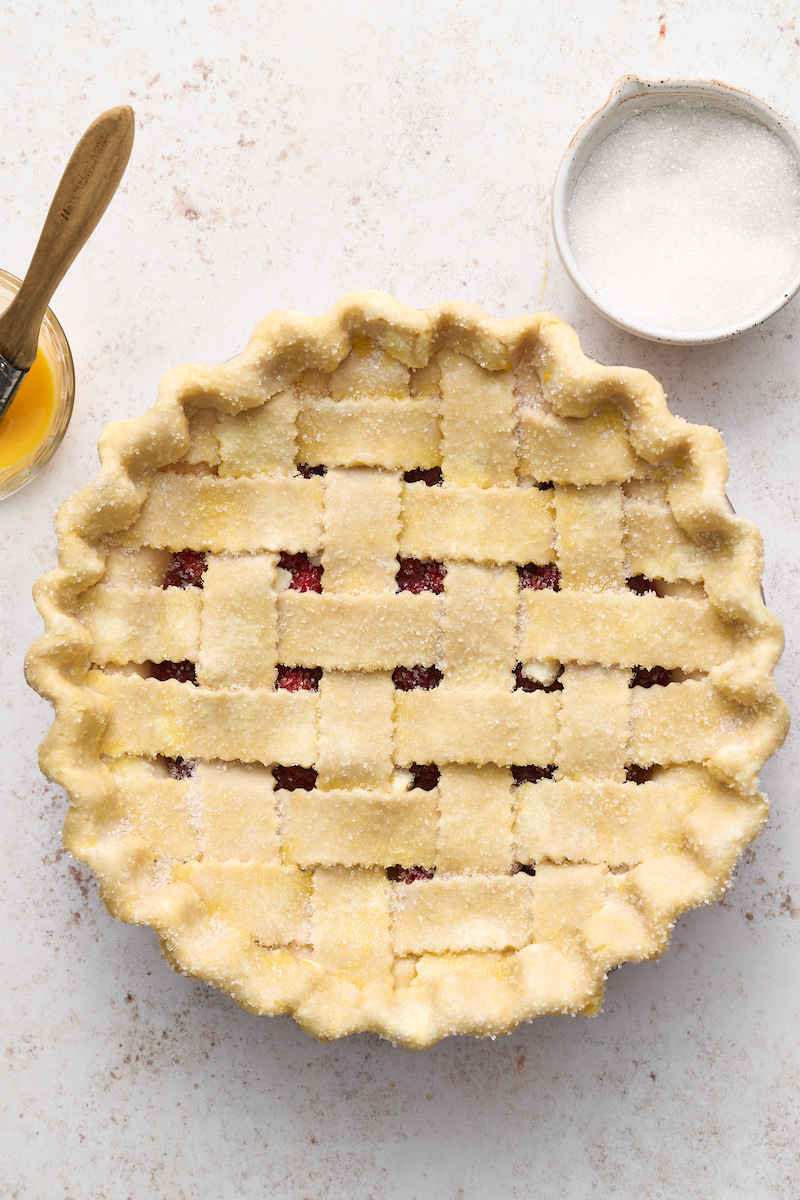
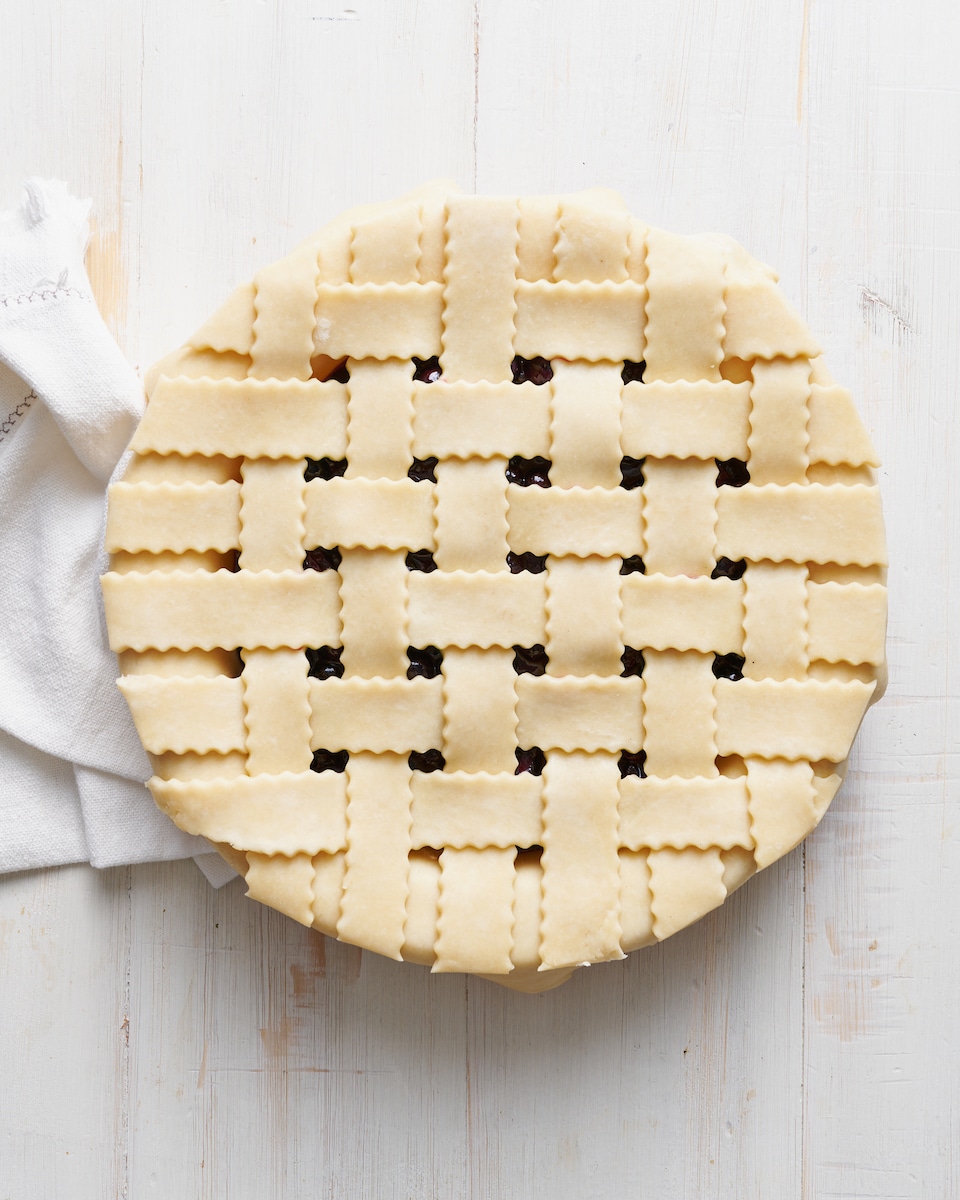
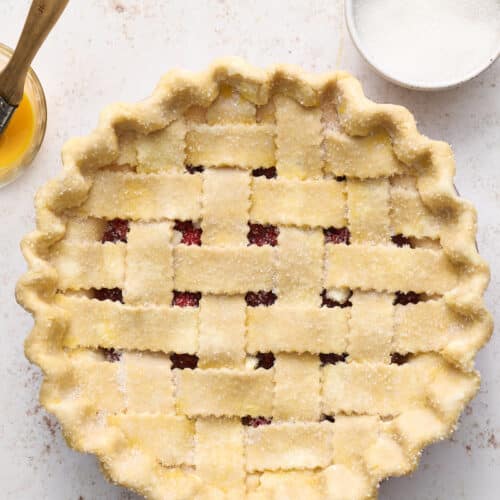
Lattice Crust: Top Crust and Bottom Crust
- I suggest rolling out the bottom crust first, as it’s the easiest. You’ll roll the bottom crust into a large circle and place it into the pie pan. Chill while you prep the top crust.
- For the top crust, roll the pie dough into a large circle. Use a pastry roller to slice the dough into long strips. Place the strips on a large baking sheet and chill the strips before use.
- Make sure both crusts have had time to chill in the fridge before baking. A cold crust will bake up flaky and golden brown! A hot crust will melt in the oven.
The Best Pie Dish for Pie Recipes
When I began baking pies, I had no idea how important of a role the pie dish plays in making the perfect pie!
- Pie plates come in many sizes, and they vary in material, from glass and ceramic to aluminum and metal.
- I prefer to bake with glass pie dishes because glass conducts heat evenly, which helps the crust and filling cook consistently.
- Ceramic pie dishes look gorgeous but can vary in thickness. This can throw off the bake time, especially if you’re using a thick ceramic plate. You may need to add baking time if you’re using a ceramic pie dish.
- Metal pie dishes absorb heat quickly. If you a metal pie plate, I suggest keeping an eye on your pie, and adjusting baking time as needed.
- This recipe makes enough pie dough to line a 9″ or 10″ pie plate.

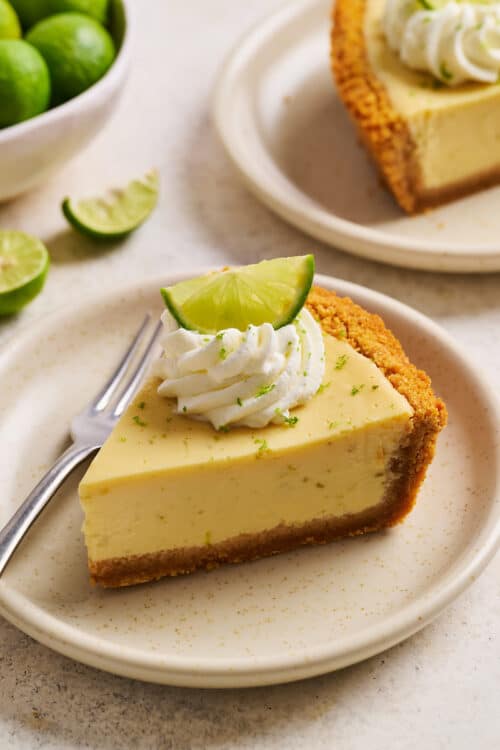
Best Pie Recipes
Foolproof All Butter Pie Crust Recipe
Ingredients
- 1/3 cup (76ml) ice cold water
- 2 teaspoons apple cider vinegar
- 2 and 1/4 cups (270g) all-purpose flour
- 1 tablespoon (11g) cornstarch
- 1/2 teaspoon salt
- 2 Tablespoons (28g) granulated sugar
- 1 cup (227) unsalted butter very cold and cut into 1/4-inch cubes
- Recipe above makes a single crust
For Double Crust (2 Crusts):
- 3/4 cup (171ml) ice water
- 1 Tablespoon (14ml) apple cider vinegar
- 4 and 1/2 cups (540g) all-purpose flour
- 2 Tablespoons (22g) cornstarch
- 1 teaspoon salt
- 1/4 cup (57g) granulated sugar
- 2 cups (454g) unsalted butter very cold and cut into 1/4-inch cubes
Instructions
- For Single Pie Curst: In a large glass measuring cup combine the ice water and apple cider vinegar. Place in the freezer (if possible) or fridge until needed.
- In a large bowl, mix the flour, cornstarch, salt, and sugar. Add in the cubed butter and toss with a spatula to coat the butter in the flour.
- Using a pastry cutter, work the butter into the flour until the mixture is a coarse meal. The butter should be about the size of peas.
- Using a silicone spatula, slowly fold in the water. Pour the shaggy dough out onto a clean surface and knead it gently, until it comes together in a ball, adding more ice water only if absolutely needed. Gather the dough into a large ball and gently flatten it into a disk.
- Wrap the disk in plastic wrap and refrigerate for at least 2 hour, or up to 48 hours. Remove the dough from the fridge 15 minutes before you plan on rolling, as dough that is too cold will crack.
- Lightly flour a rolling pin and a large work surface. Place dough in the middle of the surface and – beginning from the center – roll the dough away from you in a firm, even stroke. After each stroke, rotate a quarter turn clockwise and roll again. Lightly sprinkle more flour as needed. Use just enough to prevent the dough from sticking. As your disc becomes larger, be sure not to overstretch the center of the dough. Continue rolling until the dough is about 16-inches in diameter, and around a 1/8" in thickness.
- Carefully fold the dough in half and lay it across one side of a 9-inch or 10-inch glass or metal pie pan, placing the seam of the dough in the center of the pan.
- Gently unfold the crust, then use your hands to fit the dough down into the pan, making sure there are no gaps between the dough and the sides of the pan. If you see any visible air bubbles, gently burst them with a fork.
- Using kitchen scissors, trim the dough overhang to 1/2-inch. Roll the overhang underneath the rim of the pie plate and crimp.
- Lightly cover the crust with plastic wrap and place back in the refrigerator until needed, at least 1 hour. Then bake as directed in the recipe you're using.
- This is for a single pie crust. For a double pie crust see instructions below.
For Double Crust:
- In a large glass measuring cup combine the ice water and apple cider vinegar. Place in the freezer (if possible) or fridge until needed.
- In a large bowl, mix the flour, cornstarch, salt, and sugar. Add in the cubed butter and toss with a spatula to coat the butter in the flour.
- Using a pastry cutter, work the butter into the flour until the mixture is a coarse meal. The butter should be about the size of peas.
- Using a silicone spatula, slowly fold in the water. Pour the shaggy dough out onto a clean surface and knead it gently, until it comes together in a ball, adding more ice water only if absolutely needed.
- Gather into a large ball and divide in half (use a kitchen scale for even weights, each half should weigh about 644 g). Gently flatten each half into a disk. Wrap in plastic wrap and place in the refrigerator to chill for at least 2 hours, or up to 24 hours.
- Remove the disks of pie dough from the fridge 15 minutes before rolling out. For the bottom pie crust follow the rolling out instructions listed in the single pie instructions above (keep chilled in the fridge until needed). If making a lattice crust for the top pie crust, follow the instructions below.
For Lattice Strips:
- Remove the second disk of the dough from the fridge and let it sit at room temperature for 15 minutes before you plan on rolling.
- Line a large baking sheet with parchment paper and set it aside until needed.
- Lightly flour a rolling pin and a large work surface. Set the dough in the middle of the surface and – beginning from the center of the disc – roll the dough away from you in one firm and even stroke. After each stroke, rotate the disc a quarter turn clockwise and roll again. Lightly sprinkle more flour on the work surface, pie dough, and rolling pin as needed. You want to use just enough to prevent the dough from sticking. As your disc of dough becomes larger, be sure not to overstretch the center of the dough. Continue rolling until the dough is about 16-inches in diameter, and around a 1/8” in thickness.
- Using a pizza cutter or pastry roller, slice the dough into 12 strips (the width of the strips should be just over an inch). Gently lay the strips on the prepared baking sheet, cover with plastic wrap, and refrigerate until needed, at least 20 minutes.
- Remove prepared crust and lattice strips from the refrigerator. Scrape desired pie filling into an even layer in the pie crust shell.
- Lay 7 of the strips parallel on top of the filling, leaving about 1/4-inch between each strip. Fold back the second, fourth, and sixth strip, then place a strip of dough so that it’s perpendicular to the parallel strips. Unfold the folded strips, so they lay over the perpendicular strip.
- Now fold back the first, third, fifth, and seventh strip, then place another strip of dough on top, so that it’s perpendicular to the parallel lattice strips.
- Repeat this layering process with remaining lattice strips, weaving the strips over and under each other.
- Trim the edges of the strips, leaving about 1/2- inch overhang. Tightly roll the excess dough up so it's firmly sitting on the edge of the pie plate, then crimp the edges to secure the strips with the bottom pie crust.
- Bake as directed in the recipe you're using.
Video
Notes
- 1/2 cup (113ml) ice cold water
- 1 teaspoon apple cider vinegar
- 2 cups (240g) all-purpose flour
- 2 tablespoons (22g) cornstarch
- 1 teaspoon salt
- 2 Tablespoons (28g) granulated sugar
- 12 Tablespoons unsalted butter
Love this recipe and have been using it for years.
Am I able to freeze the dough and use later? Thanks!
I have made this one time before but could not recall if I used my own crust recipe. I used the one here, and cut the butter to 1 and 1/2 cups but still found it to be too much! The pie is in the oven now and is oozing fat. Now, I understand that butter adds to the flavor and flakiness of the crust, but personally I prefer a crust that is slightly firmer and not as fatty.
Other than that, the recipe itself is very good and makes a delicious pie..
Hi Lucy! I’m sorry you didn’t enjoy this recipe. If the pie is oozing butter in the oven, it’s an indication the butter was not cold enough before entering the oven. That being said, this is definitely a very flaky and all-butter buttery pie crust. And you might enjoy a pie crust made with a different fat, like shortening. Thank you for trying my recipe! Happy holidays!
Do you have to blind bake this crust?
Hi Brandi. I only recommend blind baking if the recipe you’re using calls for it.
How to keep the butter from oozing out all over? Just went to make a pie using your recipe and my problem occurred. Please help! I followed your recipe as written. Are all butter crusts more crispy than those made with butter and shortening?
Hi Sha. If the butter is oozing in the oven, it means the crust was not chilled enough. The butter should be completely solid and very cold to avoid this from happening. I’m so sorry it didn’t turn out for you!
I’d give this crust a million stars if I could! So easy and baked up perfectly. I gave myself star baker lol.
Haha! Congratulations star baker!