


 Search
Let me teach you how to bake the best cheesecake recipe ever! This classic cheesecake recipe has a heavenly rich and creamy cheesecake filling and classic graham cracker crust. Reader’s say it’s even better than the cheesecake factory cheesecake! Baked cheesecake will keep, chilled in the refrigerator, and stored in the springform pan, for 5 days!
Rebecca Lynne Scheetz says
“![]() This is the BEST cheesecake I have ever made. So creamy and delicious! I can’ t wait to make it again. Hands Down THE WINNER!”
This is the BEST cheesecake I have ever made. So creamy and delicious! I can’ t wait to make it again. Hands Down THE WINNER!”
Ready to Bake The Perfect Cheesecake?
If you’re a serious cheesecake lover, this cheesecake recipe is going to change your life!
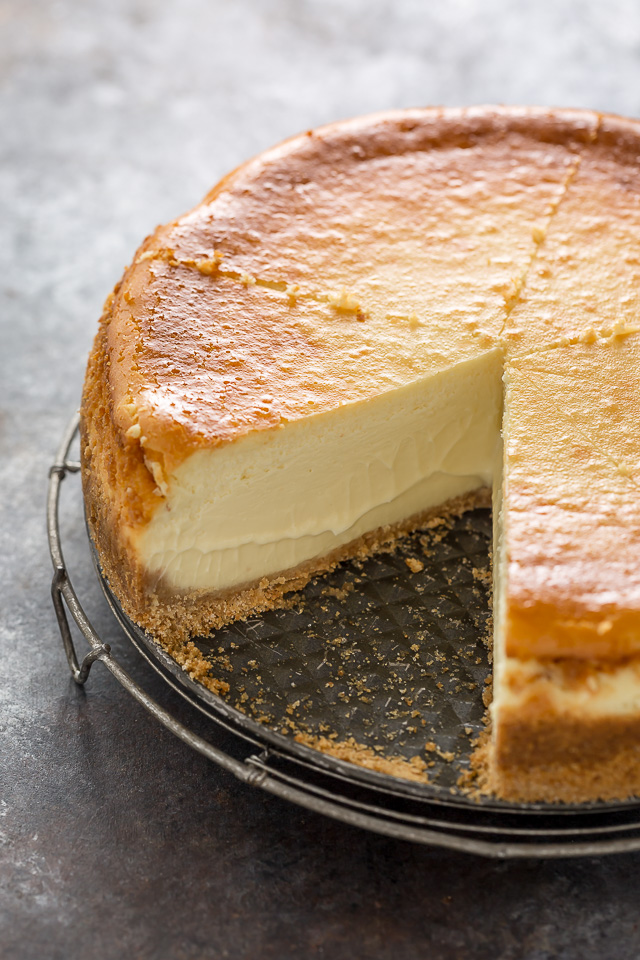
Because let’s be real, what’s better than than sinking a fork into a creamy slice of cheesecake? From the crunchy graham cracker crust to the silky smooth cream cheese filling… this seemingly fancy dessert is pure perfection! And actually quite easy to make at home.
And did I mention that cheesecake is the ultimate holiday dessert? Because you can make it days – or even months – in advance. Which is a good thing because although it’s an easy dessert, it’s definitely a time consuming one. But you can make this dessert up to 3 days in advance and chilled in the refrigerator.
Water bath guide and cheesecake step-by-step video tutorial in the recipe card.
I’m Cheesecake Factory Alumni
Have you ever wondered: how are cheesecake factory cheesecakes baked? Well, you’re not alone in pondering this question. I worked there over 5 years, serving dessert to thousands of cheesecake lovers. And during that time, people asked me that exact question over and over again.
I’ve probably consumed over 1 million calories from cream cheese taste-testing my way to the answer! I’d take a slice or two home almost every night… sometimes even more! And quickly it became my life mission to learn how to bake next level cheesecakes. After years of research, I finally created the perfect recipe to share with you.
The Best Cream Cheese?
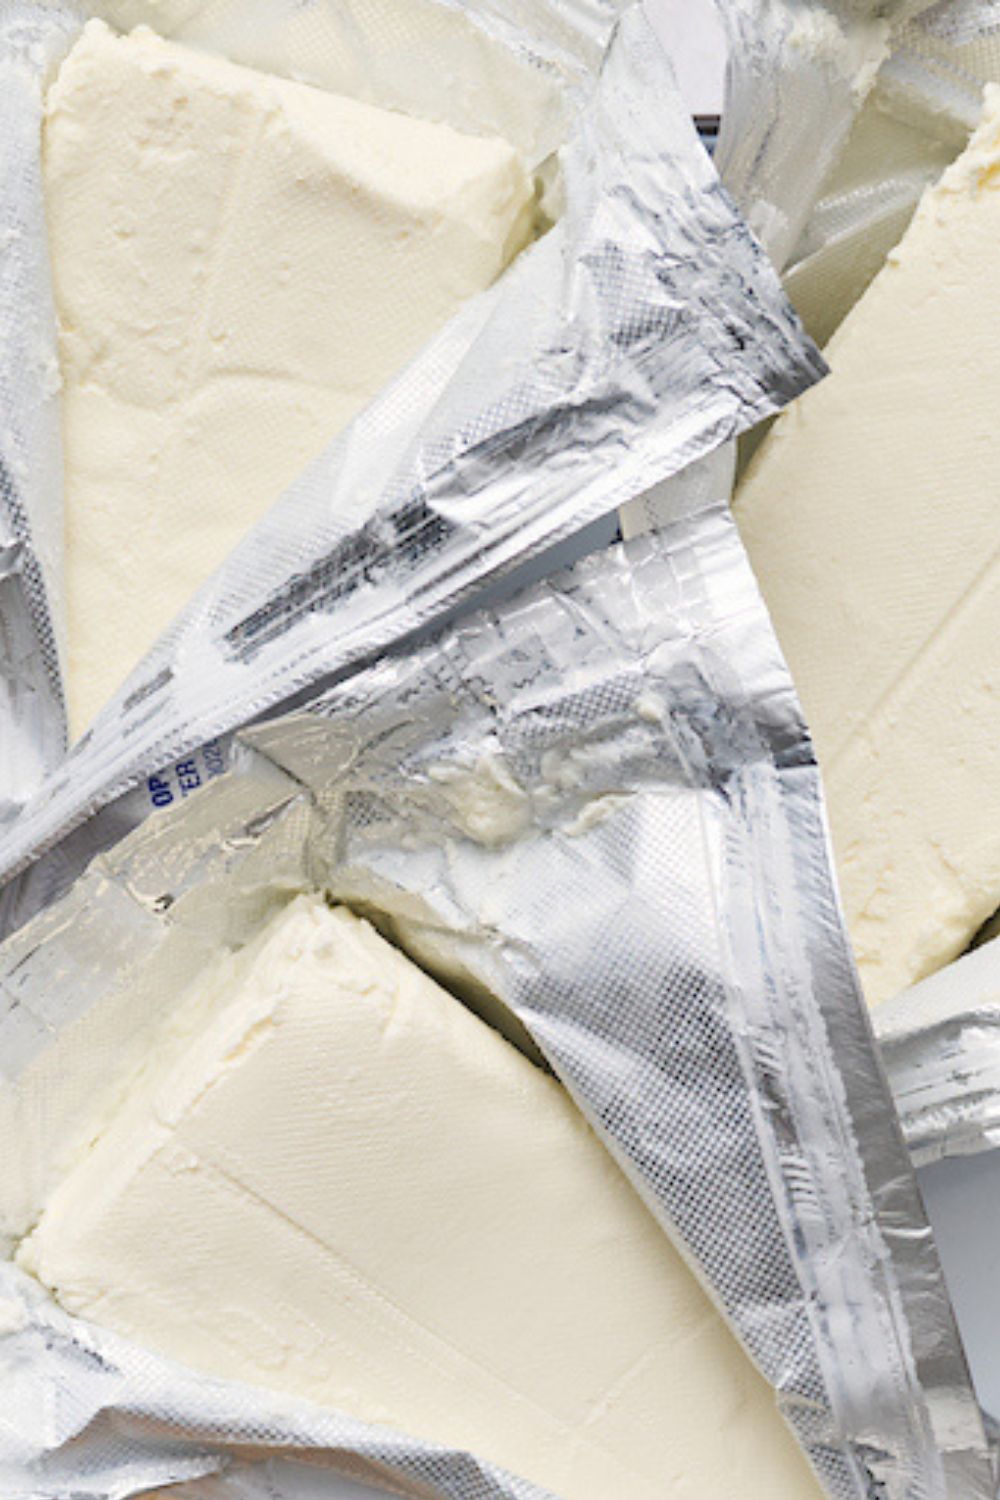
The most important ingredient in this recipe is cream cheese! With dozens of cream cheese options, it can be hard to know which variety works best, right? Well, I can tell you that after baking HUNDREDS of cheesecakes, the best cream cheese is brick-style cream cheese. I love Philadelphia brand, but use your favorite.
Just be sure your cream cheese is:
- Brick-Style
- Plain (Unflavored)
- Full-Fat
- And Room Temperature (before you begin baking)
Start with Room Temperature Ingredients
The ingredients should always be at room temperature before use! You remove them from the fridge at least 45 minutes before you plan on baking this cheesecake recipe. And never attempt to use cold ingredients! Cold cream cheese won’t blend smoothly and cold eggs won’t bond with the rest of the batter.
- Cream Cheese: Our number one ingredient, so be sure to read all my cream cheese tips above. And do not attempt to make this without cream cheese.
- Granulated Sugar: I don’t suggest reducing the amount of sugar in this recipe. Or using an alternative sweeteners, not even brown sugar.
- Eggs: Use large eggs and bring them to room temperature before use. You’ll use both whole eggs and egg yolks. Save egg whites for another recipe. Be sure to add the eggs one at a time, as adding eggs one at a time helps avoid over mixing.
- Vanilla: Pure vanilla extract adds so much delicious rich flavor. Do not use artificial or imitation vanilla.
- Heavy Cream: Aka heavy whipping cream, don’t sub with milk, half and half, or sour cream.
- Graham Cracker Crumbs: Pre-crushed graham cracker crumbs are the easiest choice. If you can’t find them, you can crush graham crackers in a blender until they’re fine crumbs, then use them as called for in the crust.
- Butter: Unsalted butter works best, but salted butter will work just fine.
Some people ask if they can add lemon juice to this recipe to cut the richness, and you can. But don’t add more than a teaspoon.
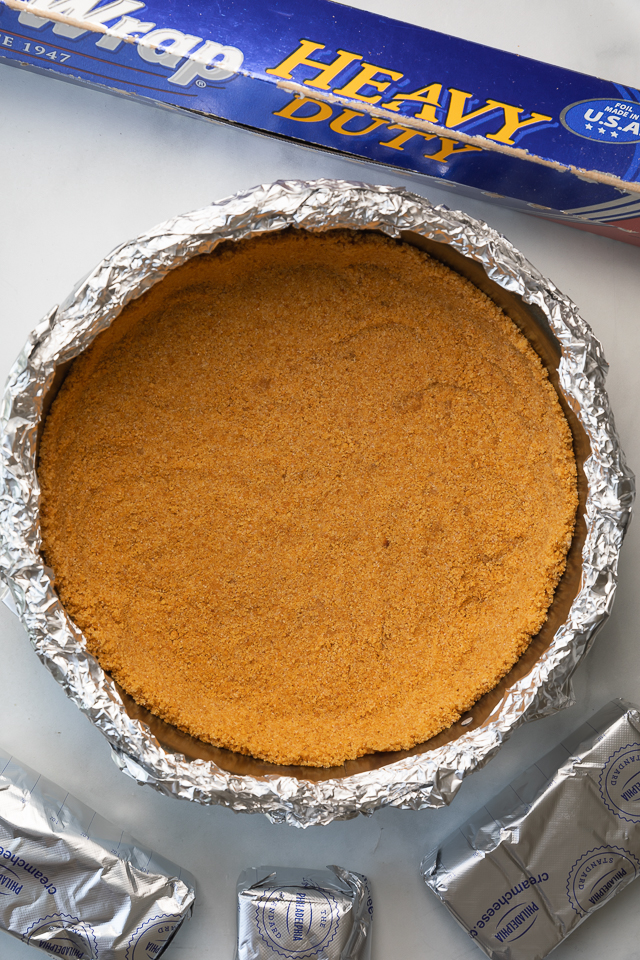
Make the Graham Cracker Crust
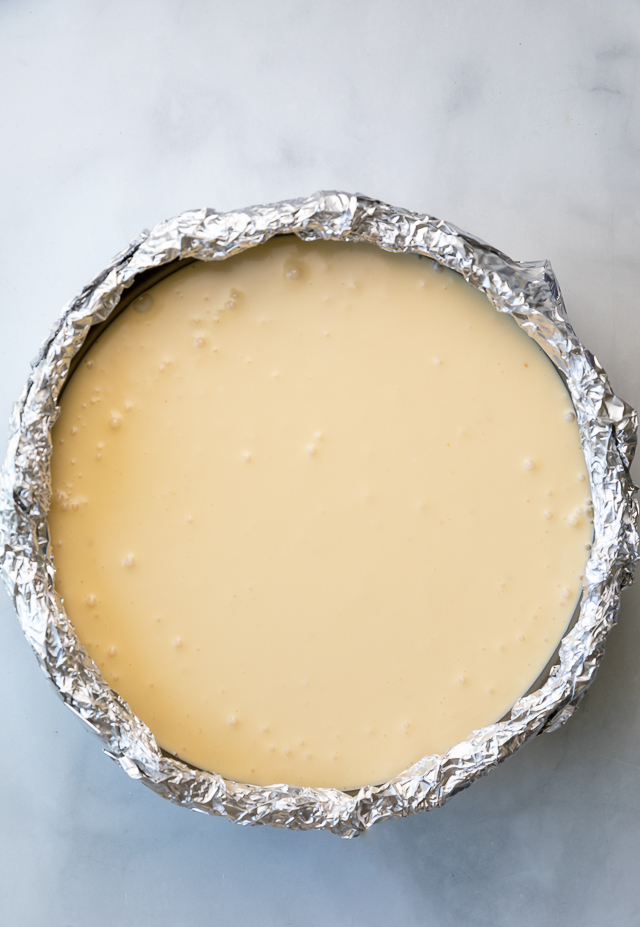
- Wrap a springform pan with heavy-duty aluminum foil. The foil will protect the pan from the water bath, keeping your graham cracker crust nice and dry!
- Spray the pan with non-stick spray. Or grease the pan with butter. Greasing the pan ensures no sticking. No sticking equals perfect slices!
- Combine the melted butter, graham cracker crumbs, and sugar. This is your graham cracker crust mixture!
- Press the graham cracker crust firmly into the bottom of the springform pan. I do this with the bottom of a measuring cup! A firmly packed graham cracker crust will bake up thick and won’t crumble much when sliced.
How to Make Cheesecake
- Cheesecake Prep: Turn the oven on and preheat the oven 20 minutes before you plan on baking. Prep your cake pan by wrapping it with aluminum foil and spraying it with nonstick baking spray. No need to line with parchment paper! The spring form will release the cheesecake easily once it’s cooled.
- Par-bake the Graham Cracker Crust: This step ensures a crunchy graham cracker crust. Allow the crust cool as you make the batter. Press the crust up and add the sides of the pan.
- Make the Cream Cheese Batter: Use a food processor, stand mixer, or a handheld electric mixer to beat the cream cheese and make the batter. Pour the cheesecake batter on top of the crust and smooth the top.
- Bake in a Water Bath: Place the springform pan inside roasting pan and fill with hot water. If you don’t have a roasting pan, use a large pan with high sides.
*This post may contain affiliate links!
Let’s Bake Cheesecake
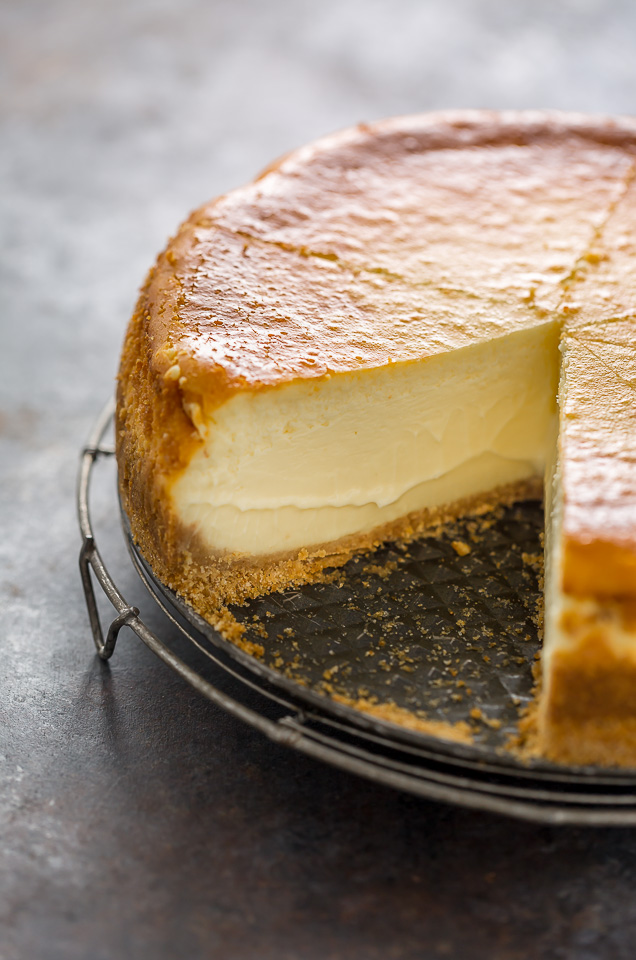
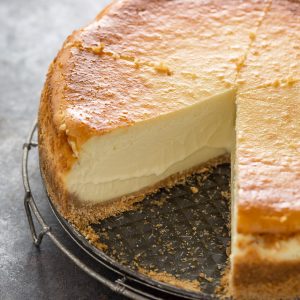
- Bake the Cheesecake: After you preheat the oven, you’ll bake the cheesecake. Until the edges look firm, but the center is a little wiggly. Don’t over bake, it’ll firm up a good amount as the cake cools.
- Cool: The cheesecake cools in the oven first. Let it cool in the oven, without opening the oven door. Then you’ll cool again at room temperature, and finally chill in the refrigerator. This is a lot of chilling but I promise it’s worth the wait!
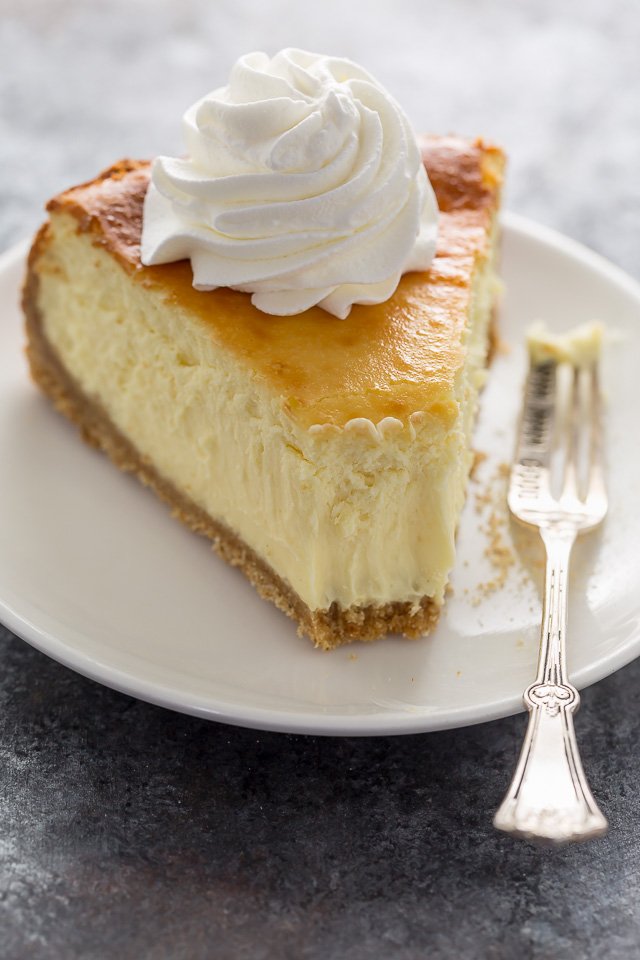
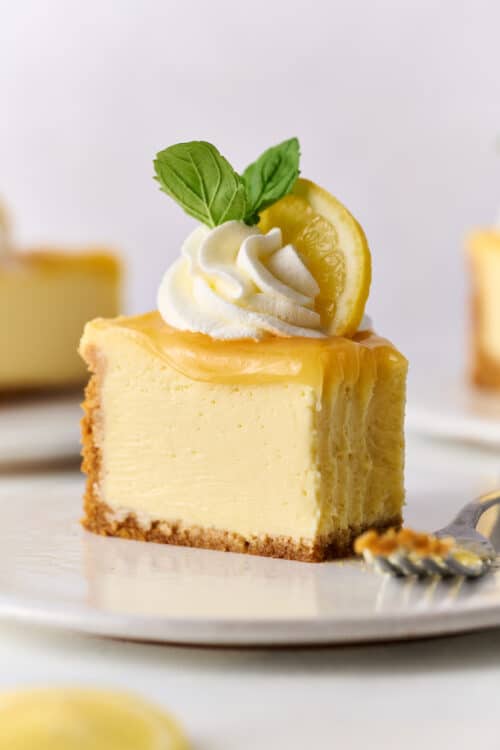
- Slice and Serve: Use a large sharp knife and wipe it between slices. Top with whipped cream right before serving! Or try homemade chocolate sauce or raspberry sauce.
- Storage: Wrap leftovers tightly in plastic wrap and store in the fridge. Or follow my guide below and you can freeze this extra rich and creamy cheesecake for up to 2 months.
Make a Water Bath: Grab a Springform Pan and Aluminum Foil!
- A water bath is an essential step in making the best cheesecake! The water bath helps the cake stay nice and moist – and gives it that signature creamy texture! A water bath also ensures the cheesecake doesn’t crack as it begins to cools down.
- You will let the cake cool in the water bath, in the oven, without opening the oven door. Then you’ll remove it from the water bath as you cool it to room temperature and eventually chill in the fridge.
- I promise, making one isn’t as hard or scary as you might think, and once you do it a few times, it becomes second nature.
For the best results, I don’t suggest making this cheesecake without a water bath!

How to Store Cheesecake
This creamy dessert will keep in the fridge for up to 5 days! To keep it even longer, you can freeze it!
- Let it cool completely at room temperature! This will take several hours, so be patient.
- Wrap the whole cake – or slices – in two layers of saran wrap. Then wrap tightly in aluminum foil.
- Transfer to a freezer bag, tightly seal, and place in the freezer for up to 2 months.
- To defrost, thaw in refrigerator overnight. Do not attempt to thaw in the microwave or oven!
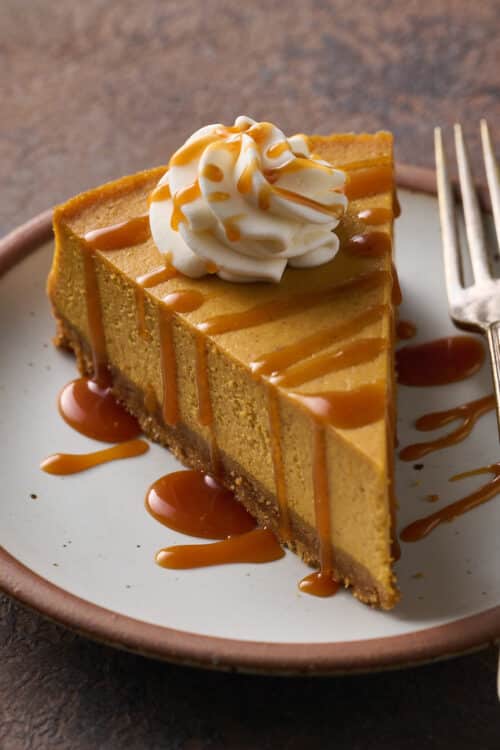
Cheesecake Factory Menu Inspired Desserts:
- Oreo Cheesecake
- Key Lime Cheesecake
- New York Style Cheesecake
- Chocolate Cheesecake
- Pumpkin Cheesecake
Even The Kitchn wrote a review on this recipe (saying it’s the only one you need)!
The Best Cheesecake Recipe
Ingredients
For the Crust:
- 2 cups (198 grams) graham cracker crumbs
- 1/3 cup (67 grams) sugar
- 7 tablespoons (99 grams) butter, melted
For the Creamy Cheesecake:
- 5 blocks full-fat cream cheese (40 ounces total) room temperature
- 1 and 1/2 cups (300g) granulated sugar
- 1 Tablespoon pure vanilla extract
- 5 large eggs room temperature
- 3 large egg yolks room temperature
- 1/2 cup (113ml) heavy cream room temperature (Use an extra 1/4 cup for even creamier cheesecake)
Instructions
For the Crust:
- Preheat oven to 350 degrees (F). Lightly spray a 9″ springform pan with non-stick spray.
- Wrap the bottom and sides of the pan with heavy duty tinfoil. I recommend doing several diligent layers here to ensure no water creeps through when you place the pan in the water bath. Set pan aside.
- In a large bowl, combine graham cracker crumbs, sugar, and melted butter; stir well to combine. Firmly pat the mixture into the prepared pan.
- Bake in preheated oven for 8 minutes. Place partially baked crust on a cooling rack and set aside while you prepare the filling.
For the Creamy Cheesecake Filling:
- In the body of a high power blender, food processor, stand mixer fitted with the whisk attachment, or in a very large bowl using a hand held mixer, beat the softened cream cheese until completely smooth, scraping the bowl as needed.
- Add sugar and vanilla and beat smooth, scraping down the sides and bottom of bowl as needed. Add in the eggs and yolks, one at a time, beating well after each addition.
- Add in the cream and beat until it’s just incorporated in the batter.
- Pour filling into prepared crust and, using a silicone spatula, smooth the top.
- Place the cheesecake pan into a large, deep pan. Fill the pan with 2 inches of hot water. This is your water bath and will help ensure your cheesecake comes out crack free.
- Carefully place the pan in the oven and bake for 1 hour and 10 minutes. Turn oven off and let the cheesecake sit, undisturbed, for 45 minutes, inside the oven with the door shut. The cheesecake should be still slightly wiggly.
- Remove cake from oven and gently run a knife very around the edge of the cake. Place the cheesecake pan on a cooling rack and cool completely, then loosely cover the pan with saran wrap and chill for at least 8 hours.
- Cheesecake will keep, covered in the fridge, for 5 days. Cheesecake may be frozen for 2 months. Thaw overnight before slicing.
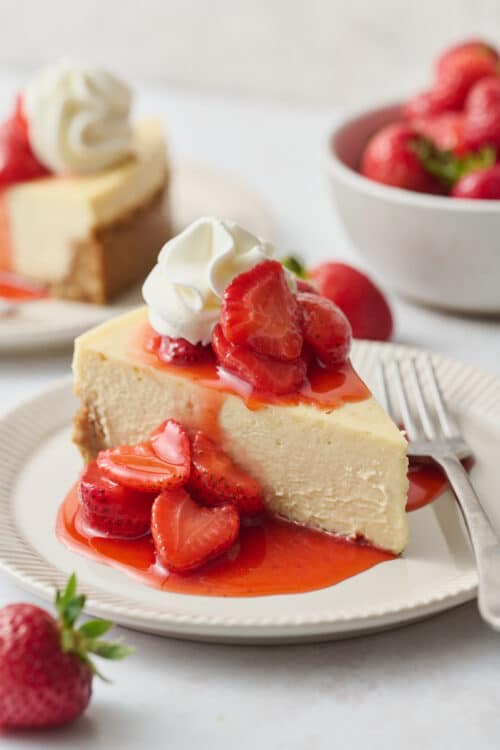
The flavor is amazing, I used fresh cane sugar from right here in Louisiana. The flavor was way better than regular granulated sugar, then I added a strawberry topping to it. Epic recipe
I don’t understand step 7. Why do you run a knife around the cheesecake when it is still hot, then let the pan cool? Can I wait until after it has cooled and I want to remove the pan from the base to run the knife around the cake? (I use a springform pan)
Thank you.
Running a knife around the sides of the cake when it’s hot helps to keep it from cracking as it cools. It shrinks when it cools and if it sticks to pan, then you may have cracks. I also run the knife around the pan before I take it out of pan.
This is to keep the top of the cake from cracking as it cools.
running a knife around outside while it is still warm helps to prevent cracks in the top as it cools and contracts.
Hi there, are there any adjustments needed for high altitude? Time or temp?
I make it in a cast iron skillet, no water bath and it’s delicious.
Hi, I cannot wait to make this cheesecake for Thanksgiving!
I just have a question, I have 2 sets of springform pans. One is non-stick and is dark in color (I would spray it with non-stick spray anyway) and the other is a regular silver. Does it matter which pan I use? Thank you for your help and for this recipe! Enjoy your Thanksgiving!
They are no way this fits a 9 inch pan. It don’t even fit a 10 inch cheese cake pan. Why would you say a 9 inch pan when clearly it don’t work. Please explain it to me . Not being disrespectful but help me understand.
You have to use a 9 inch *spring form pan* not a traditional cake pan which is probably what you’re using. This is my go-to cheesecake recipe I’ve made at least 10 times minimum for events & it’s perfect everytime. It fits perfectly in a 9 inch spring form pan.
Thank you. I made it and it was behind fabulous. I didn’t use a spring from pan that was tall enough and changed to a bigger 9 inch and it turned out amazing. Now I’m making for my friend who said she has had many cheese cakes and this is far the best she’s ever eaten, even better than cheesecake factory. Thank you for the wonderful recipe. You rock!!!! With your cheesecake recipes. Your the best
It fits my 9” springform pan perfectly
My first ever attempt at a “from scratch” cheesecake. Instructions were easy to follow and it came out perfectly. I don’t see any reason to ever look for another recipe!
The best cheesecake recipe ever!
This cheesecake recipe looks amazing!! Do you have any recipe recommendations for different cheesecake toppings for this cake?
For those that have problems with a water bath. Try this , form your foil around pan then gently remove foil. That gives you a foil form . When your chessecake is ready for oven. Place the pan in a crockpot liner and then put your pan back into your foil form . Wrap it up tightly. Then you should not have a problem with water leakage. Proceed with the water bath.
Just one question ❓ how do you put ALL the ingredients in a 9 inch cheesecake pan. No way!!!. I made it and you would need a 10 inch pan.
Kimberly, I’ve made this a couple of times and it is a little much to fit in a 9in pan. Just put the extra in a smaller dish, or bake it separately. This cheesecake is so good!
Thank you. I’ve looked at alot of cheesecake recipes and I choose this one out them all. I will comment when I make it. So rich that it has to be delicious. Thanks again
How did it come out? Was it creamy? Thanks!