


 Search
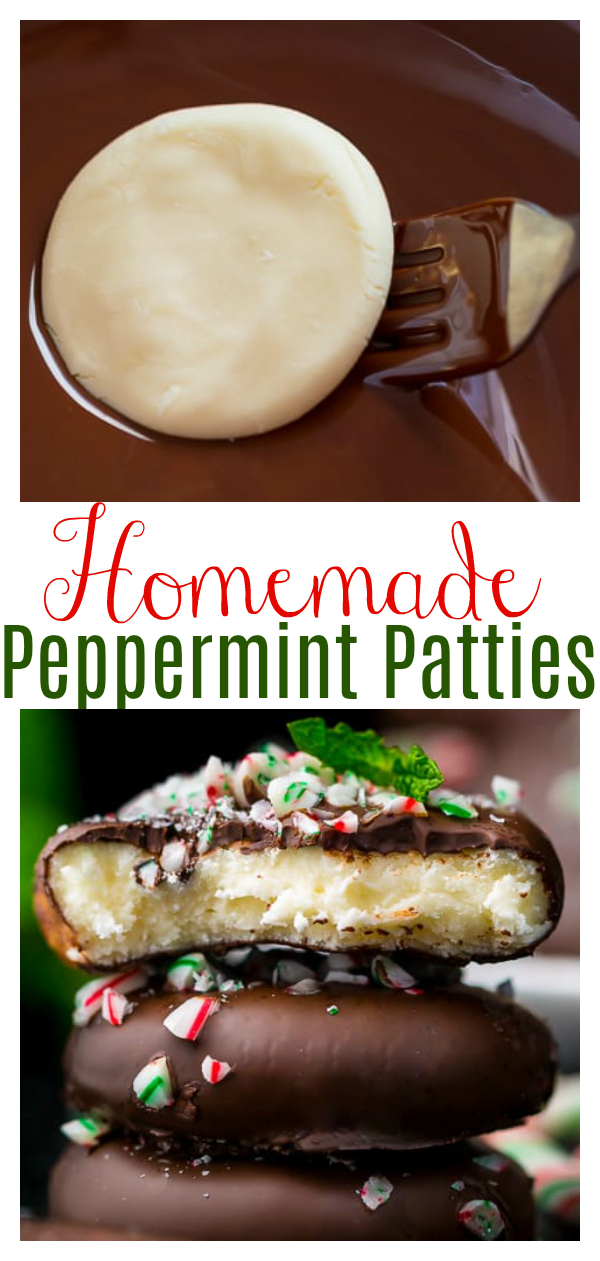
Homemade 5-Ingredient Peppermint Patties taste even better than york peppermint patties – and are so easy and delicious! The recipe uses sweetened condensed milk, confectioners’ sugar, and peppermint extract to create the peppermint patty base. Dipped in dark chocolate and sprinkled with crushed candy canes or peppermint candies, they’re the perfect homemade holiday gift!

Homemade Peppermint Patties Recipe
If you like york peppermint patties, you’ll LOVE this homemade peppermint patties recipe! They’re easy to make, only require 5 ingredients, and are actually quite fun to make, too. Especially during the holiday season! My kids love shaping the peppermint patties into little rounds and dunking them into the rich dark chocolate!
The patties themselves are rich in peppermint flavor thanks to peppermint extract and crushed candy canes on the dark chocolate coating! If you make this outside the holiday season and can’t find candy canes, you can use crushed peppermint candy canes instead. But I think the red and green candy canes make these peppermint patties look extra festive!

How to Make Peppermint Patties
- Because this recipe only calls for 5 ingredients, I suggest using the best ones you can get your hands on.
- For the chocolate coating, you’ll want to be sure to use real chocolate, not chocolate chips. And because the filling is quite sweet, I suggest using semi-sweet or dark chocolate. I used Lindt 70% cocoa bars and the flavor and texture was amazing! (not sponsored!)
- And while we’re on the topic of sweetness, I want to encourage you of one thing: don’t skip the salt! Adding a small amount of salt to the filling brings out the flavors while balancing the sweetness. Trust me on this!
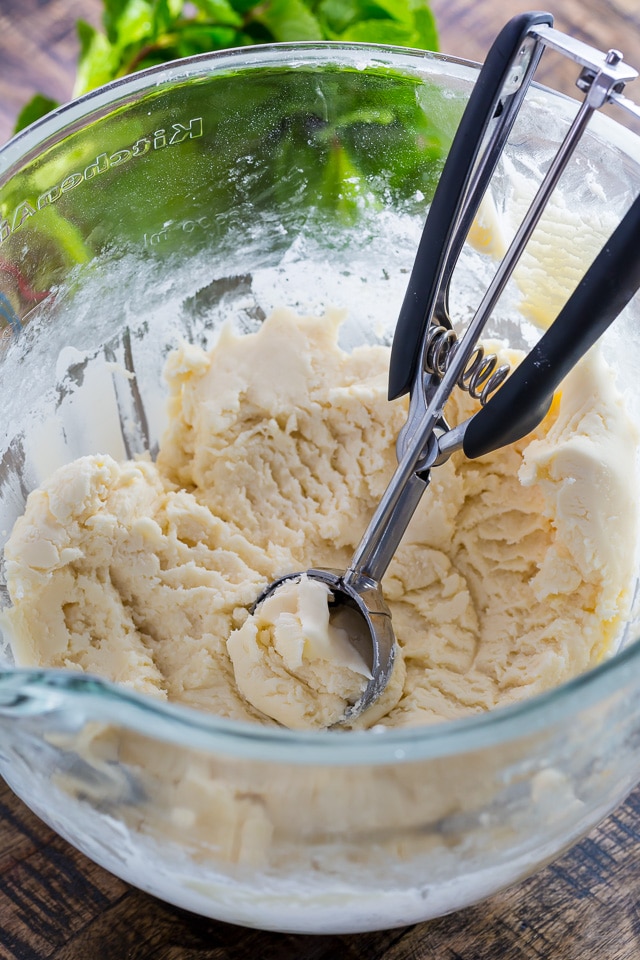
- Don’t skimp on the confectioners’ sugar. You’ll need at least 5 cups, and may need up to 6. You want the filling to be very thick and not sticky.
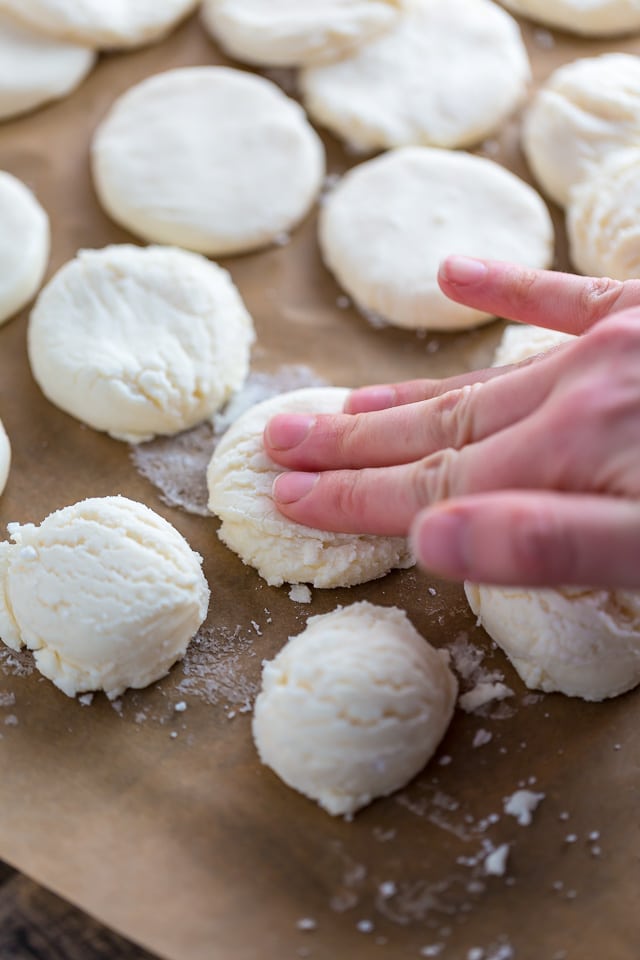
- The easiest way to form the patties is to use a medium cookie scoop. You’ll simply scoop out a level scoopful and roll it in your hands a few times to ensure its smooth; then place the ball on a piece of parchment paper and gently press it down into a small circle. Don’t make the circles too big, or they’ll fall apart when you dip them.
Shape the Patties
- I love the organic shape hand rolling gives these peppermint patties, so I just scoop, roll, and flatten.
- If you’d prefer perfectly even patties, you can roll the dough into a 1/4-inch thick sheet. Then use a 1-inch cookie cutter to cut out rounds.
- Either way, you’ll want to let the peppermint patty dough dry for about 1 hour.
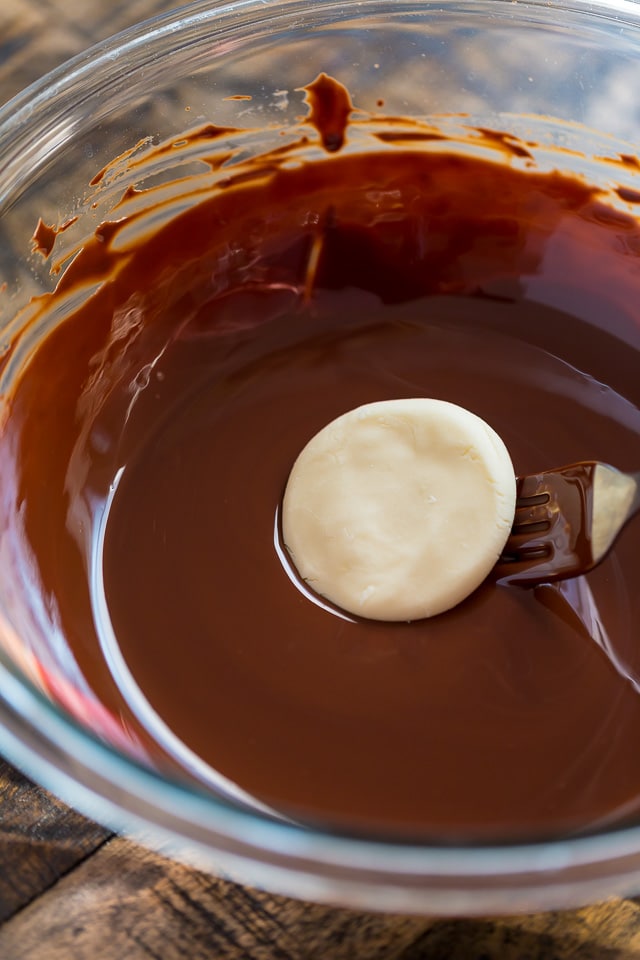
Dunk in Dark Chocolate
- This is not an optional step! You need to dip the patties in some sort of chocolate. If you don’t like dark chocolate, you could use semi-sweet chocolate, milk chocolate, or even white chocolate.
- This recipe calls for you to temper the chocolate. If you don’t want to temper, you can simply melt the chocolate in a double boiler and then dunk.
- If you use the melt and dunk method, just note your chocolate coating won’t be as shiny. And will likely have fingerprints when someone handles the peppermint patties.
Either way, the peppermint patties will taste delicious! I suggest tempering if you’re gifting the patties or want a stunning peppermint patty recipe. And I suggest the melt and dunk method if you’re making these for a more casual setting.
York Peppermint Patty Tips
- The circles of filling must dry on each side for at least one hour before dipping them in the chocolate, so be sure to plan ahead time wise.
- If the filling won’t lift off the parchment paper easily, use a small spatula to loosen the circles, then try again.
- I do not have a suggestion for substituting the sweetened condensed milk.
- For an extra strong peppermint flavor, increase the called for amount by 1 teaspoon.

Make your season extra delicious with these 5-Ingredient Peppermint Patties! They’re stupid simple and STUNNING. And honestly, they taste like a gourmet York peppermint patty!
And don’t forget, while they’re a delicious addition to any dessert spread, they can also double as homemade holiday gifts. Just wrap them up in a pretty box, top them with a bow, and warn the recipient they’re addicting 😉

If you try this recipe for 5-Ingredient Peppermint Patties, let me know! Leave a comment below and don’t forget to snap a pic and tag it #bakerbynature on instagram! Seeing your kitchen creations makes my day.
More Christmas Candy Recipes:
- Easy Peppermint Oreo Truffles Recipe
- Peppermint Bark Fudge
- 5-Ingredient Peppermint Chocolate Truffles
- Oreo Peppermint Bark
- Easy Peppermint Chocolate Fudge

5-Ingredient Peppermint Patties
Ingredients
- (1) 14 ounce can sweetened condensed milk
- 1 Tablespoon plus 1 teaspoon peppermint extract
- 5 cups confectioners’ sugar, plus more if needed
- 1/4 teaspoon salt
- 24 ounces semi-sweet or dark chocolate, finely chopped
- 1 cup crushed candy canes (optional)
Instructions
- Line a large baking sheet with parchment paper and set it aside until needed.
- In the bowl of a stand mixer fitted with the paddle attachment, or in a very large bowl using a handheld electric mixer, beat together the sweetened condensed milk and peppermint extract until well combined.
- With the mixer on low speed, gradually add in the confectioners’ sugar, allowing what you’ve added to fully incorporate into the mixture before adding more. Beat in the salt. *If the filling is still sticky after adding the 5 cups of confectioners’ sugar, add more, a 1/4 cup at a time, until the filling is very thick and can easily be handled.
- Using a medium cookie scoop, scoop out level scoopfuls of filling, kneading and rolling each one in your hands a few times before rolling it into a ball and transferring it to the prepared baking sheet. Repeat with all filling. Using your fingertips, or the palm of your hand, press each round of filling down into a 1-and-1/2″ circle.
- Set aside and allow the patties to dry for at least 1 hour on each side. I suggest setting a timer so you know exactly how long they’ve been drying. *To easily flip the patties over without breaking them, slide a small spatula underneath each one and gently flip it over.
When you’re ready to dip them in chocolate…
- Fill a medium pot one-third full with water and bring it to a low simmer over medium heat. Place a heatproof bowl that will fit on top of the pan snugly, but will not touch the simmering water, on top of the pan. Reduce the heat to low and place two-thirds of the chocolate into the bowl. Place a candy thermometer intp the chocolate and let it melt, stirring frequently with a silicon spatula. *Do not let the temperature of the chocolate exceed 120°F.
- Once the chocolate has fully melted, remove the bowl from heat, but keep the pot of simmering water on the burner. Wipe the bottom of the bowl to remove any condensation.
- Stir in the remaining chocolate, a little bit at a time, allowing what you’ve added to completely melt before adding more.
- Set aside and allow the chocolate to cool to 82°F. Once the chocolate has reached 82°F, place it back over the simmering water and reheat to a temperature between 88°F and 91°F. Remove the bowl from heat once you have reached the correct temperature. The chocolate should be smooth and glossy, with no streaks.
- Using a fork or candy dipper, dip each patty in the chocolate, allowing excess chocolate to drip back into the bowl before transferring it back to the parchment paper line baked sheet. Sprinkle the top of each dipped patty with crushed canes, if using.
- Set aside and allow the chocolate to set before serving, about 1 hour.
- Store in an airtight container, at room temperature, for up to 1 week.


These are very tasty. I use 1 tsp of 100% Peppermint oil, makes for a very intense flavor.
These are sooo good!!! I like to freeze them after the drying time so they are a little easier to dip!!
Love, Love, Love these. They are addicting and pretty easy to make. What is the longest you can let them dry? Can they dry out to much?
How many does this recipe make?
The recipe says 30
Love, Love, Love these. They are addicting and pretty easy to make. What is the longest you can let them dry? Can they dry out to much?
the best!!
This is my second year making your recipe! I am not a talented baker and I find these to be simple enough for me to handle, and extremely delicious. They also look so fancy and are special to give as gifts. I am vegan, so I made my own vegan sweetened condensed milk (sugar and coconut milk) and used that this year and I couldn’t even tell a difference. Thank you for the recipe! Could I freeze the extras?
Never mind, I see the freezing instructions above. Thank you!
Each Christmas I try a new cookie to add to my list, these peppermint patties knocked it out of the park. They were deliciously AMAZING. Everyone wanted more. Even my son, who isn’t a sweet eater, said they were AMAZING. Thanks so
Much for making my Christmas cookie trays even larger this year. This is definitely a keeper.
Could I roll the dough and use a round cookie cutter instead? I have no confidence in my ability to make circles without a cutter, lol!
I have made these with softened cream cheese in place of sweetened condensed milk and they taste amazing and are not overly sweet.
Thanks, I think I’ll try the cream cheese.
Can you tell me what the ratio of cream cheese is?
Thankyou
Can you freeze these?
I was wondering the same thing… 🙂
me too! – or freeze the filling and then dip later?
Me too!!
Me too!
Hi Jessica. Yes! You can freeze these homemade peppermint patties! Allow the chocolate to fully set (so that they don’t stick) then store the peppermint patties in an airtight freezer-friendly container and freeze for up to two months! Eat frozen or thaw a bit before serving.
Thanj you. I was wondering about that too.