


 Search
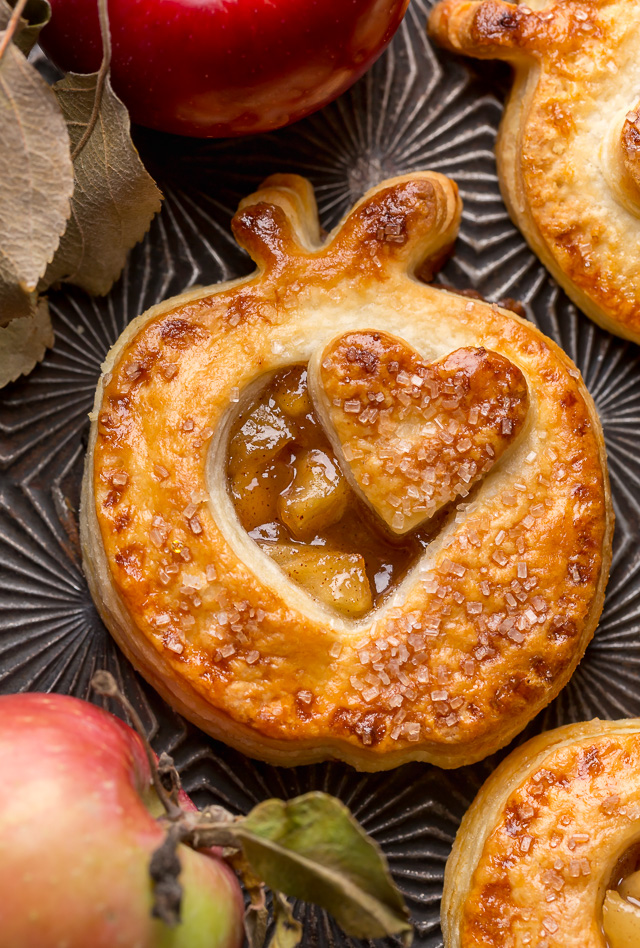
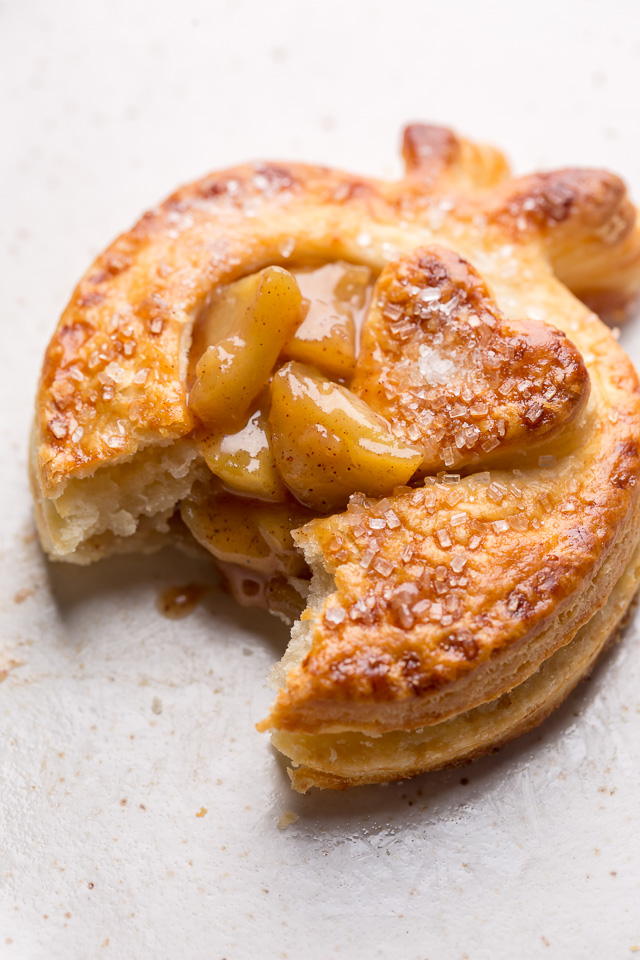
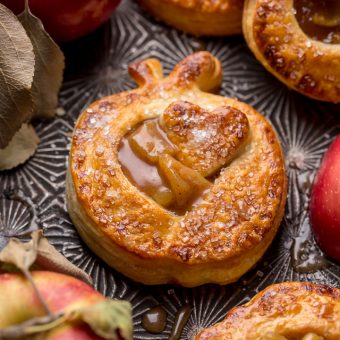
The best apple hand pies have homemade pie crust and a richly spiced brown sugar apple pie filling… plus, they look like mini apples! Brush the top of the pie dough with egg wash and sprinkle with coarse sugar for a golden brown and flaky crust. Store bought pie dough or even puff pastry will work in a pinch! Serve with a scoop of vanilla ice cream on top.
Cutest Apple Hand Pie Recipe Ever
Cutest Apple Hand Pie Recipe Ever
Here in the Hudson Valley, fall is in full swing! And it has me inspired to bake all things apple! I picked up a few pounds of apples at the Rhinebeck Farmers Market on Sunday… and baked the cutest little apple hand pies ever! They’re everything we love about old-fashioned apple pie, but so much easier.
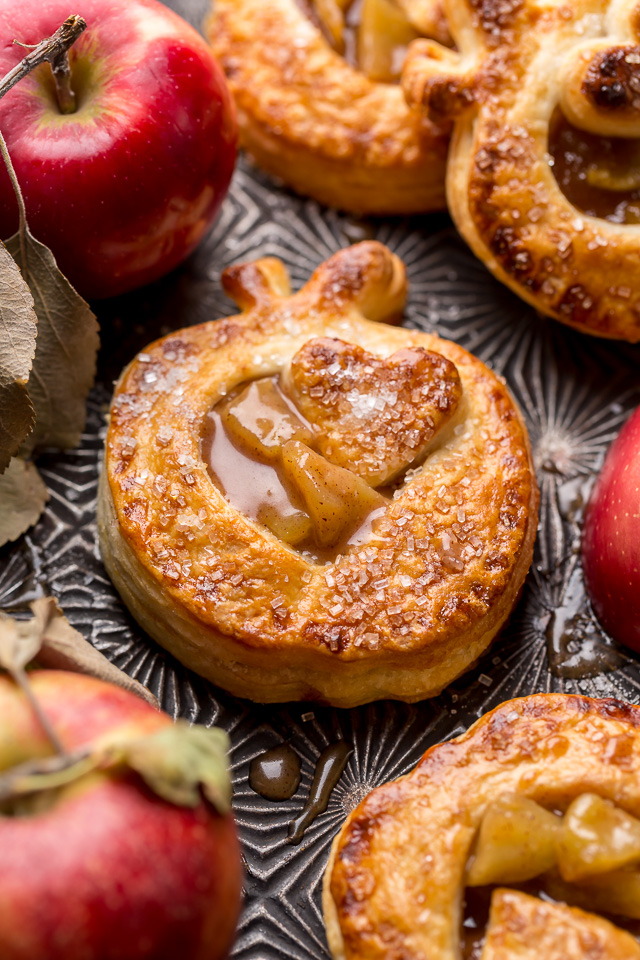
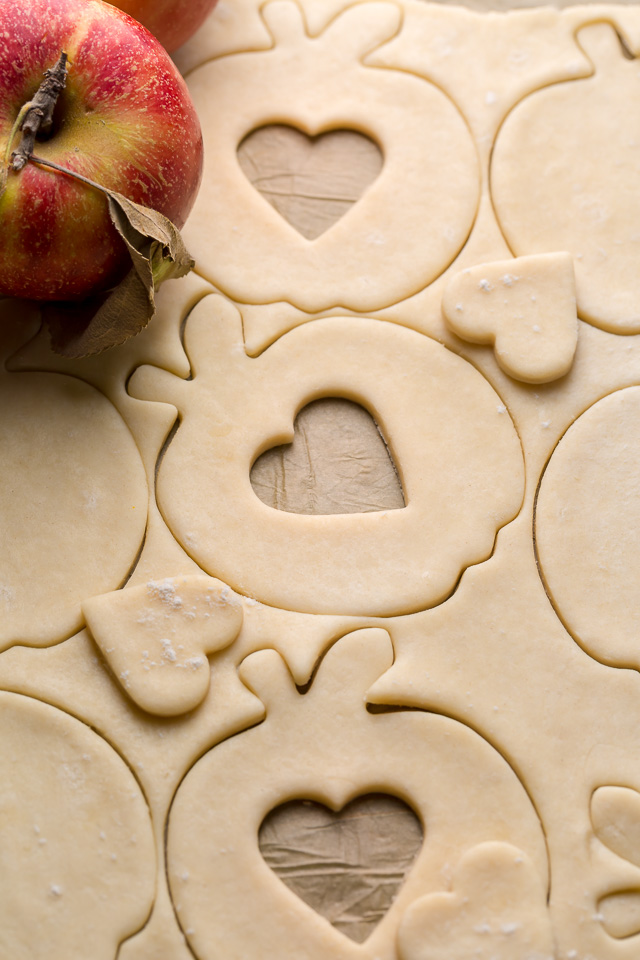
To make the apple hand pies extra cute, I used an apple shaped cookie cutter to cut out the pie crust. And a mini heart shaped cookie cutter to make the vent on top of the pies.
If you don’t have these exact cookie cutters, just cut the dough into squares! They won’t be as cute without the cookie cutters, but they’ll still be super delicious. If you cut them into squares, they’ll look a lot like these cinnamon apple bourbon hand pies.
Apple Pie Filling
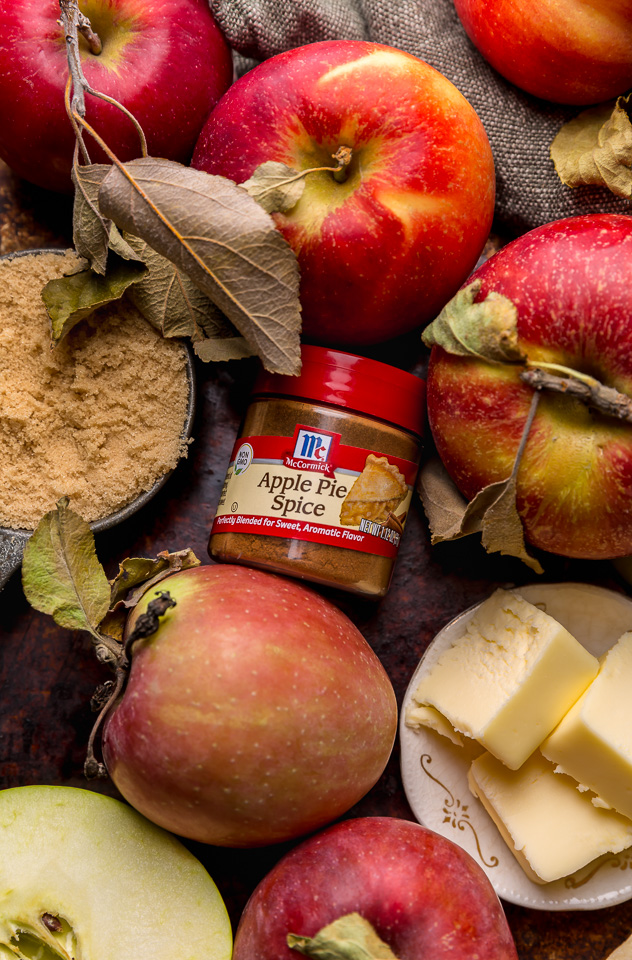
- Apples: Some of my favorite apples for apple pie filling are Granny Smith and Honeycrisp apples! Jonagold, Golden delicious, and Northern Spy are also great choices! No matter the variety, peeled and diced apples are a must before you cook the filling.
- Butter: The key ingredient for our homemade pie crust! I prefer unsalted butter, but salted butter will definitely work in a pinch!
- Spices: Apple pie spice is the easiest way to add apple pie flavor. But if you don’t have any, you can make your own. Combine a 1/2 teaspoon of cinnamon, a 1/4 teaspoon of nutmeg, and 1/4 teaspoon of allspice.
- Lemon Juice: Cuts the sweetness and adds a pop of acidity. You won’t taste the lemon flavor, but for best results, use fresh lemon juice.
- Sugars: Dark brown sugar and granulated sugar add sweetness and depth of flavor to the apple pie filling.
- Flour: Our thickening agent for the apple pie filling! Don’t add this ingredient too soon, or the apple pie filling will be lumpy.
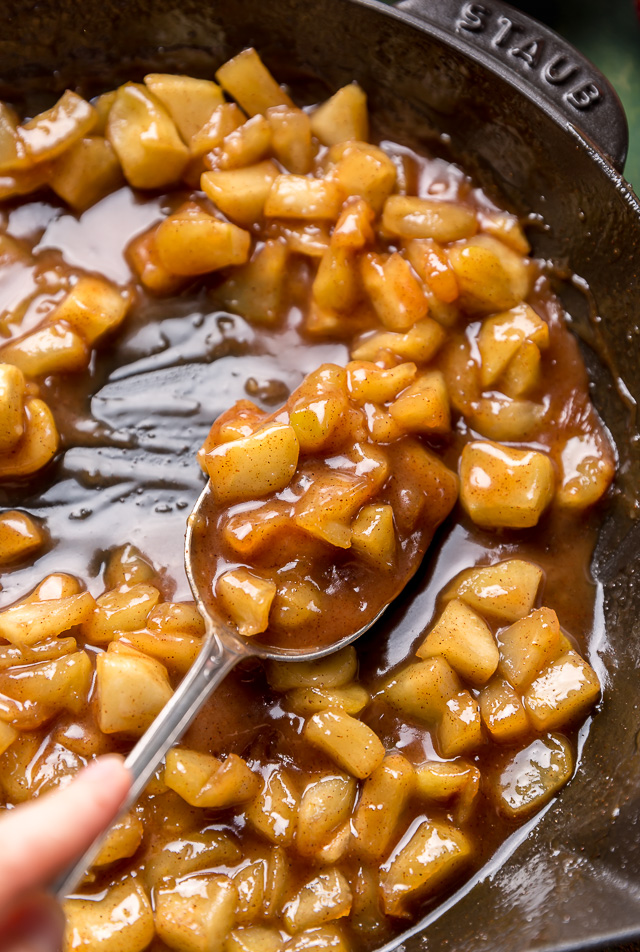
You’ll cook the apple pie filling over medium heat and it will take about 10 to 12 minutes in total. The filling should be thick and the apples should be soft and tender.
Homemade Pie Crust: Tips and Tricks for Flaky Crust
- This homemade pie crust is made with basic ingredients like flour, butter, sugar, and salt. And a few unexpected ingredients like baking powder and sour cream. If you cannot find sour cream full-fat Greek yogurt is your best substitute option.
- The homemade pie crust dough is easy to work with. If you’re completely new to pastry, check out the recipe video for my cherry hand pies. Which has a step by step video on making the crust.
- In a pinch, you can use your favorite brand of store bought pie dough.
Assembling Apple Hand Pies
- Pie Prep: Preheat your oven and line a large baking sheet with parchment paper. Set aside until needed.
- Roll out the Pie Crust: Use a rolling pin to roll out the dough into a large square, about 18×18 inches. Be gentle with the dough and if you see any butter melting, pop it back in the fridge for a few minutes.
- Cut the Dough: Using a pastry cutter or cookie cutters, slice the rolled dough into 16 squares or shapes. You may be able to get 18 if you roll the dough thin enough! You want an even amount because each hand pie has a top and bottom.
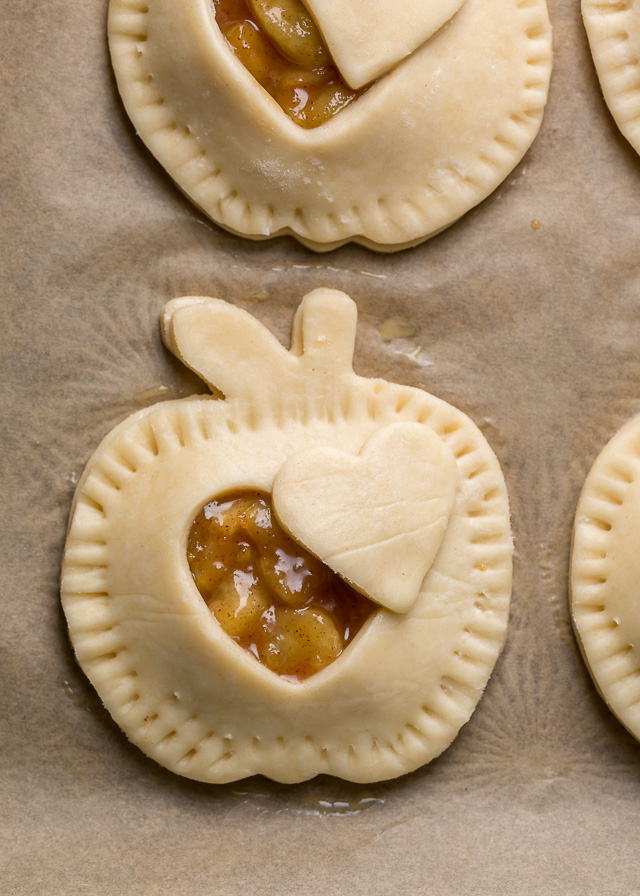
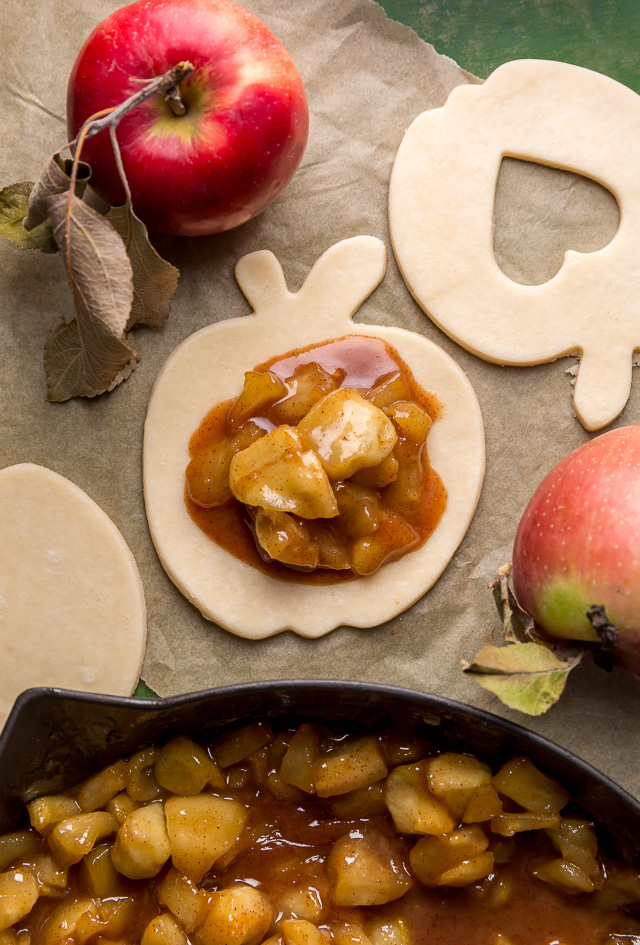
- All the Apple Pie Filling: Divide the filling among 1/2 of dough pieces. About 1 Tablespoon is a good amount of filling. Resist the temptation to add too much; it’ll seep out and burn in the oven.
- Make a Vent: On the other half of the pie cut-outs, slice a small vent in the center. You can use a tiny heart shaped cookie cutter like I did! Or use a paring knife to create a tiny X like I did with these blueberry hand pies.
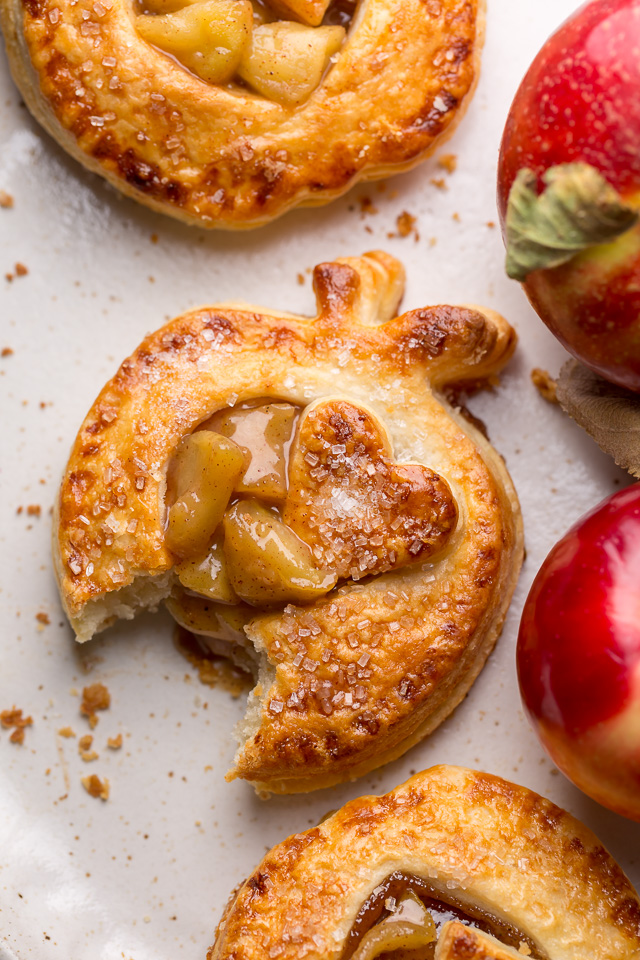
- Crimp the Edges with a Fork: Brush the edges of apple filled pies lightly with egg wash, then top each filled pie dough with a vented piece of pie dough. Use the tines of a fork, crimp the edges shut.
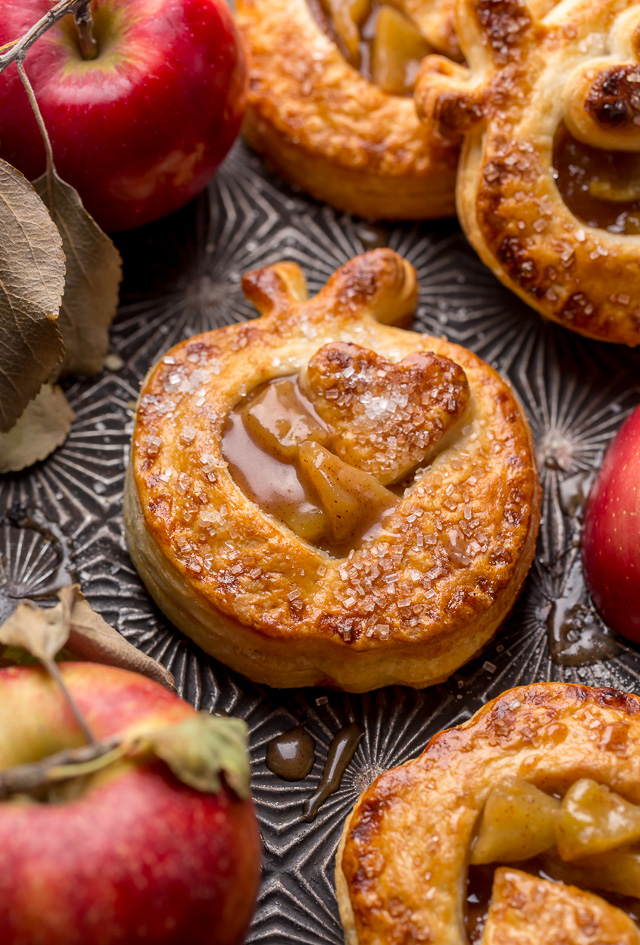
- Bake the Hand Pies: You’ll want to bake until the pies are deeply golden brown, about 15 to 20 minutes. Don’t be afraid of the pies getting a little color on top, browning is totally normal!
- Serve: You can serve right away or wait about 30 minutes until they’ve cooled down a bit. These are delicious warm or at the room temperature! But my favorite way to serve is fresh from the oven with a giant scoop of ice cream! Vanilla, salted caramel, or butter pecan ice cream are all great options.
Can I Double this Apple Hand Pie Recipe?
- You can absolutely double or even triple this recipe. However, I suggest making the pie crust in two (or 3) individual batches.
- Doubling or tripling the dough would make a huge amount. Making it impossible to knead it without over working the dough.
- You can double or triple the apple pie filling and cook it at the same time. You may need to adjust is the cooking time, as cooking a larger volume of apples may take an additional few minutes.
How to Make Apple Hand Pies in Advance?
Between the homemade pie crust and the apple pie filling, making hand pies is a labor of love! So it’s always a good thing to do as much in advance as possible!
- You can make the homemade pie crust up to 3 days in advance and store it in the fridge. You can freeze the pie dough for up to 2 months!
- Remove the pie dough the night before baking and thaw in the fridge. Then let the pie dough sit at room temperature for about 20 minutes before rolling it out.
- Pie dough that’s too cold will crack when rolled out.
- You can make the apple pie filling up to 48 hours in advance and store it in the fridge. Let it sit at room temperature for 15 minutes before use. I don’t suggest freezing the apple pie filling.
Tools Needed For Apple Hand Pies
- Rolling Pin: We prefer marble rolling pins because they keep the pie crust cool, but a wooden one will work just fine.
- Apple Cookie Cutter: If you want apple shaped pies, this is the cookie cutter I used. You can also use a large knife to cut them into squares. Or a round cookie cutter to cut them into circles.
- Heart Shaped Cookie Cutter: This will make the cute heart shaped cut-outs you see in my photos.
- Sparkling Sugar: Coarse sugar looks gorgeous on top of pies and other baked goods like scones and muffins!
- Pastry Brush: This will help you easily brush the top of each hand pie with egg wash. For this recipe, a smaller brush works best as it will give you more control.
- Baking Sheet: A large sturdy baking sheet is a must-have for every baker! A lighter baking sheet works best as it’ll help avoid over browning.
- Parchment Paper: Reduces clean up time and ensures your baked goods don’t get too brown on the bottom. Do not sub wax paper or aluminum foil!
More Apple Pie Recipes:
Cute Little Apple Hand Pies
Ingredients
For the Crust:
- 2 cups all-purpose flour
- 1/2 teaspoon salt
- 3/4 teaspoon baking powder
- 1 and 1/2 Tablespoons granulated sugar
- 1 cup (227g) unsalted butter very cold, cut into cubes
- 1/2 cup Full-fat sour cream cold
For the Apple Pie Filling:
- 4 large apples peeled and cored
- 3 tablespoons unsalted butter
- 1/4 teaspoon salt
- 1/4 cup granulated sugar
- 1/4 cup brown sugar
- 2 teaspoons apple pie spice
- 2 Tablespoons fresh lemon juice
- 2 Tablespoons all-purpose flour
For the Egg Wash:
- 1 large egg, beaten
- 2 Tablespoons sparkling sugar optional
Instructions
For the Crust:
- In a large bowl whisk together the flour, salt, baking powder, and sugar.
- Add the butter, working it in with your hands or a pastry cutter, until it’s a coarse meal. The butter should still be in large, pea-sized pieces.
- Using a rubber spatula, stir in the sour cream. The dough will be very shaggy at this point. Turn it out onto a well floured work surface, and bring it together with a few quick kneads.
- Pat the dough into a 10 inch log, then roll it out into a 12″ x 14″ rectangle. Dust both sides of the dough lightly with flour, and starting with the shorter end, fold it in three – like a letter. Flip the dough over, and roll it again into a 12″ x 14″ rectangle. Fold it in three again. Wrap the dough in saran wrap, and chill for 1 hour.
For the Apple Pie Filling:
- Peel and core apples. Dice them into tiny pieces and set aside.
- Melt the butter in a large skillet over medium heat. Allow the butter to brown into a light golden color; about 1 minute.
- Add apples into hot butter; sprinkle with salt and both sugars. Cook, stirring occasionally, until apples are completely softened, about 8 minutes. Mix in apple pie spice and lemon juice and continue cooking until apples are soft and sticky, 1 to 2 more minutes. Sprinkle the flour on top and mix well, allow mixture to thicken, about 2 minutes. Remove from heat and let cool for at least 15 minutes.
Assembly:
- When you’re ready to make your pies, preheat the oven to 425 degrees (F). Line a large baking sheet with parchment paper and set aside.
- Roll the dough out into a 18" x 18" square. Using apple cookie cutters, cut out sixteen apples. Or use a pastry well to slice the dough into 16 squares.
- Divide the apple filling among 8 of the squares, using about 1 heaping tablespoon for each. Brush some of the beaten egg along the edges of each filled square.
- Cut a vent into each of the remaining eight squares, using a small knife or heart shaped cookie cutter.
- Top each filled square with a vented square, and press along the edges with the tines of a fork to seal.
- Brush the top of each pie with the remaining beaten egg, and sprinkle with sparkling sugar, if using.
- Transfer the pies to the prepared baking sheet. Bake the pies for 15 to 18 minutes, or until crust is golden brown and filling is bubbling.
- Remove them from the oven and let cool for 10 minutes before serving.


I just made these apple hand pies, and they turned out amazing! The filling was perfectly spiced, and the flaky crust was a dream. Thank you for the detailed instructions—I can’t wait to share these with my family!
Another recipe that I was able to enjoy as a beginner baker! Everyone liked them. Came out so cute! Thank you!
Good and flaky crust. I find mine get dark fast on the bottom, I take them out at 15 minutes.
A family favorite! These are quite fun to make and taste amazing.
Hi! I don’t see a link for the cutters. Also, if I bake these at home and bring them to a party but want them to be warm to give that “fresh out of the oven” feel, how should I heat them back up after they’ve already been baked?
Finally bought the apple cookie cutters to make this recipe. A lot of work but worth it! They are adorable and so delicious.
I just made these adorable hand pies for a picnic and they were a huge hit with my friends! The flaky crust and sweet apple filling were perfect. Can’t wait to make them again
Loved this recipe! The combination of Granny Smith and sweet apples was perfect. Can’t wait to make these again for my family’s next fall gathering
These hand pies are adorable and look so delicious! Can you share the recipe? I’d love to make them for my kids’ snack time